Michelle’s 110 Upgrade!

yungreefer2410

Well-Known Member
uh marine grade paint is hellu expensive and thats usually not to be used on untreated wood, more like on fiberglass which its made to adhere too
 

squidy

Member
uh marine grade paint is hellu expensive and thats usually not to be used on untreated wood, more like on fiberglass which its made to adhere too

Thanks for the heads up. I had a while ago that marine grade paint holds up better to the abuse of the sw, but painted the stand my 45g is on with a latex simi-gloss and havent had any problems.

Speaking of paint:
AL, how is the Krylon Fusion holding up on the back of your tank?

Also:
I had another idea. Can I use Thompson’s Water Seal on the inside of my cabinet? I really dont want to mess with painting the inside.
 

BigAl07

Administrator
RS STAFF
Speaking of paint:
AL, how is the Krylon Fusion holding up on the back of your tank?

It's holding up GREAT but I've painted my LAST back glass on a Reef tank. The paint drastically affects the light IN the tank. See this topic from last year....
http://www.reefsanctuary.com/forums/equipment/37410-does-painting-back-glass-affect-anything.html

I had another idea. Can I use Thompson’s Water Seal on the inside of my cabinet? I really dont want to mess with painting the inside.

I don't know. I hadn't look at the composition to TWS. I can tell you this much. I am pretty sure on my next stand (actually in my existing stand when we move) I'm painting the entire inside with a LATEX paint and probably gloss white. Something with HIGH gloss and light colored to help when I'm under there working on stuff. The High Gloss is much easier to clean because it's that slick.

Just my 2 cents :)
 

squidy

Member
Sorry I have not posted in the last week. My father passed away last Saturday and I was in Texas the whole week. Anyways, I finished the cabinet over the weekend and posted a few pics. I plan to get it painted this week. Going with a typical simi-gloss black paint.
 

Attachments

  • DSCN1811 (512 x 384).jpg
    DSCN1811 (512 x 384).jpg
    36.3 KB · Views: 61
  • DSCN1812 (512 x 384).jpg
    DSCN1812 (512 x 384).jpg
    34 KB · Views: 61
  • DSCN1813 (512 x 384).jpg
    DSCN1813 (512 x 384).jpg
    43.6 KB · Views: 61

squidy

Member
Thanks Jonathan. I am getting ready to start setting everything up for painting. Cant wait to get this thing done. I still have to demo out an old desk in the kitchen and start plumbing the tank.
 

squidy

Member
I know it has been a while since my last post, but here is the cabinet. Its all painted and finally finished. The next part is demo! I get to bust out the old built-in desk in our kitchen and make room for the tank. Once I get the stand in the house, I will begin plumbing the tank. I ordered ¼” acrylic yesterday for making my overflow box. Here is the current status on equipment:

Tank - Check
Light - Check - 2x150 MH w/2x96w PC’s
Pump - Still need to buy (thinking a 1200 ghp)
Skimmer - Check
Sump - Have to pick up 29g from friends house. Hope to get it this weekend.
ATO - Plan to use left over acrylic to build an ATO that will sit on top of the sump.
Heaters - Check (have 3. 2 for the sump and the third for backup.)
Glass Baffles for sump - Waiting to measure the sump.
Plumbing - Have most of the PVC.


I would like to get a power strip that I can easily attach to the inside of the cabinet. Please chime in with any ideas or products.

Oh and I just wanted to mention I TOTALLY have my heart set on a pair of Doni's Picasso Clowns. I even gave the hubby a heads up on the purchse when I get this tank established, lol.
 

Attachments

  • DSCN1820 (512 x 384).jpg
    DSCN1820 (512 x 384).jpg
    44.7 KB · Views: 83
  • DSCN1821 (512 x 384).jpg
    DSCN1821 (512 x 384).jpg
    33.8 KB · Views: 83
  • DSCN1822 (512 x 384).jpg
    DSCN1822 (512 x 384).jpg
    40.9 KB · Views: 84
  • DSCN1823 (512 x 384).jpg
    DSCN1823 (512 x 384).jpg
    38.9 KB · Views: 83

sneaks03

Member
As far as a power strip goes I know there are some out there that are used in the IT world that have like 12 outlets on them and are about 4-5' long. If it would fit in/on your stand and not show I would consider one, of course make sure it is plugged into a GFCI outlet. I will check with the guys at the office tomorrow to see if I can find out where we order them from if you would like.
 

squidy

Member
That would be great Jonathan! I just want something I can plug into an outlet without having to do a bunch of wiring. Then I would like to attach it inside my stand with screws to keep it off the floor. I am going to try to keep all my cords organized, lol. My current tank has everything plugged into a powerstirpe and I have no idea what goes to what. Drives me crazy.
 

sneaks03

Member
Ok, I will check with the guys in a few mins to see if anyone can tell me where we got them. Just depends on who was here when they were ordered.
 

squidy

Member
OMG! That second one is a monster, lol. I like the first link you posted. Looks like it would give me room for timers.
 

squidy

Member
I got a little side tracked with a home project. Anyways, here is an update on the tank. Cabinet is finished and sitting in the kitchen. I painted the back and trim on the tank today. I also finished my overflow box. Here is a picture of the overflow box during a water test. It is completely water tight but I will still silicone the joints for added protection plus I need to drill 2 holes in the bottom for my 2 bulkheads. I am hoping to get the tank moved into the house tonight so I can start plumbing. I promise to update my thread more often as my goal is to have the tank up and running with fish by Thanksgiving, lol.
 

Attachments

  • DSCN1942 (600 x 450).jpg
    DSCN1942 (600 x 450).jpg
    48.6 KB · Views: 62
  • DSCN1943 (600 x 450).jpg
    DSCN1943 (600 x 450).jpg
    43.8 KB · Views: 62
  • DSCN1944 (500 x 375).jpg
    DSCN1944 (500 x 375).jpg
    43.2 KB · Views: 62
  • DSCN1945 (500 x 375).jpg
    DSCN1945 (500 x 375).jpg
    43.3 KB · Views: 62

squidy

Member
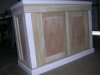
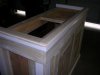
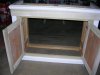
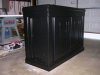
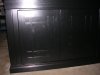
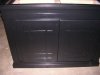
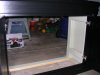
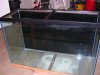
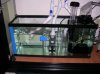
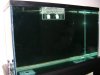
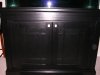
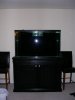
Well it has been a while and Im way overdue for an update. Here are plenty of pictures. We moved the tank and stand into the house. I decided to set it up in the office instead of the kitchen. The tank was just too large for the kitchen and made the room feel Closter phobic. I capped the 2 drilled holes in the bottom of the tank and drilled 2 x 1 ¾” holes in the back about 5” from the top. I then attached my overflow box. Because I used 2 rubber gaskets on each bulkhead (1 placed between the flang and the back wall of the overflow box and the other between the overflow box and the back wall of the tank), I had a ¼” gap between the overflow and the back wall of the tank. I used silicone to fill this keeping everything water tight. My thinking behind the 2 gaskets was to have a water tight seal both on the tank and the overflow. I didn’t want unwanted water trickling into the overflow. Ok, moving on. The fun part was the plumbing (laughing sarcastically). I must have made 20 trips to Home Depot but I finally got it worked out. I did have to purchase a Mag 18 as the Catalina Aquarium 1500gph pump totally sucked. I love the flow I am getting with the Mag 18. If I were to only keep fish and soft coral, I don’t think I would need to add powerheads. Ok, so here is a written description of the plumbing to go along with the pictures.
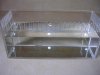
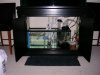
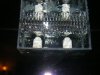
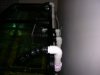
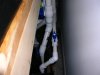
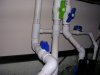
I have 2 x 1” drains. The right drain routes directly into the far right section of the sump which houses the skimmer. The left drain routes to the far left to the fuge and has a T with a ½” line routes to the skimmer section. This is in case I want to reduce the flow to the fuge the excess water will be redirected to the other side of the sump. The middle section houses the return pump (Mag 18) with a 1” pvc line that runs up the back of the tank to about 8” from the top. I have a Y (which was REALLY hard to find. This is the site that did have the part. Product Listing - PVC-Wyes) that split’s still into 2 branches using 1” pvc at a 45 degrees for another 10-12” . Attached to both of these branches have another 45 degree elbow with a ¾” reducer bushing followed with 90 degree elbows with ¾” Locline attached.
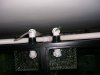
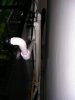
The 90 degree elbows that come off the overflow box on the back of the tank have a small hole drilled with rigid tubing inserted for air intake. This has helped with some of the noise, but my drain pipes are very loud. Does anyone have any ideas as to how I can reduce the waterfall sound in the drain pipes? I am going to research insulating the pipes.
Ok, I think I covered everything. Right now I have freshwater in the tank for leak testing (so far so good) and to fine tune everything.
 

Attachments

  • DSCN2114.jpg
    DSCN2114.jpg
    46.9 KB · Views: 45
  • DSCN2115 (475 x 356).jpg
    DSCN2115 (475 x 356).jpg
    42.6 KB · Views: 45
  • DSCN2117.jpg
    DSCN2117.jpg
    39.9 KB · Views: 45
  • DSCN2118 (500 x 375).jpg
    DSCN2118 (500 x 375).jpg
    49.7 KB · Views: 45
  • DSCN2119.jpg
    DSCN2119.jpg
    29.2 KB · Views: 45

squidy

Member
Here are a few more pics.
 

Attachments

  • DSCN2120.jpg
    DSCN2120.jpg
    39.9 KB · Views: 45
  • DSCN2121.jpg
    DSCN2121.jpg
    34.3 KB · Views: 45
  • DSCN2124.jpg
    DSCN2124.jpg
    34.2 KB · Views: 45
  • DSCN2125.jpg
    DSCN2125.jpg
    32.2 KB · Views: 45
  • DSCN2126.jpg
    DSCN2126.jpg
    32.9 KB · Views: 45

squidy

Member
And the last final picture. And yes, I need BOTH chairs to access the top of the tank. It measures over 6' tall!

Can anyone tell me how to add captions to the pictures?
 

Attachments

  • DSCN2127.jpg
    DSCN2127.jpg
    26.4 KB · Views: 45

astiesi

Member
I'm having the same problem with the waterfall sound in the drain pipes! If you find a solution definately let me know, I would love to quiet the thing down.

Plumbing looks great, keep the updates coming!
 
Top