squidy
Member
Ok, I have posted various thread with questions regarding lighting and plumbing for my 110 gallon upgrade. I figured now is a good time to start a thread tracking the process. My current tank is a 45 gal corner tank I have had running for about a year now. I purchased my 110 on Craigslist for $90. Tank measures 48”L x 31”T x 18”W.
Plumbing: The tank is predrilled with two 1 ¾” holes in the bottom on center. I will be using 1” bulkheads and PVC routed to the sump and ¾” return which will be routed up the back of the tank. The size and placement of the holes has been a challenge in planning my plumbing, but I want to maximize overall flow. Using the Head Loss Calculators, I am thinking a Mag 12 or Mag 18 for a return pump should put me at about 800-900 gph return and with a total of 2” of drain from the overflow should accommodate.
Lighting: After discussing lighting options with fellow RS members, I have decided to get a 48” 2x250MH with T5’s. This will put me in the 700+ watt range allowing me to keep just about anything I want. I have not purchased the light yet though.
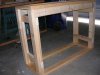
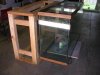
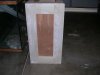
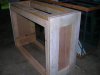
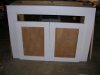
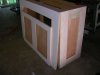
Stand: I started the stand last night. Measures 36 ½”T x 50”L x 20”W. I reused 2x4’s we had from our basement demo. For all you construction people out there, this is a LEED certified project, lol. Keepin it green! Here are a few pictures of the stand frame. I wanted to maximize my door openings for maintenance, so I doubled two 2x4’s as beams that run across the top transferring the load down the doubled up sides. The sides were built to minimize the risk of racking or movement. I will also be adding metal “L” brackets which will attach on the bottom inside to both the sides and the bottom 2x4’s for added strength. There will be 2 euro style doors without a middle style. I am going to skin the cabinet with ½” birch and eventually paint using a black marine grade paint.
Sump: Also not purchased yet. I do have a 29 gal I could use for the sump. The stand is built tall so the middle of the tank will be at eye level so I would have plenty of room to access a 29 (I know a common problem with using 29g for sumps is the height). What do you guys think? This would give me room for an external skimmer and top-off.
Ok, so in conclusion, this is where Im at so far. I plan to finish the stand this weekend and prep for painting. Please feel free to add any advise or concerns as this is my first time going at this from scratch.
Plumbing: The tank is predrilled with two 1 ¾” holes in the bottom on center. I will be using 1” bulkheads and PVC routed to the sump and ¾” return which will be routed up the back of the tank. The size and placement of the holes has been a challenge in planning my plumbing, but I want to maximize overall flow. Using the Head Loss Calculators, I am thinking a Mag 12 or Mag 18 for a return pump should put me at about 800-900 gph return and with a total of 2” of drain from the overflow should accommodate.
Lighting: After discussing lighting options with fellow RS members, I have decided to get a 48” 2x250MH with T5’s. This will put me in the 700+ watt range allowing me to keep just about anything I want. I have not purchased the light yet though.
Stand: I started the stand last night. Measures 36 ½”T x 50”L x 20”W. I reused 2x4’s we had from our basement demo. For all you construction people out there, this is a LEED certified project, lol. Keepin it green! Here are a few pictures of the stand frame. I wanted to maximize my door openings for maintenance, so I doubled two 2x4’s as beams that run across the top transferring the load down the doubled up sides. The sides were built to minimize the risk of racking or movement. I will also be adding metal “L” brackets which will attach on the bottom inside to both the sides and the bottom 2x4’s for added strength. There will be 2 euro style doors without a middle style. I am going to skin the cabinet with ½” birch and eventually paint using a black marine grade paint.
Sump: Also not purchased yet. I do have a 29 gal I could use for the sump. The stand is built tall so the middle of the tank will be at eye level so I would have plenty of room to access a 29 (I know a common problem with using 29g for sumps is the height). What do you guys think? This would give me room for an external skimmer and top-off.
Ok, so in conclusion, this is where Im at so far. I plan to finish the stand this weekend and prep for painting. Please feel free to add any advise or concerns as this is my first time going at this from scratch.