You are using an out of date browser. It may not display this or other websites correctly.
You should upgrade or use an alternative browser.
You should upgrade or use an alternative browser.
Project 58!! (Image intense)
- Thread starter Maxx
- Start date
Craig Manoukian
Well-Known Member
Cool beans Maxx!
Maxx
Well-Known Member
Originally posted by mps9506
Rockin
Love the dog, I have a black lab myself, and he stares at his own reflection in the sump and growls for like 10 minutes straight, I think all labs have mental issues
Mike
I keep telling my fiance that its a good thing Gracie is cute.....cause she aint smart....

Oddly enough, Rocio gets mad when I say that.
Nick
Spooda420
Member
looks good nick, I guess you timed it about right by the time you'll be adding livestock.... you can write to santa
Dear Santa,
I have been a good boy. I help keep the peace in St. Louis, MO. I try not to do bad things. My wish list is:
1. Fish
2. Corals
3. Fish food
4. Fish
I promise I will take care of them and put them away when I'm not playing with them
everything looks great!
keep the pics coming!
Chris
Dear Santa,
I have been a good boy. I help keep the peace in St. Louis, MO. I try not to do bad things. My wish list is:
1. Fish
2. Corals
3. Fish food
4. Fish
I promise I will take care of them and put them away when I'm not playing with them
everything looks great!
keep the pics coming!
Chris
Maxx
Well-Known Member
ROFL Chris......
Wasnt it about this time last year the squirrel invasion occured? Thats still pretty high on my list of priorities!
But yeah, the plan is to get this beast up and running hopefully within the month.
Scooterman gave me a way to check if my house can handle the increased electrical usage.
So it looks like I'll be doing that on Tuesday night after Rocio gets off work. She works from the house and I cant exactly go inadvertantly flipping off her computer, just cause I wanna see what breaker goes where.....I work tonight and Monday night also...so its gonna have to wait til at least then.
I will buy the DJ 100 power centers Tuesday, and order a TDS meter as well. so thats its for iupdates for the moment unfortunately....
Nick
Wasnt it about this time last year the squirrel invasion occured? Thats still pretty high on my list of priorities!
But yeah, the plan is to get this beast up and running hopefully within the month.
Scooterman gave me a way to check if my house can handle the increased electrical usage.
Hey Nick.... you need to find the breaker that supplies power to your outlets. The cheapest way of doing this is by flipping off each breaker one at a time, then going around to each room to see what was turned off, when doing this you may want to shut everything off but a light in each room. I used a small light & went to the room that the breaker turned off and plugged it in to every outlet, sometimes one breaker will cover several rooms, so take notes, & make a list, this is time consuming I know but will pay off later. Once you get a complete list, you can see what size breaker/s that feed your aquarium, & other devices. In most post-modern homes the big electrical demands were, kitchens, I.e., refrigerators, toasters etc. The other was your central A/C/electric stoves, which big ticket items used 220v double pole breakers, usually they are very obvious in the breaker box. Modern homes, electric water heaters, microwaves, dish washers, dryers etc. so they have larger breakers supplying those areas, sometime several breakers feed the kitchen (I think I have one 50A for the stove, one 30A & one 20A in my kitchen). The under sight until recently has been the living room, this room these days also use up lots of power. Most all other rooms can span one breaker with no problems. As you make a list, on the breaker panel, either write the rooms each breaker supplies or post a detailed list next to it, in emergencies it will be helpful. In an older home, it may be difficult to power a huge reef & maintain a safety factor, It could be as easy as adding another breaker & dedicated line to the tank area, or it could mean totally breaker box replacement, then adding another line to the tank area, this is when you will need to call in a professional, certified, or at least well experienced in retrofitting & meeting the proper codes in your local area. Now that I scared you, LOL, you can use plan "B", after locating all of your breakers & their feeds, you can devise a split on power maybe. Try and use two separate breakers, & save you lots of cash. One good thing about breakers, if you are pushing them too far, they should trip (if properly wired in the first place), that is their purpose, if you do trip a breaker, then it is time for alternative planning. I hope this helps Nick.
So it looks like I'll be doing that on Tuesday night after Rocio gets off work. She works from the house and I cant exactly go inadvertantly flipping off her computer, just cause I wanna see what breaker goes where.....I work tonight and Monday night also...so its gonna have to wait til at least then.
I will buy the DJ 100 power centers Tuesday, and order a TDS meter as well. so thats its for iupdates for the moment unfortunately....
Nick
Maxx
Well-Known Member
I went downstairs and messed with the breakers tonight in order to discover which breaker my tank would be on. If I'm reading things right, my tank will be on a 20 amp breaker which runs only three outlets. Those three outlets power :
My computer and printer.
My paper shredder.
And a living room light.
Three 60 or so watt bulbs in the basement.
Not exactly sure of the total draw of all of those together....but I feel much better about plugging everything into the outlet next to the tank.
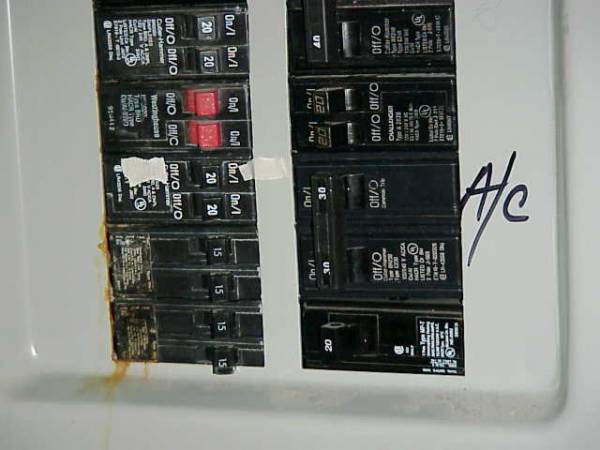
Here is the whole breaker box.
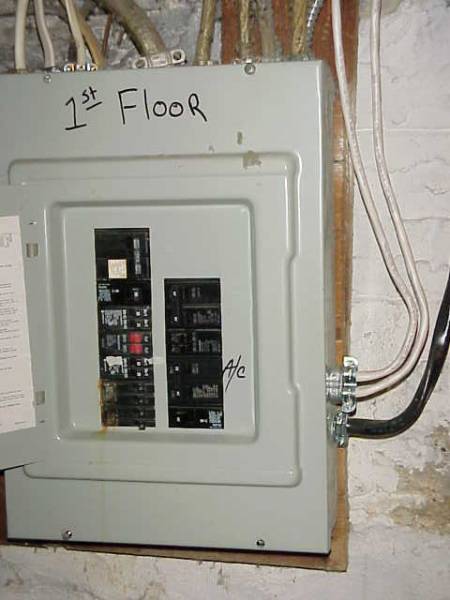
And here is a close up of the breaker box. The switch with the tape on either side is the one controlling the outlet I want to run my tank from. Its the first one down from the two red switches....
BTW anyone got any idea what those are sposed to control?? Cause they didnt turn anything else off in the house.
Nick
My computer and printer.
My paper shredder.
And a living room light.
Three 60 or so watt bulbs in the basement.
Not exactly sure of the total draw of all of those together....but I feel much better about plugging everything into the outlet next to the tank.
Here is the whole breaker box.
And here is a close up of the breaker box. The switch with the tape on either side is the one controlling the outlet I want to run my tank from. Its the first one down from the two red switches....
BTW anyone got any idea what those are sposed to control?? Cause they didnt turn anything else off in the house.
Nick
Last edited:
Maxx
Well-Known Member
Update: 11-29-2004,
I feel like a bit of a dumb@$$ cause I made some stupid errors in construction.
I used the remaining 3/4" plywood, (left over from skinning the stand), on my lightbox. This resulted in a lightbox that weighed about 40-50 lbs which was 'sposed to hang over the tank. When I realized how heavy this was I figured it was just well built.......
DOH!!!! note to self....bigger is not neccessarily better when building a canopy full of electric lamps to hang over a fragile water filled glass box.
Well it was so heavy it pulled my support braces out of whack and wasnt really going to work as planned. So, I decided to take it apart and reconfigure. I decided to use 1/4" plywood instead for the skin. One of the things I had disliked about the original lightbox was that it hung over all four edges of the tank a couple of inches....cause I just cut the lightbox frame pieces the exact dimensions of the tank. I didnt take into account the extra two inches created by the wood used for the frame itself, (ie used 1x2's for the frame....cut the 1x2's into (4) pieces 36" long, (4) pieces 18" inches long for the width...which when assembled left with a box 36" long, but 20" wide...18 inch pieces were placed inside the 36 inch pieces....make sense?) And when I added the 3/4" playwood to that, it added another 1 1/2" to the diameter of the box...so now I've got a 38Lx 22Wx10H box that weighed 40-50 lbs.....
So I did some surgery on the lightbox frame with my mitre saw.....and didnt do such a good job.....cut the side braces, (originally 18" long), too short......and then I headed on back to HD for more wood.
The new box is being stained right now. Its ALOT lighter in weight than the previous one. Its also shorter in height and width as well. The new box should be about 38Lx15Wx7.5H. I am going to be running 36" 95 Watt VHO actinics, in addition to my dual 250 w AB10K DE bulbs...so thats why I needed 36" of interior lightbox space....which makes the exterior of the lightbox a full 38 inches long.
I also just bought a TDS meter from the same place I bought my RO/DI unit from www.airwaterice.com
Cost me $35 shipped. I was in the process of ordering the cuttingboard for the bottom of the tank...but their website is kinda weird regarding custom sizes...so I'll wait til later on today when they are open and speak to a person by phone so there are no misunderstandings.
Thats all for right now......I'm gonna wait til the TDS meter arrives before filling the tank. I want to double check the water coming out of my RO/DI unit...Ive had it for about 2 years, but I shut it off for the last 10 months or so since I havent had a tank up and running during that time. I have spare filters for it, but I just want to make sure. The filters are sposed to be the color changing type, and the bottom of one of the membranes has turned and orange rust color, but its just the bottom inch...so in theory, it should still be good to go.....
Thanks for staying tuned...
Nick
Craig Manoukian
Well-Known Member
Keep up the good work Nick!
Maxx
Well-Known Member
Goodies came in the mail today!!!
Got my cutting board for the bottom. I bought it from www.thecuttingboardcompany.com and bought a sheet of white 1/2" thick measuring 34 3/4" x 16 3/4". I cut a section out for the overflow and placed in the tank. Looks good and I'm happy with it.
My TDS meter arrived today also...(along with the neighbors bills??? I'm not payin 'em...I dont care if he is my neighbor).
Water from the tap measures at 215-218 ppm. Water from the RO/Di unit measures at 014 ppm. I'm happy with that. The tank will have water put it in it tonight. Probably wont be able to get it full tonight...but thats okay, cause I can wait another day.
I have the new lighter weight, light box ready to be hung. And I bought the American DJ PC-100A power centers the other day. they need to be hooked up. I like these things. More pics will follow.
Nick
Maxx
Well-Known Member
Got a bunch done.....
First step was to get the cuttingboard inside the tank. This required some measuring, planning and my favorite.....cutting!
The cutting board was ordered as a sheet of white 1/2" thick measuring 34 3/4" x 16 3/4" with rounded over edges. This was just a 1/8 of an inch smaller than the inside of the tank.
Here it is being measured for cutting. I needed to cut it in order for it to fit around my overflow box which is 10"Lx6"W.
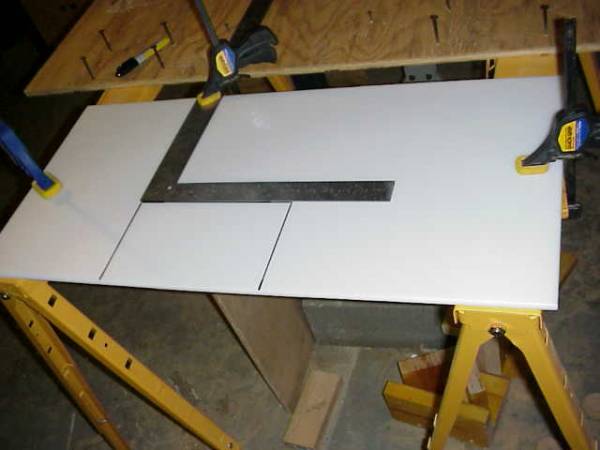
Here it is with the footprint of the overflow all traced out. You can also see the clamps I used while building this entire stand. These things are worth their weight in gold IMO...thankfully, they arent that expensive. Also comes in different sizes...this is one of the smaller ones I have.
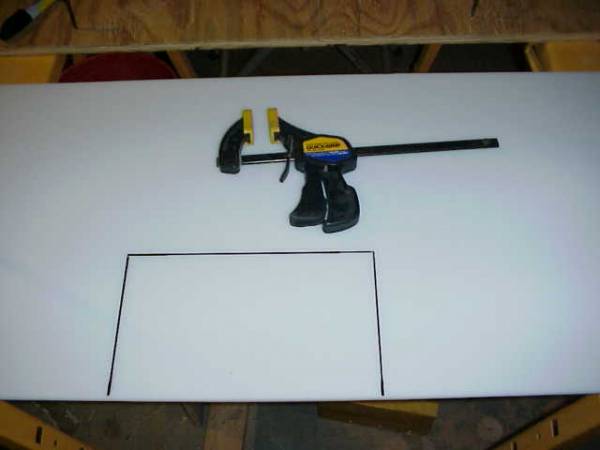
I cut it with a jig saw and a regular blade. No hassle at all. Worked so easy it was frightening.
Nick
First step was to get the cuttingboard inside the tank. This required some measuring, planning and my favorite.....cutting!
The cutting board was ordered as a sheet of white 1/2" thick measuring 34 3/4" x 16 3/4" with rounded over edges. This was just a 1/8 of an inch smaller than the inside of the tank.
Here it is being measured for cutting. I needed to cut it in order for it to fit around my overflow box which is 10"Lx6"W.
Here it is with the footprint of the overflow all traced out. You can also see the clamps I used while building this entire stand. These things are worth their weight in gold IMO...thankfully, they arent that expensive. Also comes in different sizes...this is one of the smaller ones I have.
I cut it with a jig saw and a regular blade. No hassle at all. Worked so easy it was frightening.
Nick
Last edited:
Maxx
Well-Known Member
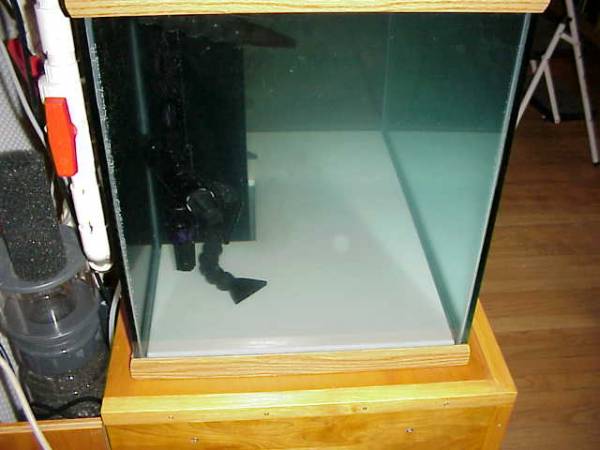
Herre is a top down shot of it. The cut wasnt as precise as I would have liked, (thats what happens when I free hand cut.....man I need a table saw!), but it is more than perfect for what I need.
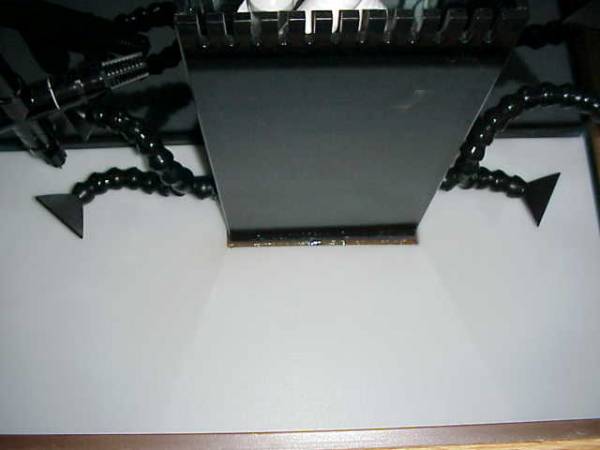
Here's a front shot of it in the tank. This stuff is lighter than water and will float. However, my Loc-line returns are keeping held down until I get the rockwork in place.
And a side shot:
The tank just has RO/DI water in it right now....no salt mix....so the water is cloudy because the skimmer isnt working properly, (Skimmers dont work in fresh water because it doesnt have the right surface tension to create fine bubbles needed to skim. Just the big old goofy bubbles that wont make skimmate...just an FYI kinda thingy.)
Nick
Last edited:
Maxx
Well-Known Member
I also added braces for the lightbox support arms. The weight of the original lightbox pulled the arms down and out of level. I made a lighter box, (no pics yet), and braced up the supports with these 2x6 pieces I had lying around that were already stained and sealed. The support arms are not stained and sealed as of yet. I'm waiting to hang the lightbox so I can determine exactly where the best point to hang the box from. I'm still trying to decide if I want to drill two holes through the support arms and run the dowel rod, (that will suspend the lights and allow me to raise and lower the lights), through them, or mount another pice of wood above the arms and drill two holes through them. The only reason for doing it that way would be to gain 4 inches or so that I could raise the lights. Any suggestions?
Left arm looking towards living room.
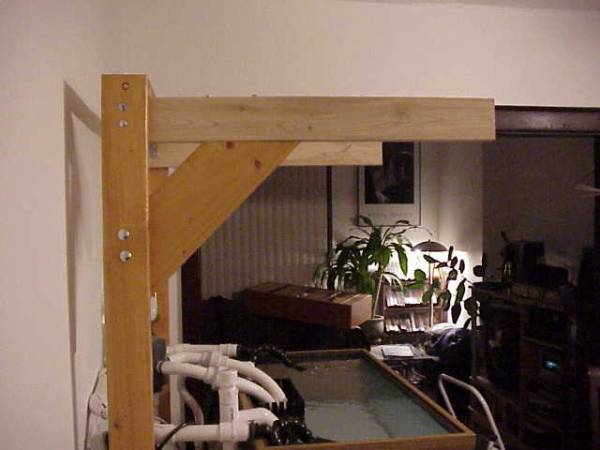
Same arm inside, looking towards kitchen.
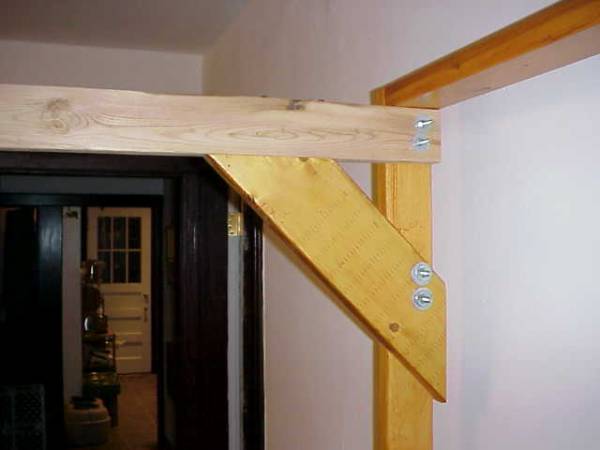
Nick
Left arm looking towards living room.
Same arm inside, looking towards kitchen.
Nick
Last edited:
Maxx
Well-Known Member
Finally, I made the standpipe mod...
Originally I made a Stockman standpipe, I chose it because I couldnt think of a way to put a strainer over the Durso and keep larger snails from getting stuck in the bulkhead.
I used plans from Durso's Standpipe Page. I'm assuming that it is necessary to use larger plumbing with those as it is with the Durso's...cause this thing was LOUD!!!!!! Rocio couldnt sleep and neither could I. It literally sounded louder than a toilet flushing constantly. Had to make a change.
Luckily, I saw another reefer's mod to the Durso, which created a strainer which would keep snails out. He basically took another piece of plumbing, and sawed a row of shallow cuts into the side, along the entire length of his "strainer". So I copied that too....
Here is a pick of the new Durso standpipe.
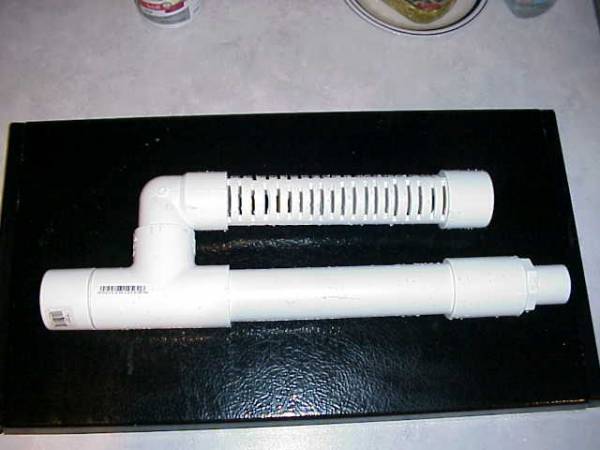
Thankfully it worked! Now the loudest thing from the tank is my closed loop pump grinding out air bubbles left inside from when it was filled with water initially. That will dissipate in time.
Nick
Originally I made a Stockman standpipe, I chose it because I couldnt think of a way to put a strainer over the Durso and keep larger snails from getting stuck in the bulkhead.
I used plans from Durso's Standpipe Page. I'm assuming that it is necessary to use larger plumbing with those as it is with the Durso's...cause this thing was LOUD!!!!!! Rocio couldnt sleep and neither could I. It literally sounded louder than a toilet flushing constantly. Had to make a change.
Luckily, I saw another reefer's mod to the Durso, which created a strainer which would keep snails out. He basically took another piece of plumbing, and sawed a row of shallow cuts into the side, along the entire length of his "strainer". So I copied that too....
Here is a pick of the new Durso standpipe.
Thankfully it worked! Now the loudest thing from the tank is my closed loop pump grinding out air bubbles left inside from when it was filled with water initially. That will dissipate in time.
Nick
Last edited:
Maxx
Well-Known Member
Unfortunately...I seem to have a heat issue already. W/O lights, the tank is running at 81 degrees. Looks like I may need a chiller. I really didnt want to have to use one....but I dont think I have much of a choice. Any suggestions on whihc brand you like and why? I'm thinking I should get a 1/6 or 1/5 hp chiller for my tank.
Nick
Nick
Craig Manoukian
Well-Known Member
Wowsy wow wooowooo! Very nice stuff Nick!
Maxx
Well-Known Member
Thanks Kat....Thats actually one of the ones I've been looking at...
What pump are you running to feed it?
Things I've noticed that may or may not be relevent....
My Fiance and I live in a 2 family flat, (one house, we live downstairs, friend lives upstairs). The upstairs apartment relies on radiant heat, (steam radiators) and the steam pipes run through the wall the tank backs up against. Had I known this beforehand I may not have put the tank there, although this wall is also supported by 2 monster iron I-beams making it the best structural location for the tank. You can feel the how much warmer this wall is compared to others in the house whenever you get close to the wall. I honestly had never felt this before, (I just dont hang out near the walls of my house....call me crazy. Besides, When I was planning out locations for this tank, it was summertime and the heat wasnt on.) I dont think this actually contributing to the heat issue, but I dont think it helps alot either.
I noticed the OM unit motor was pretty hot to the touch....by using my non calibrated hands...I'm guessing about 160 degrees or so. Its uncomfortable to touch for very long, but not painful and doesnt leave redness or anything. I was pretty concerned about this thinking I might have overtightened the motor after re-assembling it...(hey I had to look inside okay?).
So I went to the website www.oceansmotions.com and visited their 4 way forums.
I found a thread titled Heat issue with HD 4 way? where Paul (manufacturer) states that the motors are rated for 110 degrees C (which comes out to 230 F) and he reiterates that the motors are made by Hurst for dialysis machines.....so reliability is NOT an issue...and I would not think heat transfer would be one either since it sits on a heat sink and the drive shaft is made of high grade plastic....It's not a great heat transfer medium.
I just unplugged the OM unit unit and the Iwaki 55 RLT. I will wait until tonight and check the temp again. I want to give the water several hours, (like 12-14) to shed some of the heat.
I had the Mag 7 and the Skimmer offline until I could quiet down the overflow...and the in tank temp was 80.6 as opposed to 82.4. I will check temp and then turn on the Iwaki, but not the OM unit. The design of the OM unit is such that water will still flow from a closed loop, even if it's not operating..there by saving your pump if by some whackadoo reason the OM unit craps out on you. There is no reason to run the OM unit w/o the pump running as well, (no way to transfer heat to tank if pumps not running), and I really dont like the idea of doing that. The OM unit is built hell-for-strong, so I honestly doubt it would do any harm for the OM unit, but I still have a worst case mindset....
I really do not want to have to buy a chiller, (cause frankly, I cant afford the extra $400-$700 one would cost right now). But I've been doing some looking online and these are the two major contenders:
Pacific Coast CL-280 1/10 HP Inline Chiller
I have been hearing great things about these both as reviews on the retailer's site, and more importantly from online boards like here and RC. The only thing about this one that I dont like is having to use yet another pump and run plumbing to it.
The other is the TradeWind Drop-in Chiller - 1/5 HP This one is more expensive, but its plug and play...also larger in size.
I honestly dont think that upgrading is going to be an issue with this tank. I plan on upgrading to a 120 or larger when Rocio and I buy a house, but the way this tank is configured, it would be PITA to tie it in to a larger system....so I wont. When I go larger, I will go to a totally seperate system.
Thanks for the input ...hopefully, I can figure this out.
Nick
Maxx
Well-Known Member
The steam pipes dont heat the wall that much, its just noticeably warmer than other walls. you cant feel the temp increase a inch away from the wall, just when you touch it. So I really doubt that its contributing anything to the tank temp.
Is the PanWorld 40 PX a pressure pump? I'll have to do some looking around on Champion's site to see if they explain what it equates to. I have an Iwaki MD-40RLT that is unused, (bought for the Etss skimmer I am not using.) and sitting in the box. I also have an older Iwaki MD 20 RXT I could use....
I'm definately not wanting to add another pump to this mix.....If I go with a chiller, the return pump is going to feed this....I'm not gonna start collecting pumps to sit under my tank.....
Nick