Basic Photography Class

nanoreefing4fun

Well-Known Member
RS STAFF
Bret is currently having some connectivity issues... he e-mailed from his phone and wanted me to let everyone know...

The start of the post processing class will begin in about a week.
 

BLAKEJOHN

Active Member
Post-Processing

In this section I will explain post-processing of RAW files using Adobe Photoshop CS3. Afterwards, I will explain post-processing of JPEG’s for those of you that are not capable of capturing RAW files.

Let’s start working on a photo!!
I have e-mailed a file to those of you that I have email addresses for. This file is HUMA.DNG. The DNG file is a Nikon RAW NEF file that has been converted.

For Nikon users: In order to process Nikons NEF files you will/may need to download Adobe’s DNG converter

On your desktop create a new folder labeled Photo Class with a subfolder HUMA. In the subfolder HUMA, create 3 more subfolders: DNG, TIF, JPEG

Download and save this file to Desktop/photo class/huma/dng
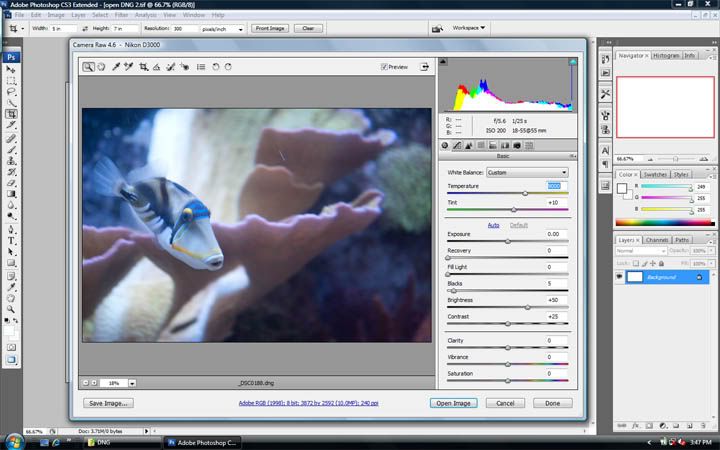
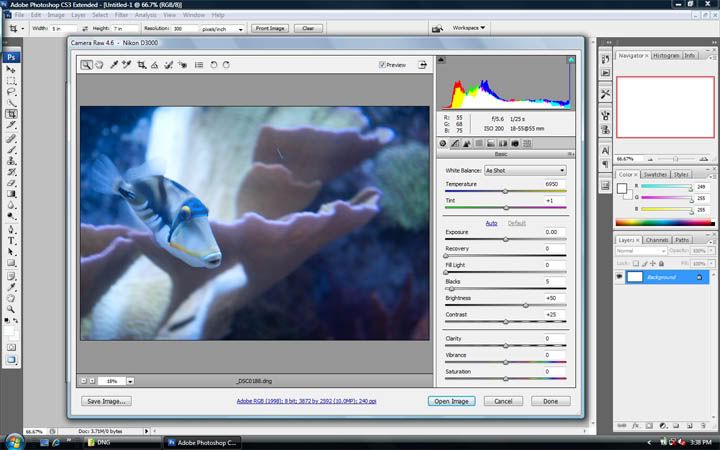
Go ahead on open Huma.DNG with Photoshop. This should open in Adobe camera raw (screen shot below)

openDNG2.jpg


Look at all the info that is available in this screen and play around with the sliders and see what they do.

Here we can adjust, Color temp, Exposure, Tint, Contrast, Clarity, Saturation, etc…

As you can see our image is a little blue. The reason for this is that my lights have a Kelvin temperature of around 16k. The Cameras White Balance was set to auto and picked a Kelvin temp of 6950 degrees, thus causing a heavy blue tint. Well, lets fix it!!

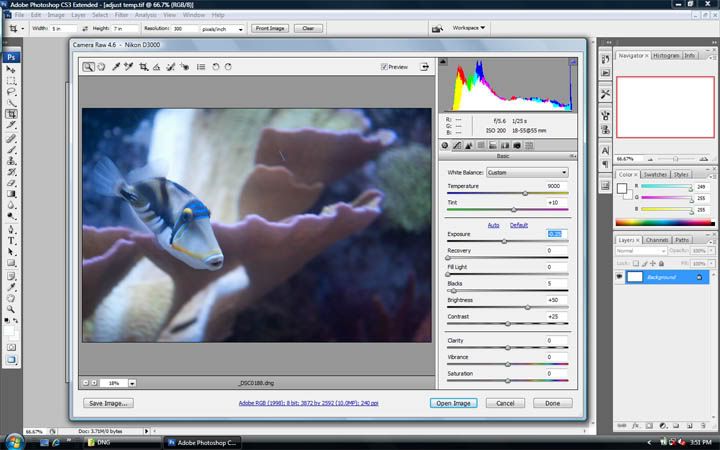
Click on the White Balance drop down box and select Custom. Adjust the temp slider to 9000.

adjusttemp.jpg


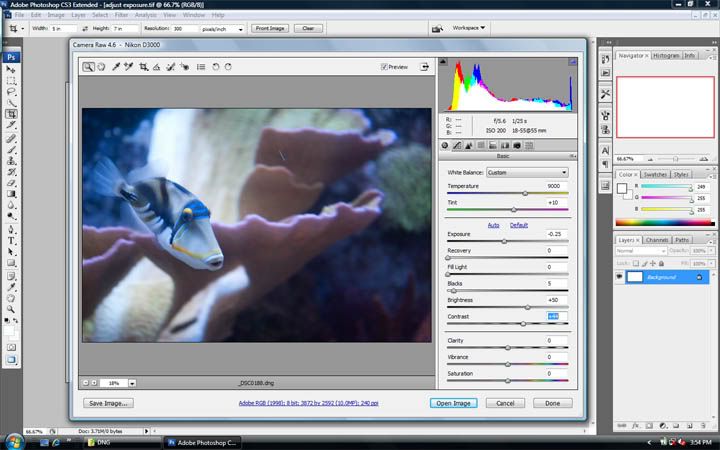
Next let’s adjust the Exposure. To me it is just a touch over-exposed. Adjust this to -.25.

adjustexposure.jpg


This image is also a bit “flat” (no POP). We can fix this a little by adjusting the Contrast. Let’s adjust the contrast to +44.

adjustcontrast.jpg


And I like to add a touch of clarity, lets move it to +20.

We are done in here so let’s save this image. In the lower left corner is “save image”, click “save image”. In the new dialogue box Click “Select Folder”. Change this to Desktop/photo class/huma/tif

Under “File Naming”, enter in the upper left box, Huma 9k
In the “File Extension” drop box select TIF.
“Format” = TIFF
“Compression” = None
Click “save”

At the bottom right you will see “open Image”. Click “open Image” and this will take you into the Photoshop workspace.


Before we go too much farther lets learn our way around the workspace.
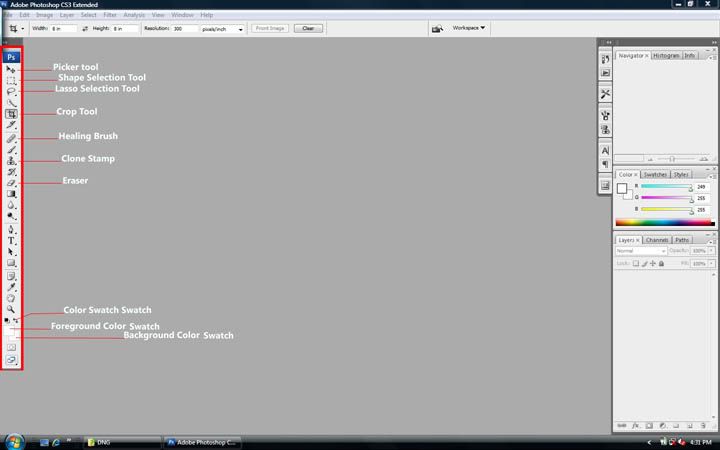
Again I am working in PS3, but most other versions of Photoshop will have the same/similar interface. Below is a screen shot of the PS workspace. This workspace can be arranged any way you like it and then saved so every time you use PS the layout will remain the same.

PSlayout.jpg


The red box on the left is your Tool Bar. Each tool that has a little arrow next to it is expandable, Click and drag out to select other options. On the top is your Menu Bar and on the right are your Docks. Your docks have other information such as the histogram, layers, history, actions, etc… We won’t really need the docks other than maybe the history. The history Dock allows you to undo multiple changes at once or one at a time if you mess up. You can also undo/stepback one action at a time through the Edit tab. In the image above the most common tools are listed, but we will only use the Healing Brush and the Crop tool.

In the Menu bar under the “image” tab is where you will find most of your “adjustments” and also “image resizing”. Under the “filter” tab you will find all of your digital filters such as “Gaussian Blur” and “Unsharp Mask”. I am sure you are familiar with the File and Edit tabs. The Edit tab also has your image transformation tools which include: Rotate, Skew, Scale, etc…
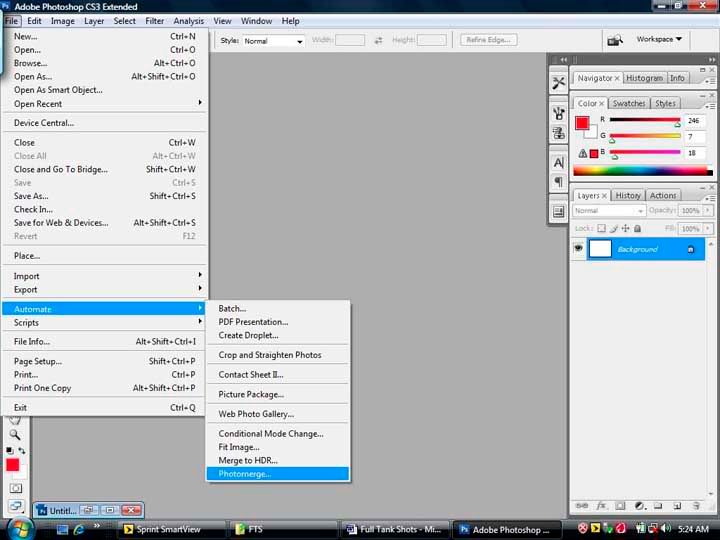
The File tab also has your automation tools such as Photo merge, which we will use in creating our FTS’s.


Ok so let’s fine tune this image!!

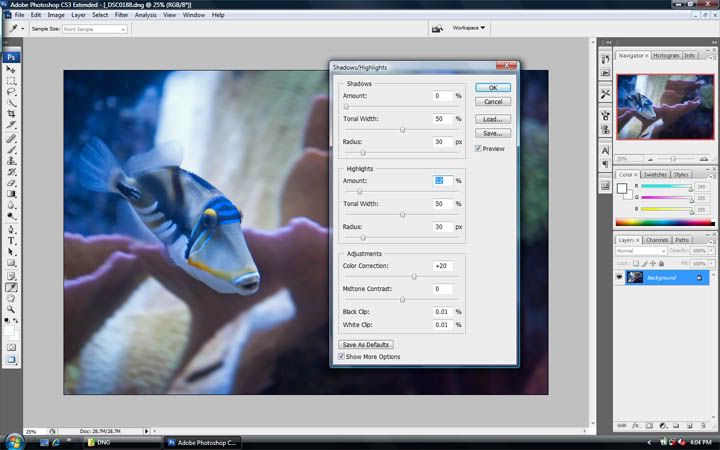
Our image is still a bit “flat”. Go to the menu bar and select: Image-adjustments-shadow/highlight.
Check the box “show more options”.
Starting at the top of the box under Shadows: Set amount to 0%, Tonal width to 50% and Radius to 30px.
Highlights: Set amount to 12%, Tonal width to 50% and Radius to 30px.
Color Correction to +20.
Black Clip and White Clip to 0.01%
Click OK.

The reason we did this was to burn down the highlights a little.

Shadowsandhighlights.jpg


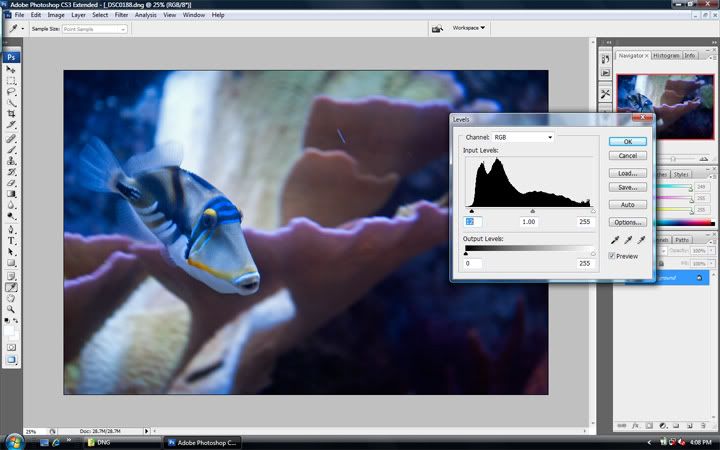
Now go to Image-adjustments-levels.
Move the black triangle under the histogram until it is at 12. The gray triangle should be at 1.00 and the white one should be at 255.
This adjusts your black point, midtones and highlights prospectively.
We moved the back under the taller hump to make the blacks a little darker.

levels.jpg


Now we will sharpen this image a bit.
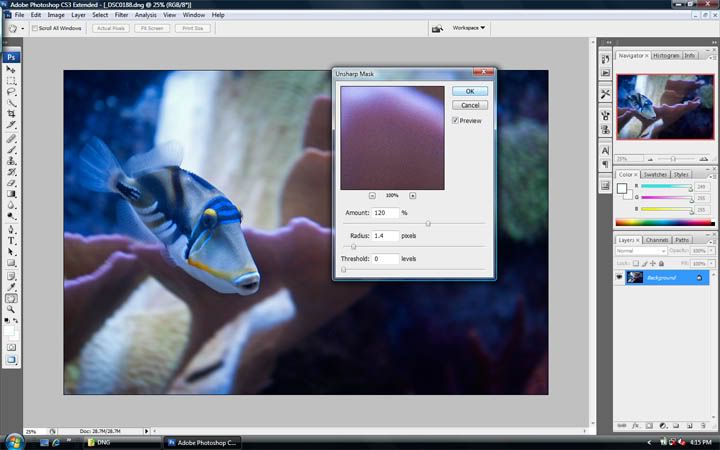
Go to filter-sharpen-unsharp mask.
We will set the amount to 120%, Radius at 1.4 and the threshold will remain at 0.
Click OK.

Do not be fooled with this filter. It will not “sharpen” a blurred image. In reality it only adds a little contrast to neighboring pixels to make the image appear to be “sharper”.

unsharpmask.jpg


Now that we are done and our image is close to what we see. We will now make the image a little more appealing to the eye. We’ll do this by Cropping the image.

Select the crop tool from the tool bar. Now look under the menu bar and you will see the crop tool settings. Lets set the width and the height to 8 in. and the resolution to 300 px/in.
Click and drag on the image to crop. The crop tool will maintain an 8” x 8” crop. Frame the tail in the upper left corner of the crop and extend the crop down to the bottom of the image, release the mouse and press Enter.


Some tips on Cropping.
1). The rule of thirds. Weather you are cropping through the viewfinder or in software we try to keep our subject in 1/3rd of the frame, the upper, lower, left or right thirds. A subject or horizon that is centered usually produces a static photo.
2). Motion. When a subject is in motion we again try to keep the subject in a 1/3rd of the frame with the remaining 2/3rds empty ahead of the subject. This gives us a little dimension. It helps show us that the subject is moving into that empty space.
3). Composition. The composition of your image is everything together. Shapes, lines and movement all placed correctly will guide the viewers eyes through the photo starting at the focal point.

Now let’s save this image. We will save two images, one will be a TIF and the other will be a JPEG.
First let’s save the TIF. Select File-save as, select folder, Desktop/photo class/huma/tif. Rename file, Huma 9k done, change the file extension to TIF/TIFF and save. (click OK through the remaining windows).
The TIF file is a large file and has a resolution of 300ppi (cause we set it in the crop). This type of file is usually used for printing and if you need to re-edit you can because it is a lossless file type, meaning that you will lose no information upon saving because it is not compressed. As compared to the compressed JPEG file which throws away info during compression and upon reopening, makes up the lost info.

Which we will now save. This file is useful for sharing photos though e-mail or of course on our forums. Because it is a compressed file it is smaller than the TIF and will load faster for the viewer.
Select Image-image size.
Change the resolution to 72 and click OK.
Select File-save as, Select folder, Desktop/photo class/huma/jpeg. File name should still be Huma 9k done, if not, change it. Change the file extension to JPEG and Click Save. The next window will be Image options. We will change the “quality” to a level that gives us a file size of around 100k. And click OK.

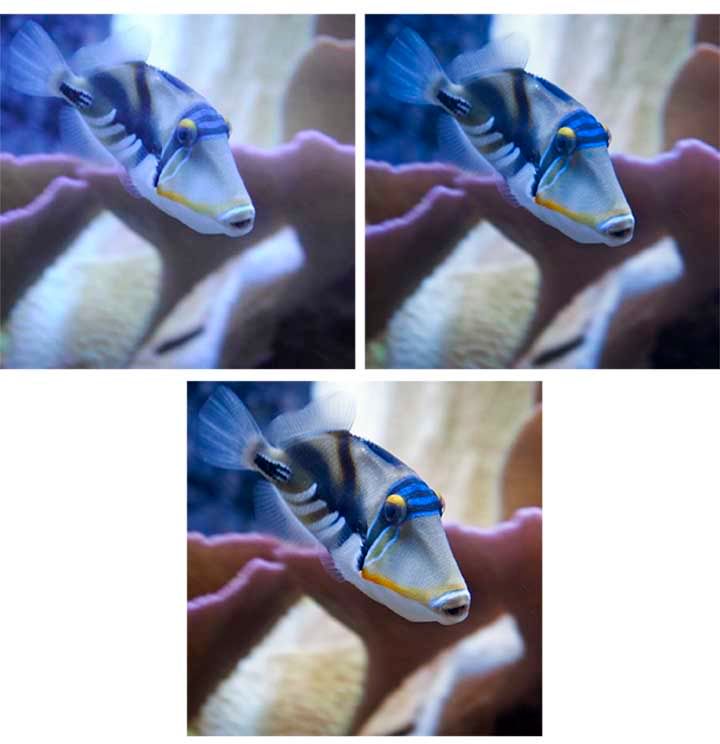
I have also corrected the same image to 16,000K which shows more of the actual color of the fish. I have below three images; Unedited, 9k and 16k. The only difference between the 9k and 16k, is the color temp. all other adjustments remained the same.

sidebyside.jpg
 

BLAKEJOHN

Active Member
Has everyone recieved the image I sent via e-mail?
Does anyone have any qestions so far?

I will post how to color correct JPEG images tonight.
 

BLAKEJOHN

Active Member
Jpeg images

Before we go into the post-processing of the jpegs, lets work on getting a decent photo from that point and shoot camera.

First learn and become familiar with your camera and its optional settings. Mainly ISO and white balance.

If your trying to get shots of fish adjust the ISO until you are able to capture a shot with minimal blurring. For coral use a tripod.

Adjust the white balance to around 9000-10000k if you can. Some have a custom setting by taking a picture of a white area (check your manual, If you can then zoom in and take an unfocused image of the sand). If you only have presets then auto is probably your best choice.

Use the macro setting and try to get the camera to focus. Sometimes this will take a while because the Point and Shoot cameras tend to focus on what they think you want.

Take the time to get a good photo, this is digital so you can take as many as you need to.

Before we go into the post-processing we need to know a little about color.

A photo has seven colors: Red, Green, Blue (RGB) and Cyan, Magenta, Yellow (CMY) and Black (K) (white is the absence of color in prints and the accumulation of all colors (except black) when viewed on the monitor).

The black is set by the black point so at this time we won’t worry about it. The others are adjusted two at a time.

If you remove Red you will add Cyan
If you remove Green you will add Magenta
And if you remove Blue you will add Yellow.
And visa-versa.

Color correcting or white balancing JPEGs can be difficult. I don’t have much practice as I don’t use them. I will give my best explanation, and there may be more than one way to do it.
 

BLAKEJOHN

Active Member
Again I have sent the oiginal jpeg to your e-mail entitled yellow polyps org.jpg

Open this file using Photoshop

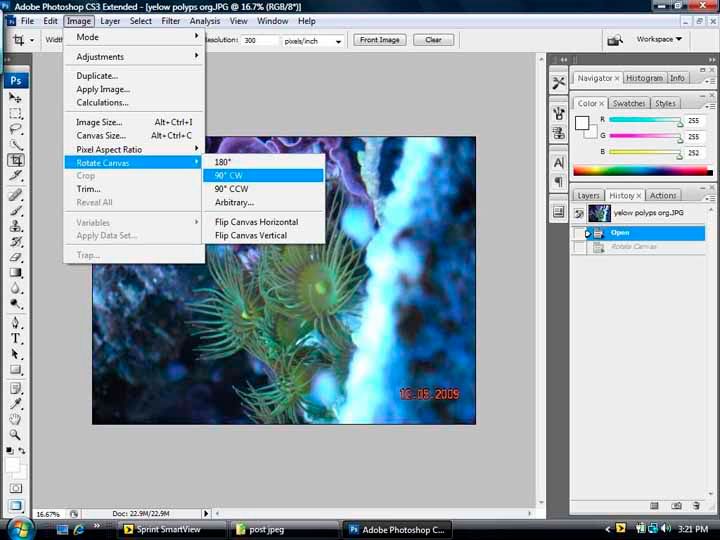
In the menu bar select Image-rotate canva-90cw

90degreescw.jpg


This next part is the tricky part
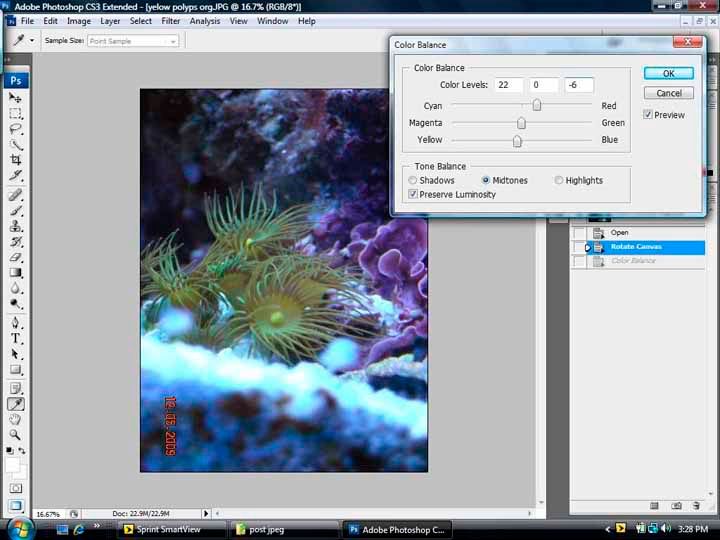
In the menu bar select image-adjustments-color balance

colorbalance.jpg


Remember I said that two colors are adjusted at one time? Here is where that happens. Make sure the midtones button is checked then Slide the top bar until you are at +22 in the first box (here you added Red to remove Cyan).
Next bar leave at zero.
the bottom bar move till the last box is at -6

Now check the highlights button. We will do the same thig again but the numbers will be different. The first box on your left will be +17, middle box +8 and the last box -14 and click OK

Learning how all those slidders will effect your photo will come with playing around with them. Remember to remove one color you have to add the opposite color.


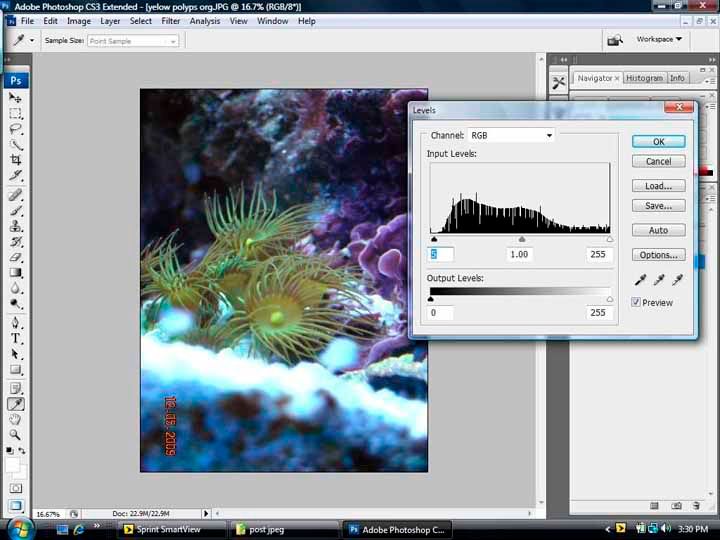
Now lets adjust the levels. In the menu bar select image-adjustments-levels

levels-1.jpg


Change the first box on the left to 5 and click OK


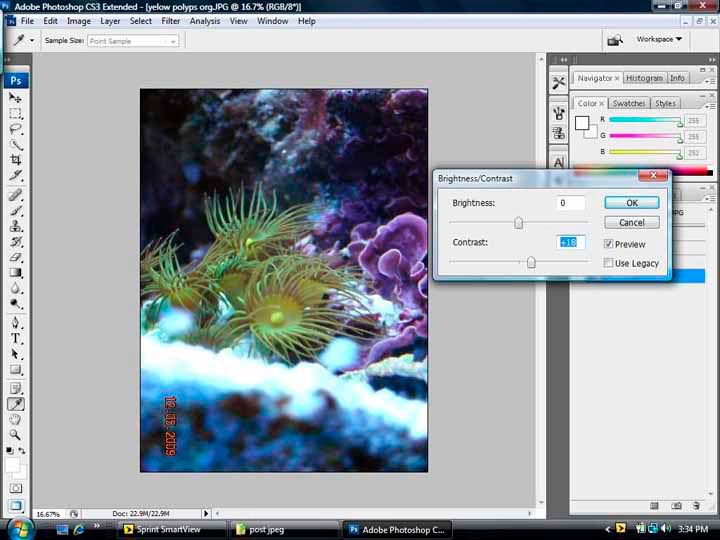
Next we will adjust the contrast. In the menu bar select image-adjustments-brightness/contrast.

contrast.jpg


Change the contrst to +18. Do nothing with the brightness and click OK.


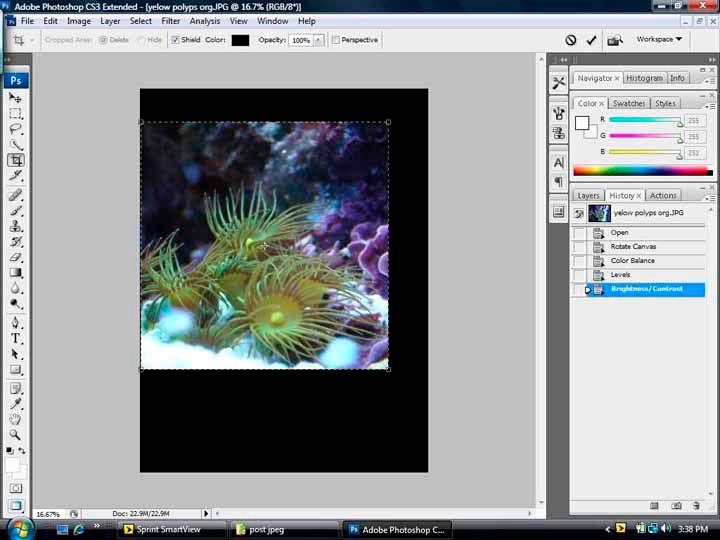
Crop the image to 8" x 8" with the resolution at 300dpi

crop.jpg


You can save this file as a printable image by saving as a tif.
next we will reduce the image back to 72dpi. Select image-image size and change the resolution to 72 and click OK.

Save file as Jpeg and then image quality at 100k or less. Now this image is ready to be shared vie internet or e-mail.

Thats it not much to it. The hard part is color balancing. Just play with the sliders till it looks right to you.

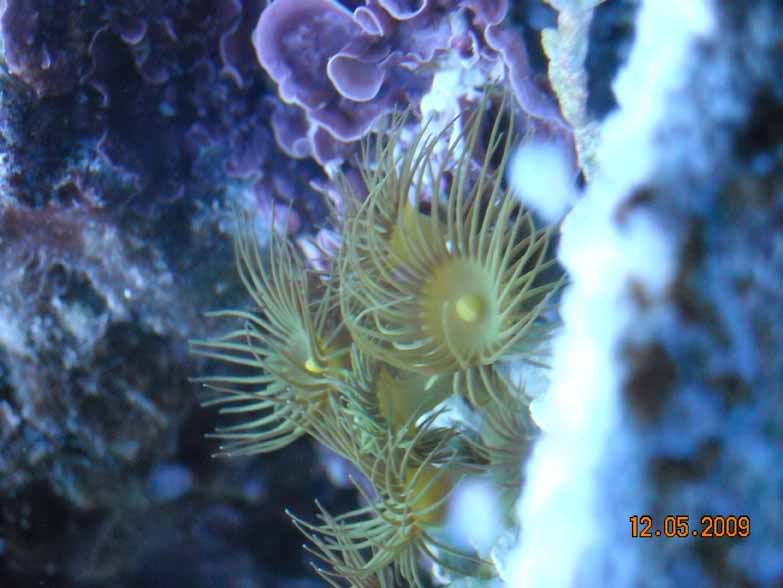
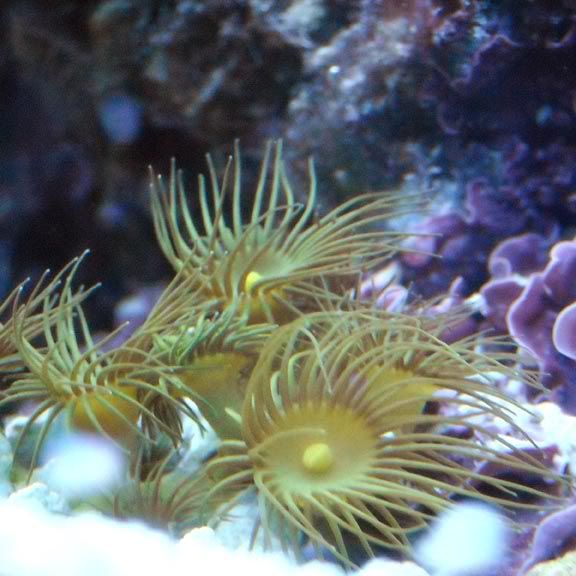
Here is he before and after

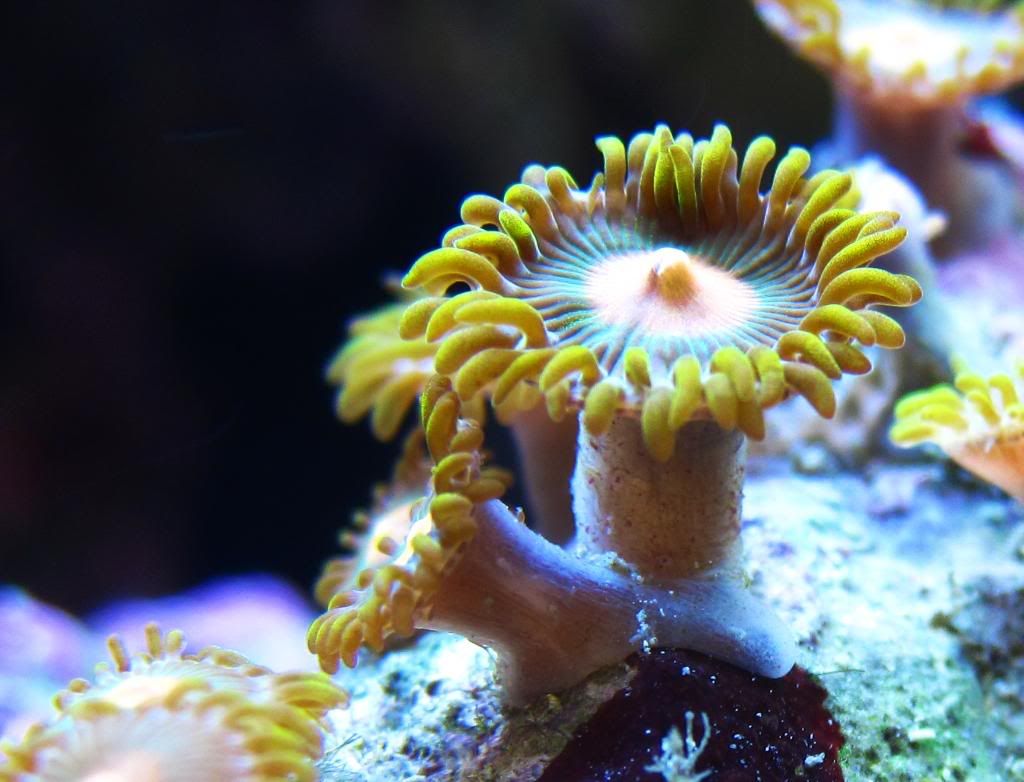
yelowpolypsorg.jpg


yelowpolypsdone.jpg
 

BLAKEJOHN

Active Member
Well thats about it for the basics. If anyone has any questions or would like to go into anything further just let me know and Ill be glad to do so. If you are having any problems or dont quite understand something please say so.

A little macro tip for those SLR users.

If you dont have the cash for a macro lens. Just take the lens off and hold it to your camera body backwards. This can be cumbersome to try and focus because it is not mounted. But if it works out for you then you can get an adapter that will allow you to mount the lens backwards for about $5.


Next I will go into Full Tank Shots and using the Automation Photomerge.
 

Doompie

New Member
nice tips, as a hobby photographer (for years) i ofcourse got my own methods and workflow for getting most out of the pics..

if there is interest for it i can post my 60 seconds basic picture workflow.
just a few basic editing steps to instantly get a great result. Not all the tricks ofcouse ;)
 

PootyTang

Member
I've been following this thread and I was hoping that if I post a few pictures I've taken since reading the material, you could help me improve my photography? I was also hoping you could do a section on underwater photography.
I use a Canon 780IS.

MrDude.jpg


Father-Son.jpg


IMG_0402-PS.jpg
 

BLAKEJOHN

Active Member
Before we go into FTS and Photomerge, lets quickly learn how to Batch-Process. Batch processing will save us time by making all the necessary changes to all of our photos at once rather than one at a time. In PS3 I have found that Batch-processing RAW files does not work. You can look up Batch-Processing for your version at adobe.com. Other wise use your cameras proprietary software.

For those of you using Jpegs we can use the actions in photoshop to easily change all of our photos relatively quickly. Actions are a recorded set of actions that can be applied by a click of the mouse or press of a key. Let’s walk through the recording and use of an action.

We will do a simple action to change the file size into a usable web image.

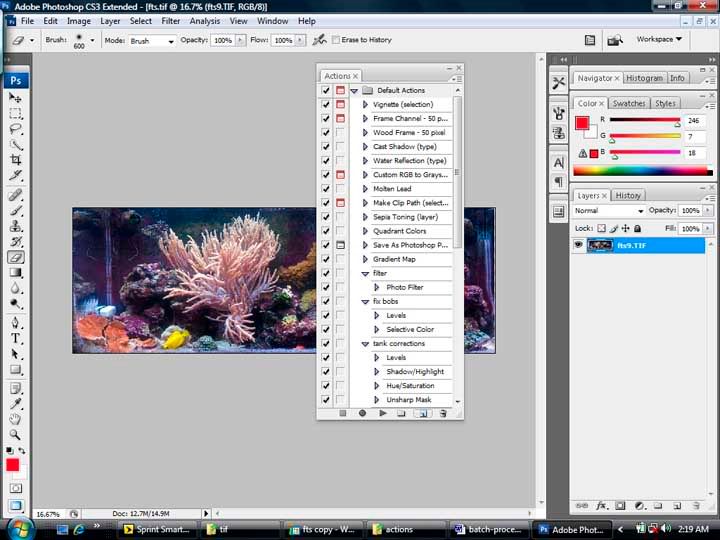
Open your file in photoshop. In the menu bar select windows-actions, you will now have the actions dock. ( you can drag this window over with the layers tab and dock them together)

actionswindow.jpg


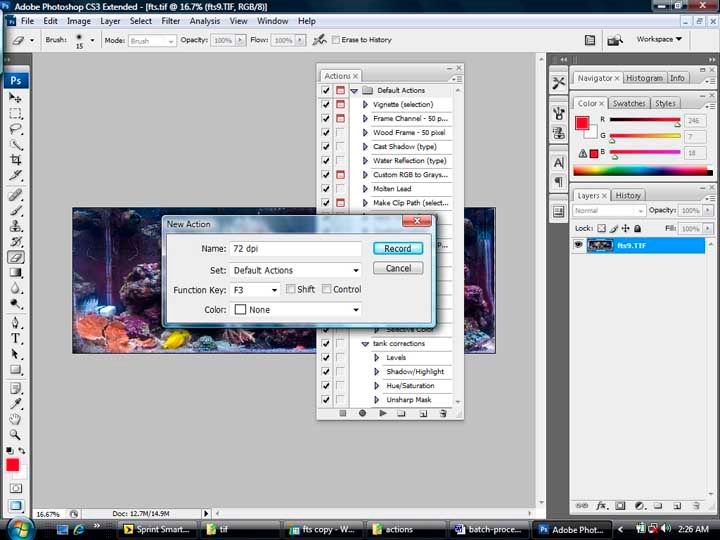
We need to make a new action. In the action dock at the bottom just to the left of the trash can is a square with a smaller square inside it, this is the New Action button. Click on this to create a new action.

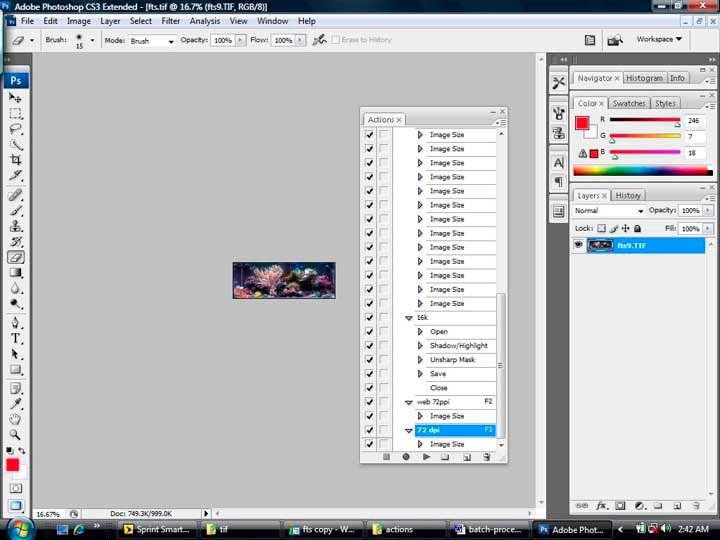
A New Action dialog box will appear. Here we will name the action, and set a hot key if you would like. So let’s name this action “72 dpi” and set the function key at “F3”. Now click record. Everything that you do from here until we hit the stop button will be recorded to this action.

actiondialogbox.jpg


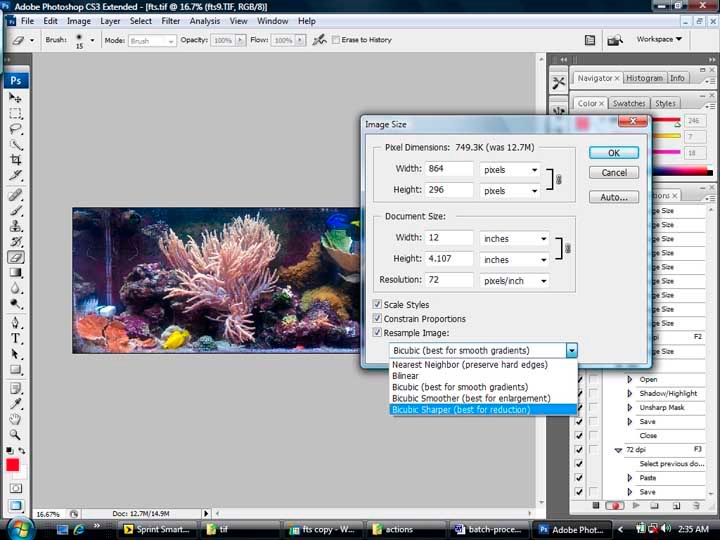
Go to your menu bar and select image-image size. Change your width and height if needed ( i reccommend a width or height of no more than 10 inches to be viewable online or through email) and the resolution to 72. You can also select bi-cubic sharper at the bottom if you would like. This helps some larger resolution images to look better when shrinking them.

imagesize-2.jpg


Now we can hit the stop button at the bottom of the actions dock to stop the recording. We now have an action named “72 dpi” to reduce the file size of an image with just the press of a single key, the F3 key.

recordedaction.jpg


You can record any amount of changes to any single action. For instance if your working with a set of jpegs you can record an action to correct the color balance of the rest of the photos in the series simply by clicking play or selecting a function key.


You can now open any other image and press F3 or select the action and click play and it will change the image to exactly what you recorded.
(do not try to use the actions to record a crop unless you want the exact same crop in the exact same place in every photo)
 

BLAKEJOHN

Active Member
One more feature to learn about our camera.

The Auto Focus Lock. This feature allows you to focus on a subject and then reposition the camera without losing the original focus. If your camera does not have this feature you can Auto focus and then while keeping the shutter half pressed switch to manual focus. This is helpful when you can’t seem to frame the subject and focus on the correct subject.

For example; you want the bottom of the image in focus but the camera does not want to focus there. You would move the camera down and focus, lock the focus and reposition the camera then capture your image. Now you have the frame you want and the subject properly focused.
This technique can be used in many different situations.
 

BLAKEJOHN

Active Member
On to making our Full Tank Shots.

This is geared toward larger tanks.

The use of a tripod would be helpful until you get the hang of it. So lets set our camera on the tripod in front and center of our tank. Tip the camera so it is it a portrait position (on end). Through the view finder, zoom in until you can see the top and bottom of your tank. Focus on a subject in the center of your tank (center in height and center in depth).

The use of a higher apature is recommended if you can (F7-F9), if not increase your distance from the tank.

A shutter speed above 1/60th of a second is also recommended unless you have an image stabilization lens or a steady hand.

I try not to use an ISO higher than 400. But you’re more than welcome to do so. Just remember the higher the ISO the more noise/grain in your photo.

Now our camera is in position and we have taken a few shots of the center of the tank and have determined that our exposure is correct and we have minimal blurring. Your center shot should look similar to this.

center.jpg


Now without adjusting the focus, zoom, apature, shutter speed or ISO we will turn the head of the tripod and aim the camera at the far left side of the tank and press the shutter.

left.jpg


Next we will turn the camera a little to the right and take another picture. This second picture will overlap the first. We will continue this all the way across the tank with approximately 7-10 shots.

series.jpg


Now that we have our series of shots we need to correct them. This is when batch-processing comes in handy. If you have to process them individually then be sure every adjustment is the same for every photo using the center photo for the basis of all adjustments. Save all corrected images in a TIF format in a dedicated folder Example; FTS/date/tif


Now we are ready to use Photomerge to assemble these images into a FTS.


Open Photoshop and in the menu bar select file-automate-photomerge.

photomerge.jpg


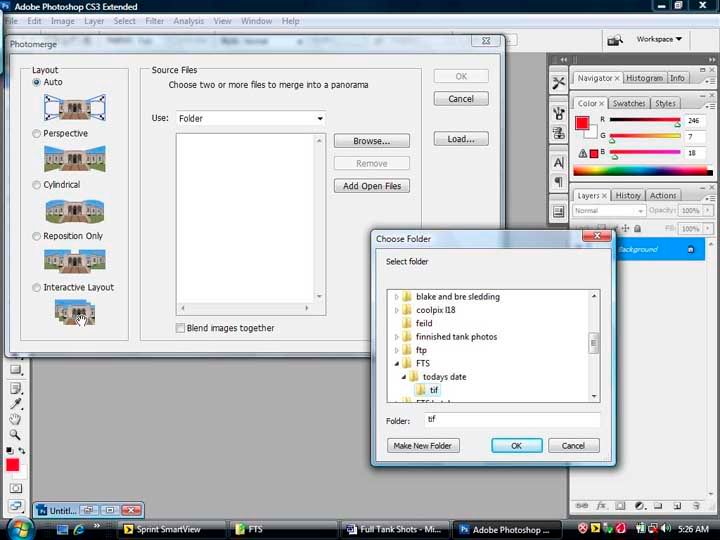
The dialog box opens and we have a few options, The first is Layout, we will leave this on Auto.

The second is Source files. To the right of Use we will select folder. Then click on browse. Find the folder that you saved the FTS TIF files and select it and click OK.

browse.jpg


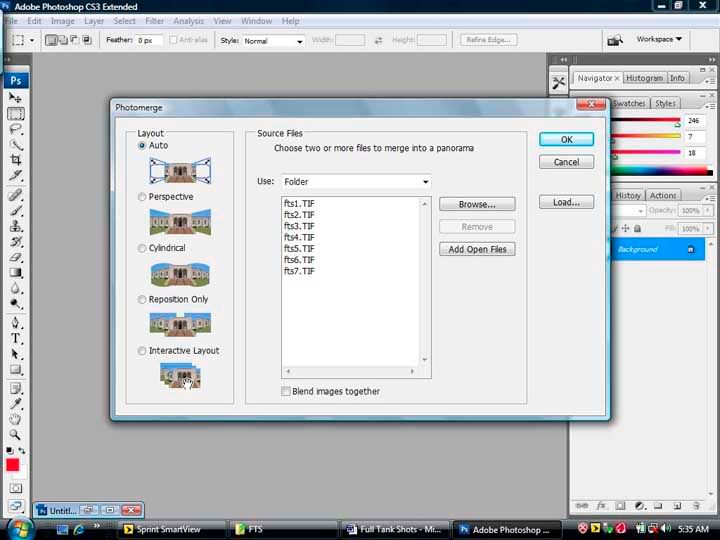
Then uncheck Blend Images Together. And click OK. (You can leave this checked. Some times when it blends automatically it distorts the image or fades together unwanted objects). We will go back and blend them manually.

checkblend.jpg


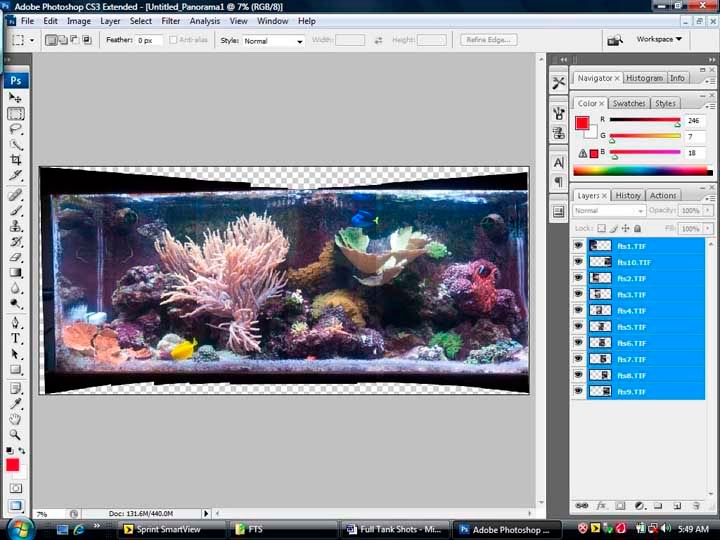
When all of it processes are done you’ll have a screen similar to this.

processdone.jpg


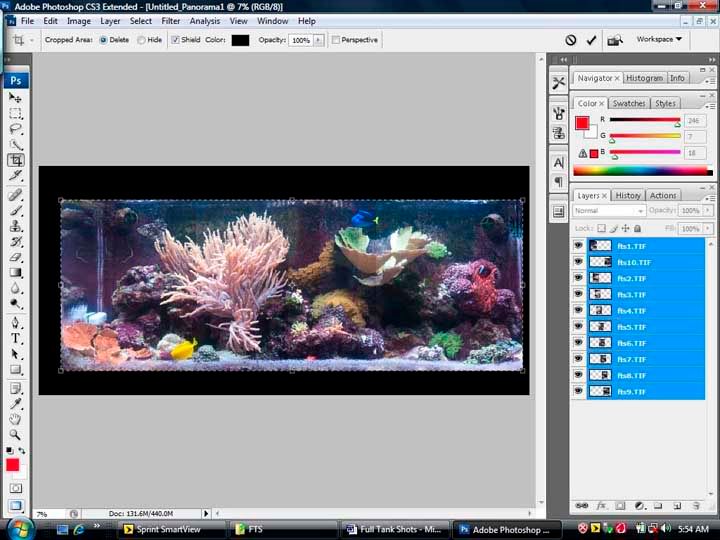
Let’s select our crop tool and make the height and width blank with a resolution of 300. We will crop the tank and stay with in the frame or edges of the tank. Seeing the edges of ones tank it this type of photo distracts the viewer from the main content.

crop-1.jpg


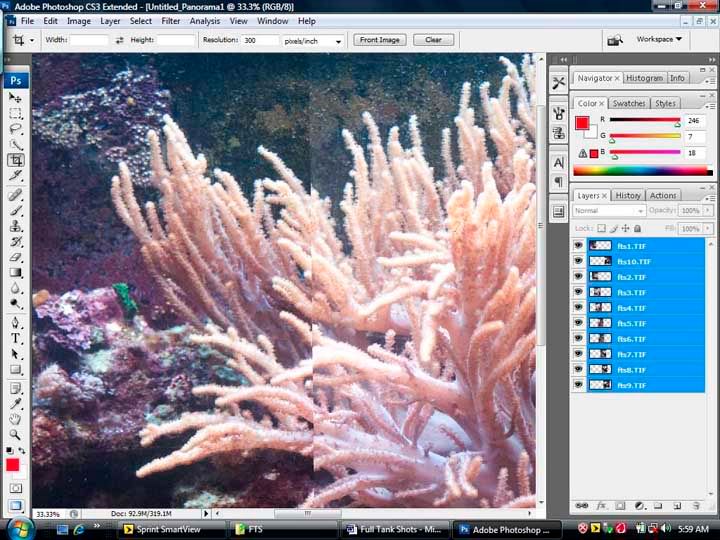
Since we did not select to blend the images together we get to do that ourselves now. If you zoom in (press and hold Control and press +/= to zoom in, press and hold control and press -/_ to zoom out) you can see clearly the edge of two images.

unblended.jpg


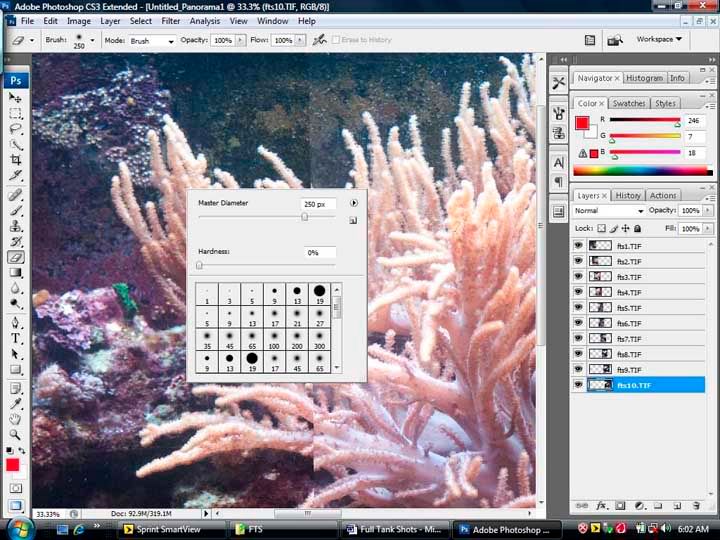
This is easy to fix. Select the eraser from the tool bar on the left. Move the cursor out onto the image and right click the mouse. Slide the hardness down to zero. And then left click outside of the properties box. If the eraser courser is too small or too big you can adjust the size by hitting the [ key to reduce or the ] key to increase the size.

eraserproperties.jpg


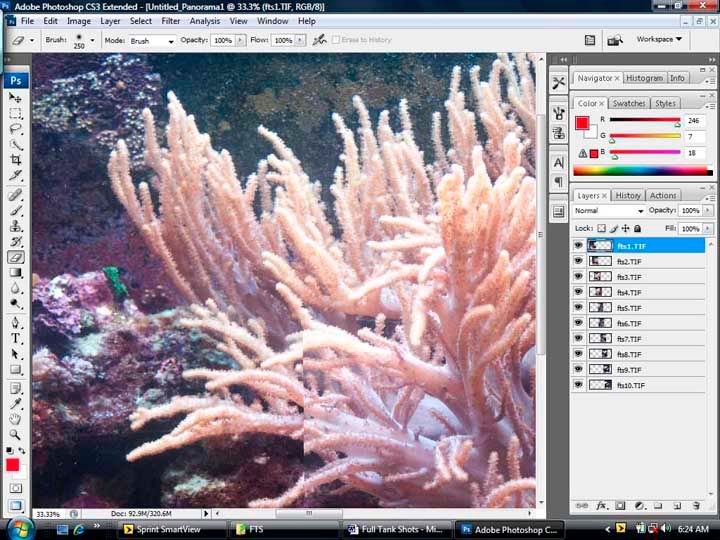
Now we need to look at the layers dock on the left. What are these layers? Layers are different images stacked one atop another. Just like multiple transparencies. The layer at the top is the first one that you can see and then the rest are under each other perspectively.
At the left of the layer is a small image of where that layers image resides in the whole image. We need to select the layer which has the first image from the left and be sure it is at the top of the layers list. Place your mouse over the corresponding layers name and click to highlight. Now we are working on that layer and that layer only. Let’s find the first edge from the left and erase it, erase as much as you need to in order for it to blend in well. Once that edge is blended move to the next edge and then select the next layer down on the list and blend it. Continue this until you are finished.

(Be sure that your layers start with the left-most image at the top and the descending layers gradually moving to the right. This makes it so the top/first layer is the first edge from the left and so on. If you need to move a layer simply click and drag the layer up or down.)
Below is the edge half bended using only the eraser.

halfblend.jpg


Once you have the edges blended and doubles or triples of fish erased, you can merge all the visible layers or flatten the image.

From the menu bar select layers-merge visible or flatten image. Now all your layers are merged together into one single layer. At this time you can make any final adjustments, levels, shadows and highlights, unsharp mask, etc…

Finally we can change the image size so it can be posted online or email. Select from the menu bar Image-image size. Change the width to no more than 10 inches and the resolution to 72, click OK. Then you can save the image as a Jpeg and upload.

ftscopy.jpg


The reason I do my FTS’s with multiple images is so that I can get closer to my tank and get more detail as compared to standing way back and taking a single full framed shot.

I know it seems like a lot of work to get one photo, but once you get the hang of it, it will only take about ten minutes to do if that.
 

ACRONUTS

Member
This is a very nice thread! Great Job!
I do have a question though.
I have a Nikon P80. It allows me to measure my white balance. I have been using a white sheet under my radiums. The problem is that it takes out most of the blue from my blue colored corals.
There is no RAW mode from what I can tell.
Would the only way to adjust ( put more blue back in)this is using a photoshop type of software?

Thanks
 

BLAKEJOHN

Active Member
Yes the P80 does not support RAW. Just high and normal quality Jpegs. Your best bet would be to use a quality editing software to remove the color cast instead of trying to put it back.
 

ACRONUTS

Member
That is what I thought. Either way I love this thread I can come back to it once I get a good imaging editing software.
Yes the P80 does not support RAW. Just high and normal quality Jpegs. Your best bet would be to use a quality editing software to remove the color cast instead of trying to put it back.
 
Top