You are using an out of date browser. It may not display this or other websites correctly.
You should upgrade or use an alternative browser.
You should upgrade or use an alternative browser.
Steve's LEDs
- Thread starter goma
- Start date
scastillo813
Member
What settings on the typhoon controller has everyone found to work the best (I'm sure every tank is different)?
I run my whites from around 1730-1930 @45% and my blues from 1900-2130 @50% right now due to some algae growth.
I run my whites from around 1730-1930 @45% and my blues from 1900-2130 @50% right now due to some algae growth.
scastillo813
Member
It seems like every time I run them together for more than 4-5 hours total I get the brown algae on the sand bed.
Mdk16
Member
In my case, I have the stock timer come on about 1/2 hour before the LEDs come on and it shuts off 1/2 after the LEDs go off so the fans are on while the stock timer is on.
Thanks Greg. I didn't even think of using the timers with the typhoon. I followed your lead and plugged the led power unit into the timer along with the moon lights. The timer comes on 3o mins before the program and goes off 30 min after.
Looking forward to my first sunset.
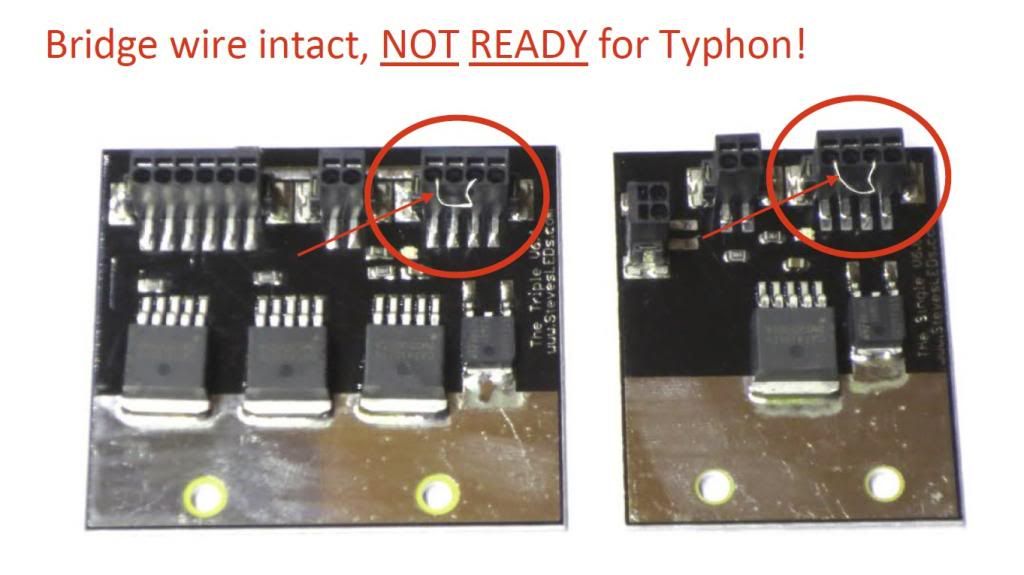
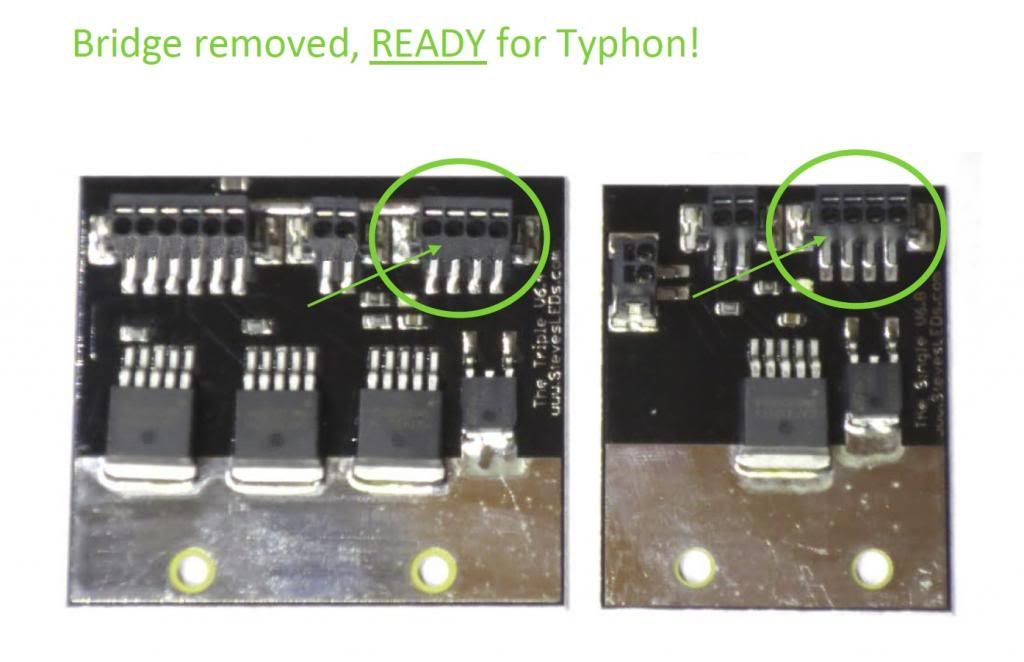
Posting this for clarity, found this on Steve's LEDs site:
Should You Leave The Dimmer Pots Intact?
We highly recommend that you leave the dimmer pots/knobs plugged in while using an aquarium controller. You can replace the dimmer with a solid jumper wire, however, remember that every time you introduce a new coral to your aquarium, you will need to slowly acclimate it every 3 days over the course of 6 weeks to ensure you don’t bleach it. It is easier to significantly easier to increase the brightness every 3 days using the dimmer pot, than to reprogram your aquarium controller every 3 days. PWM will allow dimming throughout the entire range that you set using the dimmer pots.


winschuc
Member
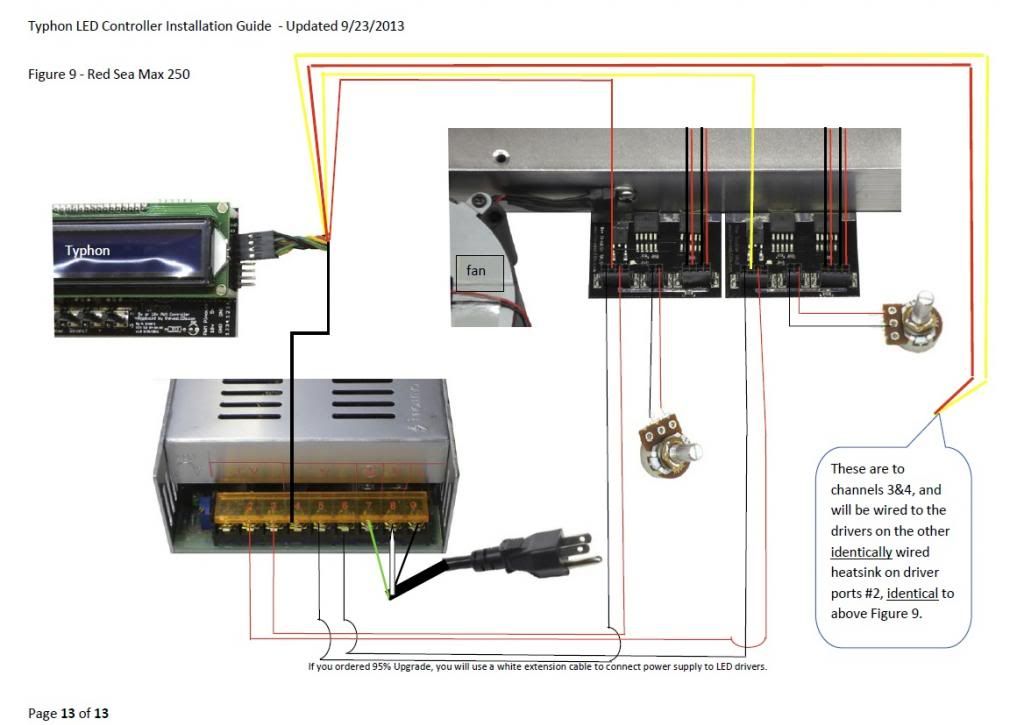
One thing I noticed when wiring mine is that, with the extension cable at least, there Is a green wire that plugs into the - port on one of the channels. In both the instructions and the diagram above it only directs the installer to wore the black to the v- port.
I didn't test this too much to see if it would work with only the black, but I have both green and black running from the negative terminals on the typhon to the v- ports on the power supply.
Figured I'd throw that out there in case someone runs into an issue wiring it up.
I didn't test this too much to see if it would work with only the black, but I have both green and black running from the negative terminals on the typhon to the v- ports on the power supply.
Figured I'd throw that out there in case someone runs into an issue wiring it up.
winschuc
Member
Also, (sorry - my train of thought was broken by an hour or so or work) when using the download sheet, most of the diagrams utilize a power supply with COM ports. It took me a while to figure out that my retro kit (not for a RSM) used the RSM instructions. The diagram that goma posted. It's the last one in the PDF, and the only one using just v+ and v- ports.
Mdk16
Member
I received this from Jeff at Steve's. I have not had an opportunity to trace the wires but thought I would post for future reference.
The RSM650 uses the PARMAX2 Extreme boards, those hold 14 LEDs, with every alternating LED on it's respective channel, so 2 channels total per PARMAX2. You'll find that there are 4 wires coming off each PARMAX2, with the top pair being one channel, and the bottom pair being another channel. That said, each pair will be going to a different driver. If you are able to trace each wire pair, they should be go separate drivers, if they are going to the same driver, that would be the problem.
The wiring should be like this.
Channel 1 - heatsink #1 - all 4 PARMAX2 boards white LEDs only
Channel 2 - heatsink #1 - all 4 PARMAX2 boards blue LEDs only
Channel 3 - heatsink #2 - all 4 PARMAX2 boards white LEDs only
Channel 4 - heatsink #2 - all 4 PARMAX2 boards blue LEDs only
Remember that the color of LED they dim is irreverent and may be the opposite, however, each channel should be dimming all the blues or all of the whites on a single heatsink.
Morning All!
I ordered mine a few days ago and only received a paypal invoice. I have not received any emails or correspondence from Steves Leds regarding receiving payment or shipping dates, is this normal?
This doesn't surprise me, give him another day or two and if you don't hear anything then, send Jeff an email.
Greg -
I sent you a PM. I have the Typhoon Extension Cable and the Typhoon Controller. Everything else I did is great. I just need help on getting the controller. The instructions are NOT helping. I have 6 wires coming out the end of the extension cable one end I know plugs into the Typhoon Controller but what do and where do I put the 2 red, 2 black, and 2 green wires???. Where in the heck do they go???
I am so excited and am annoyed.... And frustrated.
Help me someone!
Landon

scastillo813
Member
That seems like a flaw in the design of the extension cable. They should have made it with 4 red and 4 black wires, so it's less confusing for people.
RSM250 w/ Steve's LEDs
RSM250 w/ Steve's LEDs
+1 ^ Cheers Greg for helping everyone with the great support & always going the extra mile in doing so !
I've been back and forth with Jeff at Steve's LEDs and now we have some clarification.
1. The green wires on the extension cable are not used at all. No need to connect them.
2. Only one of the black wires of the extension cable needs to be connected to the driver port 1. The other black wire does not need to be connected.
He is going to get the installation manual updated and when he does I'll post an updated wiring diagram here.