Johnspierce
New Member
Hi all, just thought I'd document my chiller installation. I know there's quite a few threads about this, but I thought there might be value in describing it from start to finish along with all parts required.
After purchasing my RSM 250, I had no problems in the winter keeping my temperature close to 79f/26c, occasionally running the fans in the daytime when the lights were on. This changed drastically as soon as April arrived and I was running the fans all day long with the lights. If I forgot and left the fans on after the lights turned off, sometimes the temp would get down below 76 and if I forgot to turn them on before going to work the temp would go up to 83-84. Not optimal since it requires so much manual effort to maintain temperature. Because our air is so dry in Denver, ambient room temperature fluctuates quite a lot in a single day.
I keep the room where my tank is around 65 degrees in the winter, up to 79 degrees in the summer. As many of you know, 79 degrees ambient is going to result in at least 83-84 degrees in the tank, sometimes even with the fans on – the RSM pumps / skimmer can add that much heat. I might mention to those who have not read their RSM manual the manufacturer recommends a chiller for anyone who keeps their ambient room temperature above 75f/24c.
My main problem is when I go out of town for a week or so and leave my baby in the care of someone who is quite possibly not as anal as I am about temperature control. I still wonder why RSM didn't include an option for tying the auxiliary fans to the light timer.
But anyway, – it's time for a chiller! After installing my chiller I don't know how I lived without it. The peace of mind and stability are just phenomenal. If you want to mimic my install, here's what you will need:
Okay, let's get started.
First of all, hook up your chiller with your vinyl hoses and your new pump in a bucket or trash can with RO water. This way, you can play with the controls and see how it works in addition to checking your attachments to ensure there are no leaks. Also, these chillers are tested at the factory, but may still have some leftover humidity or water in them so a little flushing with RO is a good precaution. I used zip ties for extra insurance where the hoses are attached, but I'm sure everything will work fine without them.
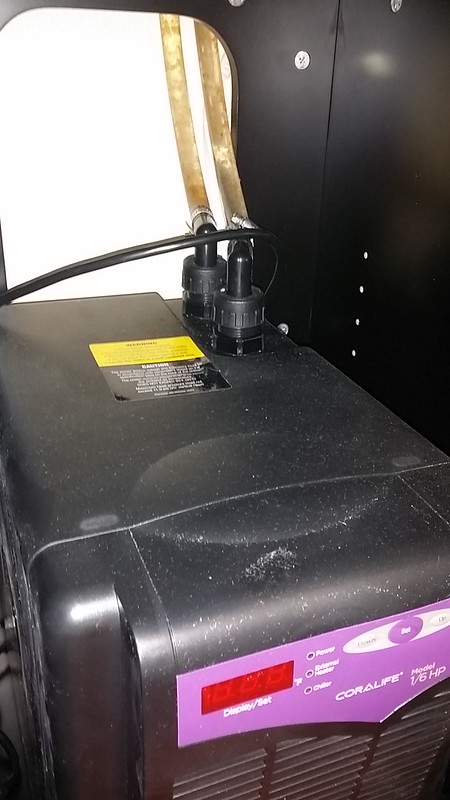
After the flush and test, you are ready to install. I put my chiller inside the RSM stand. With the big oval hole in the back, it seems to be vented well enough for the chiller. Also, since I chose to purchase the ¼ hp model, the chiller doesn't run for very long to get the water back down to optimum temperature – maybe 10 minutes to reduce it from 80 degrees to 79 degrees.
Now – some people run a chiller off the standard pump and some will use the extra pump only to push water to the chiller and still use the standard RSM pump to push water back into the tank. I think using the Eheim 3000 as the solitary right side pump is a better solution since it will then plug into the RSM powerstrip and behave just like the stock pump.
Even though the Eheim 3000 is a 792 gph pump, by the time it pushes water approximately 6 ft. in and out of the chiller, the output feels very similar to the stock RSM pump at the tank nozzle. One note on the Eheim: I have read several posts where people have just removed the grill on the Eheim which makes it a bit easier to slide in and out of the right side chamber. I did this initially, but I found the pump would sometimes suck itself up against the wall of the chamber, restricting the flow into the chiller and also making a bit of a racket. So, I took the pump back out, and put the grill back on. The front circular piece can be popped out which gives you another 1/16” reduction and then the pump with grill on will just barely fit in the chamber. I also used two of the four rubber suction cup feet since all four were not fitting well in the bottom of the chamber. After doing these two things, the pump fits absolutely perfect and is very quiet.
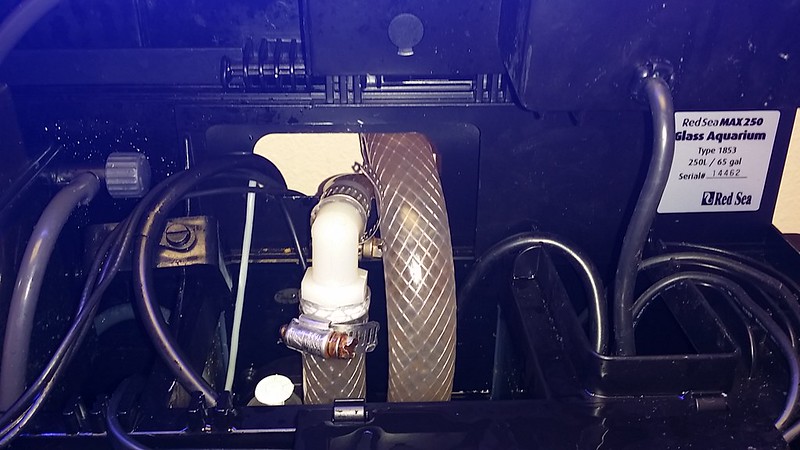
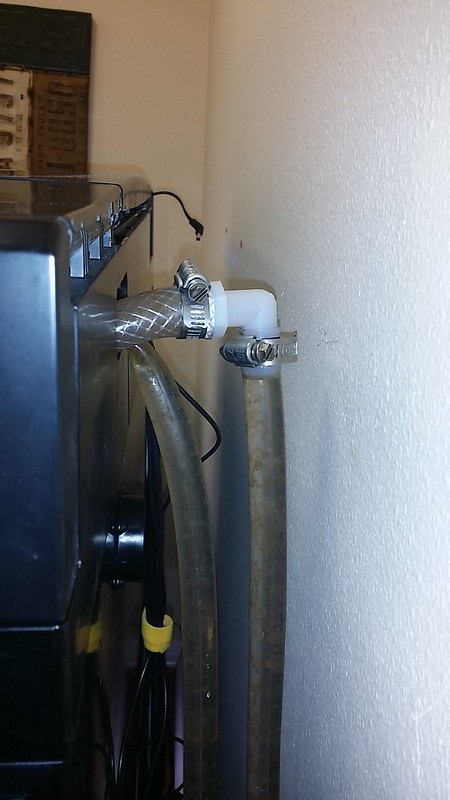
After you have attached the chiller hoses and are now working on the flow back into the tank, you will find a small issue; for some reason, RSM decided to use a 5/8” nipple on the nozzle attachment at the tank wall but have a 1/2” nipple on the chiller accessory nozzle. This is why you will need the 1/2” to 5/8” reducer for your vinyl hose. I used the original pump hose cut down and attached to the insert, then to the 1/2” vinyl tubing into the accessory. As I said above, the flow coming out of the nozzle just using the Eheim seems to be almost the same as with the stock pump.
After the installation, I have not run the RSM accessory fans at all, I have my lights running 8 hours per day and the temperature has been between 79 and 80.1 degrees consistently 24 hours a day. Marvelous! The JBJ Arctica ¼ HP chiller is very quiet and seems to turn on about every two hours when the lights are on with the ambient temp at 79 degrees in the room.
Now I can go out of town this weekend and be assured my little buddies will not see any drastic daily changes in temperature!
Cheers,
John
After purchasing my RSM 250, I had no problems in the winter keeping my temperature close to 79f/26c, occasionally running the fans in the daytime when the lights were on. This changed drastically as soon as April arrived and I was running the fans all day long with the lights. If I forgot and left the fans on after the lights turned off, sometimes the temp would get down below 76 and if I forgot to turn them on before going to work the temp would go up to 83-84. Not optimal since it requires so much manual effort to maintain temperature. Because our air is so dry in Denver, ambient room temperature fluctuates quite a lot in a single day.
I keep the room where my tank is around 65 degrees in the winter, up to 79 degrees in the summer. As many of you know, 79 degrees ambient is going to result in at least 83-84 degrees in the tank, sometimes even with the fans on – the RSM pumps / skimmer can add that much heat. I might mention to those who have not read their RSM manual the manufacturer recommends a chiller for anyone who keeps their ambient room temperature above 75f/24c.
My main problem is when I go out of town for a week or so and leave my baby in the care of someone who is quite possibly not as anal as I am about temperature control. I still wonder why RSM didn't include an option for tying the auxiliary fans to the light timer.
But anyway, – it's time for a chiller! After installing my chiller I don't know how I lived without it. The peace of mind and stability are just phenomenal. If you want to mimic my install, here's what you will need:
- A chiller. Most sites will recommend at least 1/5 hp for the RSM 250, I bought the JBJ Arctica ¼ hp since it was on sale and the bigger your chiller, the less it will have to run.
- Approximately 10 feet of 1/2” flexible vinyl tubing
- A pump to push water into the chiller. I tried several pumps, but the right chamber where it will be installed is very tight. The one you want which is absolutely a perfect fit is the Eheim Compact 3000.
- Zip ties. Not strictly necessary, but good for peace of mind.
- Power strip with surge protector for your chiller since all the slots are being used in the RSM unit.
- 1 1/2” to 5/8” insert reducer coupling.
- RSM chiller accessory kit.
Okay, let's get started.
First of all, hook up your chiller with your vinyl hoses and your new pump in a bucket or trash can with RO water. This way, you can play with the controls and see how it works in addition to checking your attachments to ensure there are no leaks. Also, these chillers are tested at the factory, but may still have some leftover humidity or water in them so a little flushing with RO is a good precaution. I used zip ties for extra insurance where the hoses are attached, but I'm sure everything will work fine without them.
After the flush and test, you are ready to install. I put my chiller inside the RSM stand. With the big oval hole in the back, it seems to be vented well enough for the chiller. Also, since I chose to purchase the ¼ hp model, the chiller doesn't run for very long to get the water back down to optimum temperature – maybe 10 minutes to reduce it from 80 degrees to 79 degrees.
Now – some people run a chiller off the standard pump and some will use the extra pump only to push water to the chiller and still use the standard RSM pump to push water back into the tank. I think using the Eheim 3000 as the solitary right side pump is a better solution since it will then plug into the RSM powerstrip and behave just like the stock pump.
Even though the Eheim 3000 is a 792 gph pump, by the time it pushes water approximately 6 ft. in and out of the chiller, the output feels very similar to the stock RSM pump at the tank nozzle. One note on the Eheim: I have read several posts where people have just removed the grill on the Eheim which makes it a bit easier to slide in and out of the right side chamber. I did this initially, but I found the pump would sometimes suck itself up against the wall of the chamber, restricting the flow into the chiller and also making a bit of a racket. So, I took the pump back out, and put the grill back on. The front circular piece can be popped out which gives you another 1/16” reduction and then the pump with grill on will just barely fit in the chamber. I also used two of the four rubber suction cup feet since all four were not fitting well in the bottom of the chamber. After doing these two things, the pump fits absolutely perfect and is very quiet.
After you have attached the chiller hoses and are now working on the flow back into the tank, you will find a small issue; for some reason, RSM decided to use a 5/8” nipple on the nozzle attachment at the tank wall but have a 1/2” nipple on the chiller accessory nozzle. This is why you will need the 1/2” to 5/8” reducer for your vinyl hose. I used the original pump hose cut down and attached to the insert, then to the 1/2” vinyl tubing into the accessory. As I said above, the flow coming out of the nozzle just using the Eheim seems to be almost the same as with the stock pump.
After the installation, I have not run the RSM accessory fans at all, I have my lights running 8 hours per day and the temperature has been between 79 and 80.1 degrees consistently 24 hours a day. Marvelous! The JBJ Arctica ¼ HP chiller is very quiet and seems to turn on about every two hours when the lights are on with the ambient temp at 79 degrees in the room.
Now I can go out of town this weekend and be assured my little buddies will not see any drastic daily changes in temperature!
Cheers,
John