addict
Well-Known Member
my journey...
Oh, where to begin...
If you've caught any of the past few threads I've started, I first had an inclination to build a frag growout room, and in the process of planning it, decided that I'd rather upgrade our tank.
Well, the plan has just about come together... the planning phase is complete (aside from the finish on the stand and canopy) and almost everything is ordered... our 120 gallon dream is about to come true.
Anyway, for reference, here's a picture of our current reef, a 55g tall aquarium on a 40" stand and with a 14" canopy.
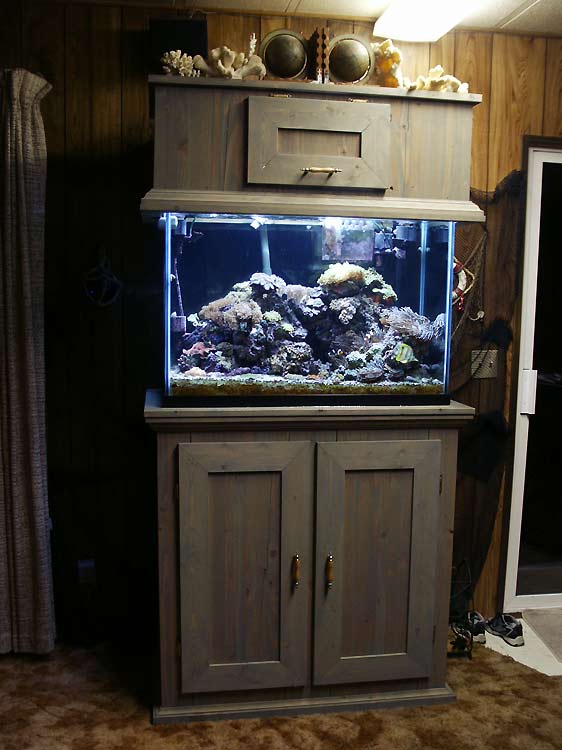
I like the effect it gives being that height off the floor... it's almost like having a picture on the wall since you don't have to stoop to look at it... but the pain is that you really can't sit and view it from up close. I really hate to be tearing it down right when it's starting to come into it's own, but the transition should be painless.
I've always wanted a cube tank. I just think they're cool. Plus it gives you the same depth from all sides to do some creative multi-outcropping reefs. Once I settled on a size, I sent out a few bids to custom tank builders for both glass and acrylic tanks. Out of the several bids sent, the two builders I had narrowed it down to both were excellent. The first bid I received was from Aquarium Obsessed based in Toronto. This was for a 36"x36"x24" tank built with Starphire Glass, but ended up being a little too steep a price of what I was looking for (cost of tank + shipping). Even Will the owner admits that they build 'high-end' tanks, and I believe the tank would have been awesome, though pricey.
The second bid I received was from a company in Beaverton, Oregon, Envision Acrylics. This place has to have the best customer service I've ever experienced. I sent an after-hours e-mail inquiring about having the tank built, and I heard back from the owner almost immediately. We succeeded in exchanging e-mails 4 times that evening, and he answered every question I had about the construction. The fact that he also built Steve Weast's 850g reef kinda helped my decision a little...")
Anyway, here's what we were able to finalize.
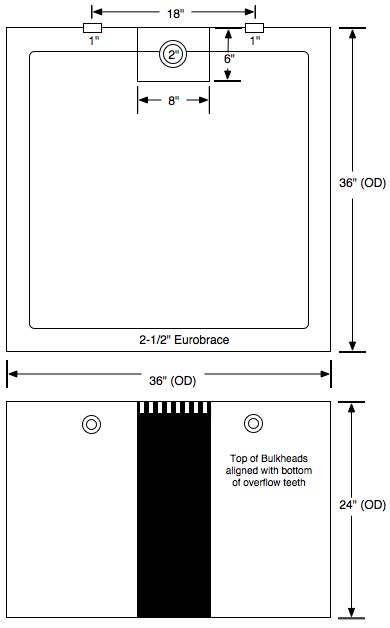
The tank will be made of 3/4" acrylic so I'll only get deflection of about 1/16", and it'll also accomodate the eurobracing. I didn't want a mostly closed acrylic-top tank, since I have a heck of a time keeping the center brace clean on my current tank.
The 2" drain and 1" returns should accommodate flow rates up to around 2700gph through the sump, which I'll probably never need. I plan on using a more reasonable 700gph to start (about 6x recirculation). The rest of the circulation will be made up with 8 MJ-1200 Powerheads.
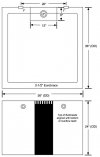
This next picture shows how the tank will be lit. I'll have (2) 250w Ushio 10K Halides and (6) 55w Coralife PC 03 Actinic bulbs. I have both Hellolights and Coralife Actinics over my current tank, and the Coralife's mop the floor with the Hellolights bulb... corals under the Coralife pair of bulbs fluoresce like crazy, so I decided to go with them for all 6.
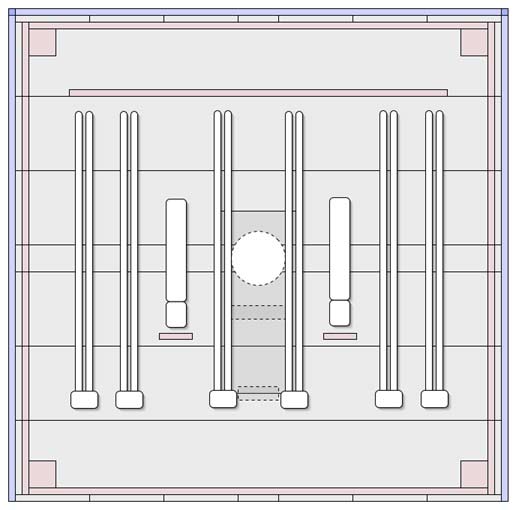
The circle in the center of the canopy is going to be the main vent for the canopy, and a fan box will sit on top of the canopy to pull the air out of it. I also plan on adding an extension to the box that will pipe the hot humid air out a window that sits just to the left of the aquarium (you can see the curtains for it in the reef pic above).
This next picture shows how the sump will be laid out. The sump will be 3/4" plywood painted with white epoxy paint, and inset with 2 glass panels in the refugium portion for viewing. I researched skimmers for days before I settled on the ASM G-3. It's essentially a Euroreef without the high(er) price. From the information I gathered, everyone that has used one has been very pleased with it's performance... it has a huge 11x14 footprint though, which is the dotted-outline in the entry portion of the sump.
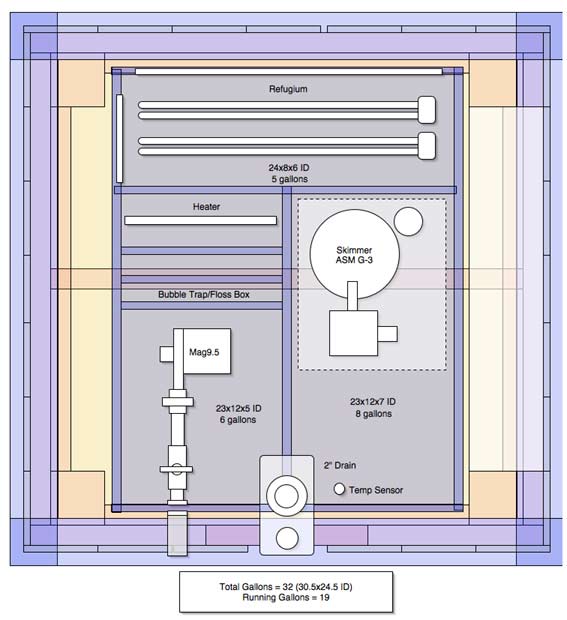
This is a top-down view of the stand. The sump is the purple square box in the center of the diagram. The water will follow a U-shaped path through the sump, starting at the lower right (where the drain will come in) and ending at the pump on the left side, spilling over into each successive compartment (a 1" drop to each).
For the time being, the sump will also travel through the refugium. If I start moving more water through the sump then I may have to rethink the design. There won't be any substrate in the fuge so I think I'll be safe... maybe a few different macroalgae's, and a ton of BTA's that constantly detonate and spread in my current tank (I'm back up to 7 again). The fuge will be lit by 2 Coralife 55w 10,000K Daylight PC Bulbs on a reverse timeline.
This stand will also be shorter than our current stand, since it has to be smaller than our doorway in at least one dimension just to fit through it. The stand will be 32" high... quite a little drop from our current reef's 40" height.
It's going to be a busy month. School started again today, and between that and building this tank I'm going to be stretched pretty thin. I hope to get the tank installed by the third week in March, which is Spring Break up here in my neck of the woods.
Well, that's about it for the first installment. I'm going to try to take plenty of photos as I progress, and make this into kind of a 'making of' thread. The tank should be completed at the end of February and I have a friend picking it up for me and driving it down. The tank builder has also offered to send a few photos as the construction of the tank progresses, so I'll post those as well when I get them.
Well, thanks for making it this far... if you can't tell, I've been dying to tell anyone who'll listen.
Oh, where to begin...
If you've caught any of the past few threads I've started, I first had an inclination to build a frag growout room, and in the process of planning it, decided that I'd rather upgrade our tank.
Well, the plan has just about come together... the planning phase is complete (aside from the finish on the stand and canopy) and almost everything is ordered... our 120 gallon dream is about to come true.
Anyway, for reference, here's a picture of our current reef, a 55g tall aquarium on a 40" stand and with a 14" canopy.
I like the effect it gives being that height off the floor... it's almost like having a picture on the wall since you don't have to stoop to look at it... but the pain is that you really can't sit and view it from up close. I really hate to be tearing it down right when it's starting to come into it's own, but the transition should be painless.
I've always wanted a cube tank. I just think they're cool. Plus it gives you the same depth from all sides to do some creative multi-outcropping reefs. Once I settled on a size, I sent out a few bids to custom tank builders for both glass and acrylic tanks. Out of the several bids sent, the two builders I had narrowed it down to both were excellent. The first bid I received was from Aquarium Obsessed based in Toronto. This was for a 36"x36"x24" tank built with Starphire Glass, but ended up being a little too steep a price of what I was looking for (cost of tank + shipping). Even Will the owner admits that they build 'high-end' tanks, and I believe the tank would have been awesome, though pricey.
The second bid I received was from a company in Beaverton, Oregon, Envision Acrylics. This place has to have the best customer service I've ever experienced. I sent an after-hours e-mail inquiring about having the tank built, and I heard back from the owner almost immediately. We succeeded in exchanging e-mails 4 times that evening, and he answered every question I had about the construction. The fact that he also built Steve Weast's 850g reef kinda helped my decision a little...
Anyway, here's what we were able to finalize.
The tank will be made of 3/4" acrylic so I'll only get deflection of about 1/16", and it'll also accomodate the eurobracing. I didn't want a mostly closed acrylic-top tank, since I have a heck of a time keeping the center brace clean on my current tank.
The 2" drain and 1" returns should accommodate flow rates up to around 2700gph through the sump, which I'll probably never need. I plan on using a more reasonable 700gph to start (about 6x recirculation). The rest of the circulation will be made up with 8 MJ-1200 Powerheads.
This next picture shows how the tank will be lit. I'll have (2) 250w Ushio 10K Halides and (6) 55w Coralife PC 03 Actinic bulbs. I have both Hellolights and Coralife Actinics over my current tank, and the Coralife's mop the floor with the Hellolights bulb... corals under the Coralife pair of bulbs fluoresce like crazy, so I decided to go with them for all 6.
The circle in the center of the canopy is going to be the main vent for the canopy, and a fan box will sit on top of the canopy to pull the air out of it. I also plan on adding an extension to the box that will pipe the hot humid air out a window that sits just to the left of the aquarium (you can see the curtains for it in the reef pic above).
This next picture shows how the sump will be laid out. The sump will be 3/4" plywood painted with white epoxy paint, and inset with 2 glass panels in the refugium portion for viewing. I researched skimmers for days before I settled on the ASM G-3. It's essentially a Euroreef without the high(er) price. From the information I gathered, everyone that has used one has been very pleased with it's performance... it has a huge 11x14 footprint though, which is the dotted-outline in the entry portion of the sump.
This is a top-down view of the stand. The sump is the purple square box in the center of the diagram. The water will follow a U-shaped path through the sump, starting at the lower right (where the drain will come in) and ending at the pump on the left side, spilling over into each successive compartment (a 1" drop to each).
For the time being, the sump will also travel through the refugium. If I start moving more water through the sump then I may have to rethink the design. There won't be any substrate in the fuge so I think I'll be safe... maybe a few different macroalgae's, and a ton of BTA's that constantly detonate and spread in my current tank (I'm back up to 7 again). The fuge will be lit by 2 Coralife 55w 10,000K Daylight PC Bulbs on a reverse timeline.
This stand will also be shorter than our current stand, since it has to be smaller than our doorway in at least one dimension just to fit through it. The stand will be 32" high... quite a little drop from our current reef's 40" height.
It's going to be a busy month. School started again today, and between that and building this tank I'm going to be stretched pretty thin. I hope to get the tank installed by the third week in March, which is Spring Break up here in my neck of the woods.
Well, that's about it for the first installment. I'm going to try to take plenty of photos as I progress, and make this into kind of a 'making of' thread. The tank should be completed at the end of February and I have a friend picking it up for me and driving it down. The tank builder has also offered to send a few photos as the construction of the tank progresses, so I'll post those as well when I get them.
Well, thanks for making it this far... if you can't tell, I've been dying to tell anyone who'll listen.