Well after several years under a DIY LED array I decided it was time to upgrade my office NanoCube 12g to a more modern LED unit. The existing one I have re-done a few times (replacing switches, fans, etc) and finally when the blues went out this time I decided I'd start searching for an easy to install, high output, dimmable and most importantly cost effective solution.
I read MANY threads, articles and reviews over the last couple of months and talked to many sources and decided to try out the product from Steves LED Home Page
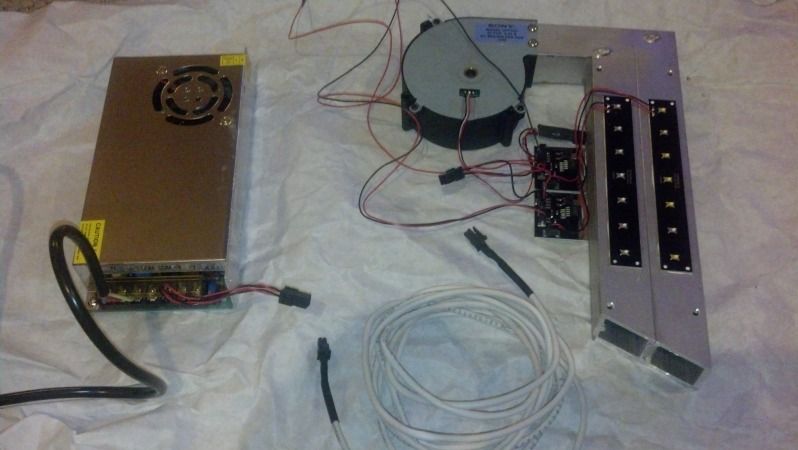
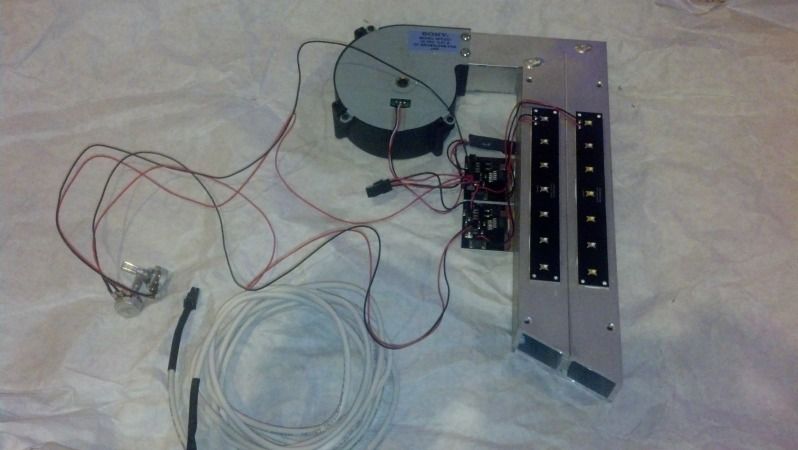
Here’s the kit I ordered
Nano Cube 12 Gallon LED retrofit kit

First I gotta give the gang at StevesLED some high remarks for bearing with me through all the questions and suggestions over the last couple of weeks. Every email was answered in less than 12 hours with most being answered in less than 2. I respect that because I know sometimes it's hard to make time for that type of interaction during a busy day. Job well done.
After looking through their website I decided I wanted to go with their standard NanoCube12 drop in system (I didn't change a single LED after I talked with Jeff at Steves) but I wanted to upgrade to the 95% system (no soldering etc). It was a small up-charge and even though I have the equipment and I'm more than capable of doing the assembly I don't have the time or desire to do so. I gladly paid the fee and got an email with expected ship date within an hour or so. I was tickled.
Upon arrival (very timely BTW) I was shocked at how compact the delivery box. At first I thought, "Maybe there is another box coming separately" but I soon found out that everything was included in the one box it's just packed very well. Each item individually wrapped and they included some very sharp looking business cards and decals. Very nice touch (I try to do the same thing).
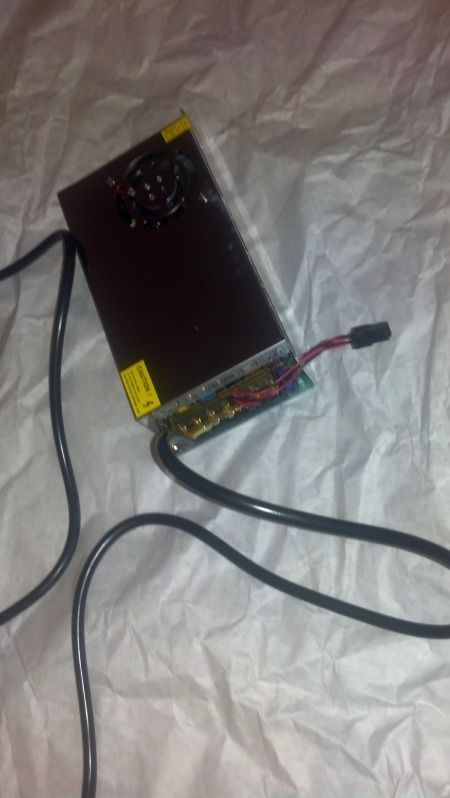
I un-wrapped the items and it was apparent that little was left to do except put the goodies into the hood. I couldn't resist at least firing them up right then on my desk just to make sure they worked (like I doubted it LOL). I plugged the power supply into the wall, plugged the connection cord into the power supply, and then plugged the connection cord into the LED array. Woa! Very nice... they all fired immediately and I tinkered with the dimmers (1x blue, 1x white) until I was satisfied everything was good. I hauled the new StevesLED array and the hood from my NC12 home so I could work on it and relax at the same time (NC12 is in my office).
It literally took me longer to take the splash shield off the hood than it did to install the StevesLED into my hood. I did have to remove the DIY unit from my hood which only took a few minutes. Because I already had LED in the hood my holes for the dimmers etc were already in place. I just slide the new dimmer knobs into place and then applied the nuts to lock them down. Here’s how the install went down:
Tear Down
Upon getting home I removed the splash shield, dimmer switches, fans, and LED array from the hood. I soaked the splash shield in hot soapy water (salt creep) and gave the hood an over-all cleaning. I then carefully wrapped the old DIY LED in a neat little bundle because I’m going to offer it for sale (cheap).
Pre-Install
I downloaded the instructions for installation (StevesLED is working on their website and will be releasing more specific instructions in the very near future per Jeff at StevesLED) and laid everything out nice and neat on the floor in front of me. I had my tools needed (not many) and had everything all within reach. I put the laptop in front of me so I could review the instructions. Amazingly I had to skip over several (I mean a LOT) steps because I went with the 95% kit.
Install
Currently I have the lights set around 50% (just a guess) and plan to slowly ramp them up over the next few weeks as to not photo-shock my coral (my DIY unit had the blues out for about 3 months.. I was lazy about taking it apart to fix).
Here is how I rate this product:
Ease of Use – A+
I don’t think it could get any easier unless they come to my office and install it for me
Quality of Components – A
once longer screws are used I would give it A+
Price – A+
I got a great kit for about ½ what the full DIY cost me about 5 years ago
Customer Service – A+
I don’t think there was anything I needed or asked about that wasn’t completely covered in our communications back and forth
Delivery Time – A+
Shipped very fast and arrived in just a couple of days
Really this is the best LED upgrade I’ve had the pleasure of using thus far. It was nice that this was specific to my tank and they utilized the factory mounting tabs greatly reducing the install time and making for a VERY neat and tidy install.
If you’ve not looked into a StevesLED unit at least give it a look. You might be looking at your next LED system for your tank.
As time goes on I’ll write some more about this unit once I’ve used it for a while. For now I’m going to be fragging some SPS this weekend to transfer into this tank. We’ll see how it looks in a few months time.
I'll post pics up here in a few minutes showing my "work" in progress LOL!
I read MANY threads, articles and reviews over the last couple of months and talked to many sources and decided to try out the product from Steves LED Home Page
Here’s the kit I ordered
Nano Cube 12 Gallon LED retrofit kit
First I gotta give the gang at StevesLED some high remarks for bearing with me through all the questions and suggestions over the last couple of weeks. Every email was answered in less than 12 hours with most being answered in less than 2. I respect that because I know sometimes it's hard to make time for that type of interaction during a busy day. Job well done.
After looking through their website I decided I wanted to go with their standard NanoCube12 drop in system (I didn't change a single LED after I talked with Jeff at Steves) but I wanted to upgrade to the 95% system (no soldering etc). It was a small up-charge and even though I have the equipment and I'm more than capable of doing the assembly I don't have the time or desire to do so. I gladly paid the fee and got an email with expected ship date within an hour or so. I was tickled.
Upon arrival (very timely BTW) I was shocked at how compact the delivery box. At first I thought, "Maybe there is another box coming separately" but I soon found out that everything was included in the one box it's just packed very well. Each item individually wrapped and they included some very sharp looking business cards and decals. Very nice touch (I try to do the same thing).
I un-wrapped the items and it was apparent that little was left to do except put the goodies into the hood. I couldn't resist at least firing them up right then on my desk just to make sure they worked (like I doubted it LOL). I plugged the power supply into the wall, plugged the connection cord into the power supply, and then plugged the connection cord into the LED array. Woa! Very nice... they all fired immediately and I tinkered with the dimmers (1x blue, 1x white) until I was satisfied everything was good. I hauled the new StevesLED array and the hood from my NC12 home so I could work on it and relax at the same time (NC12 is in my office).
It literally took me longer to take the splash shield off the hood than it did to install the StevesLED into my hood. I did have to remove the DIY unit from my hood which only took a few minutes. Because I already had LED in the hood my holes for the dimmers etc were already in place. I just slide the new dimmer knobs into place and then applied the nuts to lock them down. Here’s how the install went down:
Tear Down
Upon getting home I removed the splash shield, dimmer switches, fans, and LED array from the hood. I soaked the splash shield in hot soapy water (salt creep) and gave the hood an over-all cleaning. I then carefully wrapped the old DIY LED in a neat little bundle because I’m going to offer it for sale (cheap).
Pre-Install
I downloaded the instructions for installation (StevesLED is working on their website and will be releasing more specific instructions in the very near future per Jeff at StevesLED) and laid everything out nice and neat on the floor in front of me. I had my tools needed (not many) and had everything all within reach. I put the laptop in front of me so I could review the instructions. Amazingly I had to skip over several (I mean a LOT) steps because I went with the 95% kit.
Install
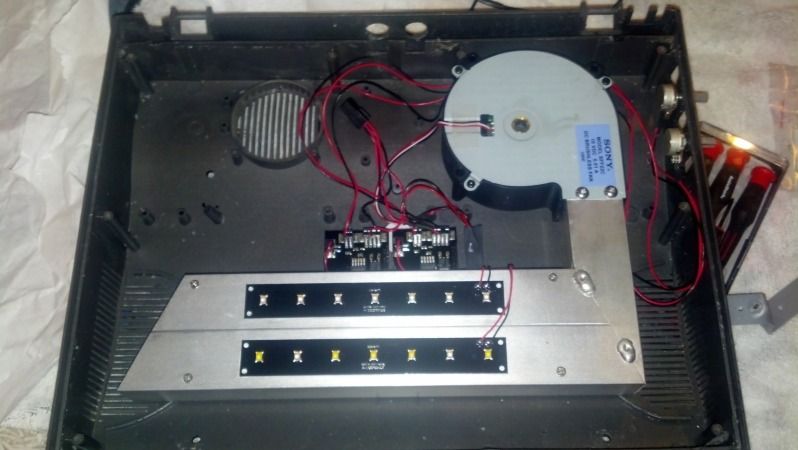
- A) I skipped down the instructions to “attach LED to hood with 4 screws” and thought it couldn’t be that simple but fact of the matter it was that simple. The heatsink is predrilled in the exact location where the factory mounting posts are in the hood. The heatsink literally fell into place (screw holes are counter sunk on both sides which made the heatsink almost self aligning) and I dropped a screw (supplied in the kit in their own sealed bag) in each hole and tightened them. 2 of the 4 screws took hold and tightened down without incident. 2 of them (farthest back in the hood if I remember correctly) barely touched the mounting posts and wouldn’t get a good bite. I used an old trick from days past and took one of the screws…put a drop of Super Glue (Slow set Gel) into the post and repeatedly ran the screw in and out slowly forming new material but NOT letting the glue secure the screw. As the glue set up it created the threads in the post that the screw would later “Bite” into. This added maybe a total of 5 minutes to the assembly. Once the glue was hardened (screw NOT glued into place) I was able to re-install the screws and tighten them down snug in the posts. I contacted StevesLED about this and they are going to try and source out some ever so slightly longer screws.
- B) Then I routed the connection cord through the opening in the back of the hood and connected it to the LED circuit board (simple push connector).
- C) Next I installed each dimmer into a hole in the side of the hood. Keep in mind the holes were already there because I was replacing an LED array that also had a pair of dimmers identical to the ones in this kit.
- D) I replaced the splash shield and tightened ALL the screws until snug (do NOT over tighten these as it’s not needed and will strip out the threads or bust the mounting post if you do).
- E) I connected the other end of the connection cord to the plug on the power supply (another simple quick connector)
- F) Plugged the power supply into the wall outlet and watched my whole living room GLOW like a space ship.
- That was it. All that was left was to take the hood to work and snap it back onto the tank. I routed the “Connection Cord” down through the wire/cord grommet on my desk and placed the power supply under my desk in the same location the original was sitting. I plugged the power cord into my timer and we were GLOWING!
Currently I have the lights set around 50% (just a guess) and plan to slowly ramp them up over the next few weeks as to not photo-shock my coral (my DIY unit had the blues out for about 3 months.. I was lazy about taking it apart to fix).
Here is how I rate this product:
Ease of Use – A+
I don’t think it could get any easier unless they come to my office and install it for me
Quality of Components – A
once longer screws are used I would give it A+
Price – A+
I got a great kit for about ½ what the full DIY cost me about 5 years ago
Customer Service – A+
I don’t think there was anything I needed or asked about that wasn’t completely covered in our communications back and forth
Delivery Time – A+
Shipped very fast and arrived in just a couple of days
Really this is the best LED upgrade I’ve had the pleasure of using thus far. It was nice that this was specific to my tank and they utilized the factory mounting tabs greatly reducing the install time and making for a VERY neat and tidy install.
If you’ve not looked into a StevesLED unit at least give it a look. You might be looking at your next LED system for your tank.
As time goes on I’ll write some more about this unit once I’ve used it for a while. For now I’m going to be fragging some SPS this weekend to transfer into this tank. We’ll see how it looks in a few months time.
I'll post pics up here in a few minutes showing my "work" in progress LOL!