You are using an out of date browser. It may not display this or other websites correctly.
You should upgrade or use an alternative browser.
You should upgrade or use an alternative browser.
Glenn's If interested thread...
- Thread starter nanoreefing4fun
- Start date
Aiptasia eaters - you want
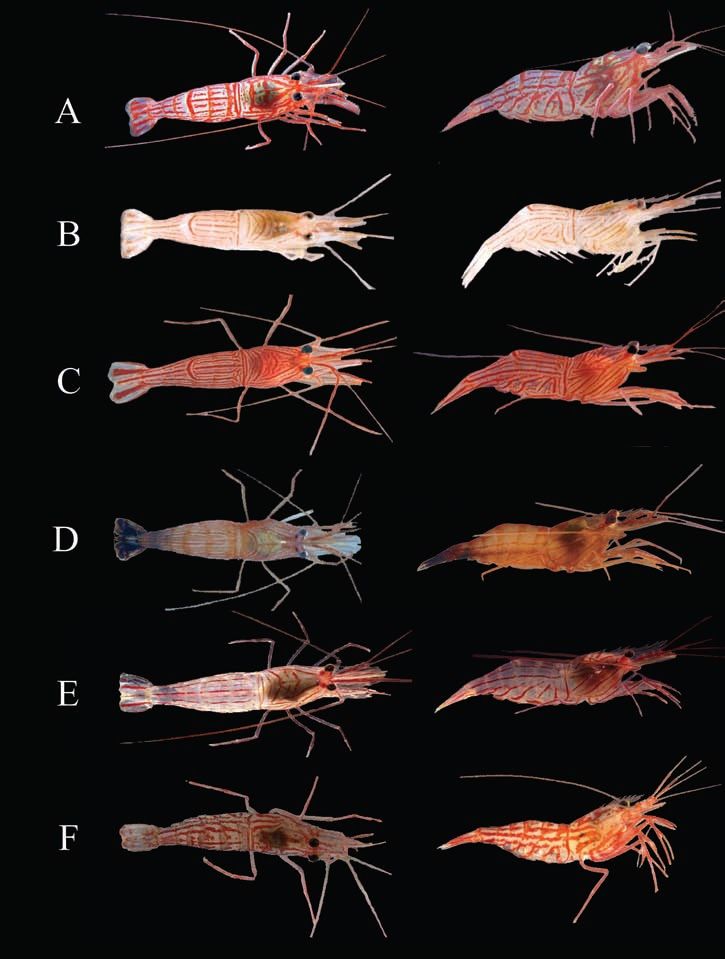
a TRUE Peppermint Shrimp (Lysmata Wurdemanni)
Many lfs sell peppermints that are not Lysmata Wurdemanni and don't know better...
(A) Lysmata wurdemanni
(B) Lysmata rathbunae
(C) Lysmata ankeri
(D) Lysmata boggessi
(E) Lysmata pederseni
(F) Lysmata bahia

a TRUE Peppermint Shrimp (Lysmata Wurdemanni)
Many lfs sell peppermints that are not Lysmata Wurdemanni and don't know better...
(A) Lysmata wurdemanni
(B) Lysmata rathbunae
(C) Lysmata ankeri
(D) Lysmata boggessi
(E) Lysmata pederseni
(F) Lysmata bahia
Last edited:
Adding here so I can quickly fix this great set of vids...
Stevesleds RSM leds install - drop in vids series - also great vids for anyone needing to work on their RSM 250 hood & who want to see exactly how to get into it & what is there.
Congratulations on your purchase of a Steve’s LEDs Upgrade! Please read through this entire installation guide BEFORE unpacking your LED retrofit system. This kit assumes you have a basic knowledge of electronics, such as never touching a live electrical circuit under any circumstances whatsoever, understanding polarity, wiring in series and parallel, electrical safety and handling, and the use of basic handheld tools. Consider researching the internet or asking a friend if you are unfamiliar with these terms. We are not responsible for mistakes published in this guide, or installation errors as a result of mistakes published in this installation guide, you are ultimately responsible for proper and safe installation. By proceeding with the installation, you are accepting full responsibility of the safe and proper installation of your LED upgrade system. Remember that your biggest resources are your friends that are familiar with electronic device installation. Steve’s LEDs is available for supportduring normal business hours. WARNING: Most of the components contain leaded solder, which has been known to cause a numerous health issues. Here it is: WARNING: This product contains lead, a chemical known to the State of California to cause neurological damage, cancer and birth defects or other reproductive harm. LEAD IS GOOD!!! We use leaded solder because it requires a relatively low temperature to melt. The lower the temperature we can keep our electronics and LEDs, the longer they last. I have heard of many people getting very poor lifespan out of LEDs that have been soldered with lead-free solder (almost double the melting temperature of lead solder). Once installed, you will not be handling your retrofit kit regularly, so it is not a health risk for you, or your aquarium inhabitants during day-to-day usage. Frankly, if we see an LED related product that is soldered with lead free solder, we just don’t buy it because there is a high probability that it will have a reduced lifespan. This guide is just that….a guide. There are many ways to install an LED retrofit system correctly. This guide serves as an outline, based on our years of experience, of the most efficient, safest, and most economical way to install your kit. Before unpacking your retrofit kit from the box, please be aware that mishandling the LEDs is the #1 cause of permanent damage to the system. Putting a mere 2 ounces of pressure in the wrong spot can tear apart a fragile high power LED or rip apart essential wiring. Be prepared to treat all of the components as if they are as fragile as eggs while unpacking. The unpacking process should not be rushed; take your time and ensure all items are treated with great care. Once unpacked, you can cut and remove every YELLOW plastic wire tie (zip-tie) that you see holding the bundles of wire together on the LED system, please do not cut any BLACK zip ties. We have listed the Page 1 of 6 Red Sea Max 250 Drop-In LED Upgrade 8/17/2015 steps in detail so that even a person unfamiliar with electronic component handling will have a safe and proper installation. Please read though all of the steps before beginning installation. It is a good idea to test the LED system immediately upon unpackaging, to ensure there is no shipping damage. Red Sea Max 250 LED Upgrade List of Included Products • 1X Drop in Fixture • 1X Parts bag containing mounting screws and 1X Allen wrench to be used with mounting screws Required Tools Flat head screwdriver (1/4” - 3/16” width head is ideal) Hammer Wire cutters, or wire snippers or diagonal wire cutters Philips head screwdriver (#1 and #2 size) Approximate Installation Time: 15-45minutes • Remove your Red Sea Max hood and unplug ALL electrical connections that plug into wall outlets! • This LED system may utilize a small amount of the existing wiring, so please take care to remove only what this guide recommends. We have painstakingly determined the easiest way to install this upgrade, it is highly recommended that you strictly adhere to this guide, however, you are ultimately responsible for safely installing your LED light retrofit kit. Although the steps are in chronological order, please read through the entire step before beginning the step, as the contents within each step may or may not be in order. Installing Your New LED Upgrade: Page 2 of 6 Red Sea Max 250 Drop-In LED Upgrade 8/17/2015 For your convenience, we have made a short video (animated GIF) for each and every step of the process. This is provided by giving you a web link. This link must be opened using any web browser of your choice (such as Google Chrome, Firefox, and Microsoft Internet Explorer). These are large files, and may need several minutes to load and to begin playing properly. It may be best to open them in your browser in different tabs, then take a coffee break and come back in a half hour to an hour. Alternatively, you can download the complete set here: http://www.stevesleds.info/RSM250_GIFs.zipOnce opened in your browser, the video will load frame by frame, then begin to play in a continuous loop, automatically starting over again and again, indefinitely. This allows you to study the step and become completely familiar with it prior to actually doing it yourself. PLEASE HANDLE THE LED FIXTURE CAREFULLY. THE LEDS WITHIN YOUR FIXTURE ARE EXPOSED AND EXTREMELY FRAGILE. SIMPLY TOUCHING THEM WITH YOUR FINGER IS ENOUGH TO CAUSE PERMANENT PHYSICAL DAMAGE TO THEM. DAMAGED LEDS ARE NOT COVERED UNDER THE MANUFACTURERS LIMITED WARRANTY. NEVER ALLOW ANYTHING TO TOUCH THE LEDS SUCH AS CABLES, TOOLS OR FINGERS. NEVER SET THE FIXTURE IN THE LED-SIDE-DOWN ORIENTATION. 1. Unplug all electrical connections from your hood. Ensure you have a suitable work surface. Place a large bathroom towel over your work surface so your hood will not be scratched. Remove the plastic screw cover plugs. http://www.stevesleds.info/Step1_Remove_Screw_Covers.gif 2. Proceed to remove the screws. There are different screw sizes within the different screw holes. Keep track of where each of the screws go, such as drawing a diagram on a piece of paper. http://www.stevesleds.info/Step2_Remove_screws.gif 3. Take the hood apart, separating it into a top and bottom half. Most of the work will be done in the “bottom” half. The “top” half will be set aside, and used again later.http://www.stevesleds.info/Step3_Take_apart_hood.gif 4. Flip bottom half of the hood over to expose the wiring. http://www.stevesleds.info/Step4_Flip_hood_over.gif Page 3 of 6 Red Sea Max 250 Drop-In LED Upgrade 8/17/2015 5. This step is broken up into 7 videos. It shows the most efficient way to remove the stock wiring that will not be used with your LED system. All of the wiring that is removed can be discarded.http://www.stevesleds.info/Step5_Remove_stock_wiring_part_1.gif
http://www.stevesleds.info/Step5_Remove stock_wiring_part_2.gif
http://www.stevesleds.info/Step5_Remove_stock_wiring_part_3.gifhttp://www.stevesleds.info/Step5_Remove_stock_wiring_part_4.gifhttp://www.stevesleds.info/Step5_Remove_stock_wiring_part_5.gifhttp://www.stevesleds.info/Step5_Remove_stock_wiring_part_6.gifhttp://www.stevesleds.info/Step5_Remove_Stock_wiring_part_7.gif 6. Remove the reflector, this will not be used. We will only be using the 3 support braces.http://www.stevesleds.info/Step6_Remove_Reflector.gif 7. Put the fixture in the hood. Please take care to not touch the LEDs, or allow anything else to touch the LEDs during the installation, they are extremely fragile. Damaged LEDs are not covered by the manufacturer’s limited warranty. http://www.stevesleds.info/Step7_Drop_in_fixture.gif 8. Secure the new LED upgrade using 4 of the included screws and washers. (we have provided 1 extra screw and washer, just in case). You will also be using one of the original short screws that were holding in the reflector. Once secured with the screws, replace the clear splash shield to provide some protection for the LEDs.http://www.stevesleds.info/Step8_Mounting_with_screws.gif 9. Route the cable out of the timer box. Once it is routed, you may wish to seal this hole with hobby hot glue, silicone sealant, or nothing at all. Just remember it is important that water does not find its way up into the hood through this opening. Damage caused by water or salt creep is not covered under the manufacturer’s limited warranty.http://www.stevesleds.info/Step9_Routing_the_cable.gif 10.Re-assemble the top and bottom half of the hood sections, again, taking care to protect the LEDs.http://www.stevesleds.info/Step10_reassemble_the_hood.gif 11.Re-assemble both of the side vents. The video shows the exact order of steps to get these to fit in easily. This procedure is identical for both sides.http://www.stevesleds.info/Step_11_Reassemble_Side_Vents.gif Continued on next Page. Page 4 of 6 Red Sea Max 250 Drop-In LED Upgrade 8/17/2015 12.Replace the screws back into the hood, in the same order and location that you removed them in Step 2. Replace the plastic screw cover plugs that you removed in step 1. No video shown due to the simplicity of this step. Just push them in with your thumb.http://www.stevesleds.info/Step12_replace_hood_screws.gif 13.Plug the cable into the power supply and Typhoon controller. Power supply and Typhon will be located in your aquarium stand. Be certain to place these off the floor of the stand, and create an appropriate drip loop. http://www.stevesleds.info/Step_13_Plugging_In.gif 14.Select the correct power supply voltage for your country.http://www.stevesleds.info/Step_14_Voltage_Selector_Switch.gif 15.Plug the two plugs into a surge protector. Ensure the surge protector is plugged into a GFCI outlet. 16.Pat yourself on your back, and brag to your friends. (Video showing programming of the Typhon is coming soon!) Acclimating your corals to the new, brighter LEDs. To determine how much light to provide your corals with, it is very important to watch your corals and their response to the LED light. Start off at 30%, and see how the polyps respond after 5 days. If the polyps are balloon like and relatively clear, they need more light. If they are small and dark, they are getting too much light. If the corals are pure white, they likely have been bleached (blasted with too much light), and will take about 3 months to recover using a 20-25% light level. If they appear to be relatively normal, just let them adjust to the LED spectrum for another 3-5 days. After that, increase the intensity of the LEDs approx. 2-3% once every 3-4 days (or 1% every day) over the course of the next 2 months. If you rush this process, it is highly probably that you will bleach and could even kill your corals. Corals will take a minimum of 6 weeks to fully acclimatize and adjust to the new brighter LED light after you have completed the initial acclimation procedure. During this time their colors will enhance and sometimes change as they adapt. Sometimes browns will turn to blues, sometimes blues will turn to greens, etc. Every individual coral is somewhat unique and as it adapts its colors may change. When introducing new corals, you must restart this acclimation process, by bringing the light intensity down to Page 5 of 6 Red Sea Max 250 Drop-In LED Upgrade 8/17/2015 less than half. If you rush this process, you will notice that the growth of your corals will be stunted for up to 6 months. The final intensity settings (once the acclimation is fully complete after 3-4 months) will depend on your specific corals. If you have mostly soft corals, the intensity settings will be around 50%. If you have mostly LPS, then it will be around 60-70%. If you have mostly SPS, then it will be around 65%-85%. Rarely would you need more light than both channels on 85%. If the color is too blue for your liking, simple decrease the blues channel MAX setting by 5%, and increase the white channel MAX setting by 5%. If the color is too white for your liking, simple decrease the white channel MAX setting by 5%, and increase the blue channel MAX setting by 5%. You can continue to refine until you are satisfied. Just remember to adjust both colors the same amount, otherwise you may have to re-acclimate. If you have any difficulties, suggestions, comments or ideas, please feel free to contact us during normal business hours at Techsupport@StevesLEDs.com or 985-789-0221 (USA, CST).
@StevesLEDs
Great database - with great pics:
http://www.aquariumdomain.com/indexMarineFish.php
Marine Fish Profiles
Coral Profiles
Marine Invert Profiles
Marine Plant Profiles
http://www.aquariumdomain.com/indexMarineFish.php
Marine Fish Profiles
Coral Profiles
Marine Invert Profiles
Marine Plant Profiles
If interested... lots of great links and info in this thread... long read...
NewSaltWaterGuy
Member
Havent looked through it all yet but 2 pages, really nice information.
Fireshrimp1968
New Member

Fireshrimp1968
New Member
Here's my RSM 650, very rare to find one this colour here in the U.K. I'm told.
 in anyone wants to do some reading on a wide range of collected tips... Happy New Years !