Building a refugium

tbittner

Well-Known Member
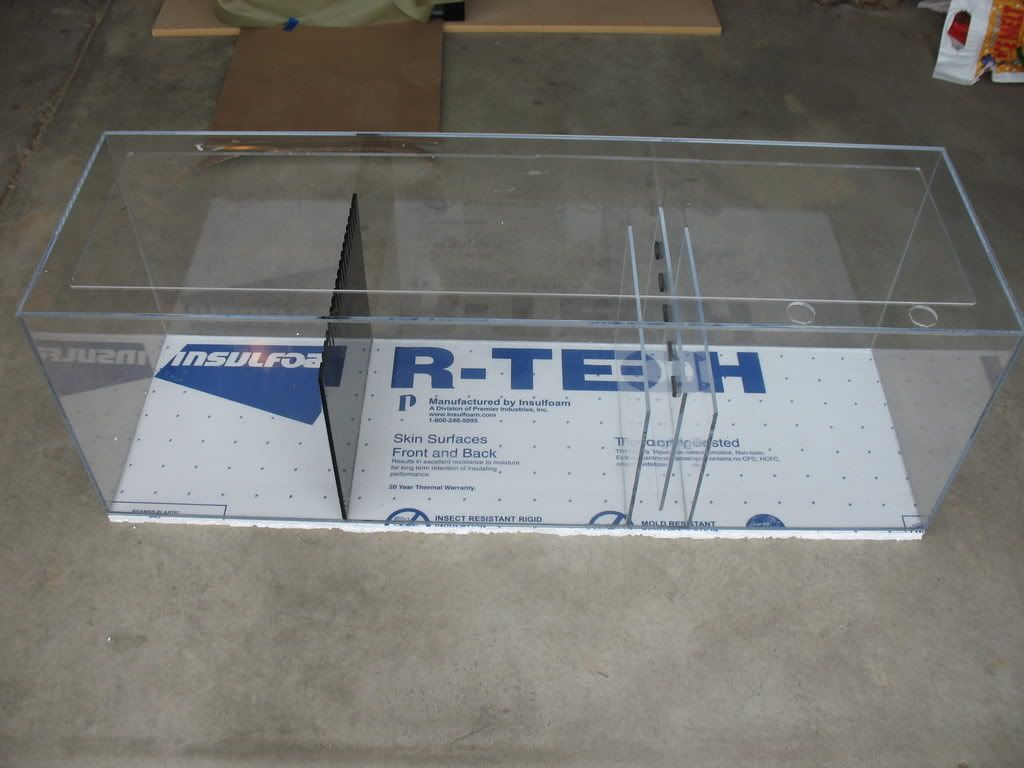
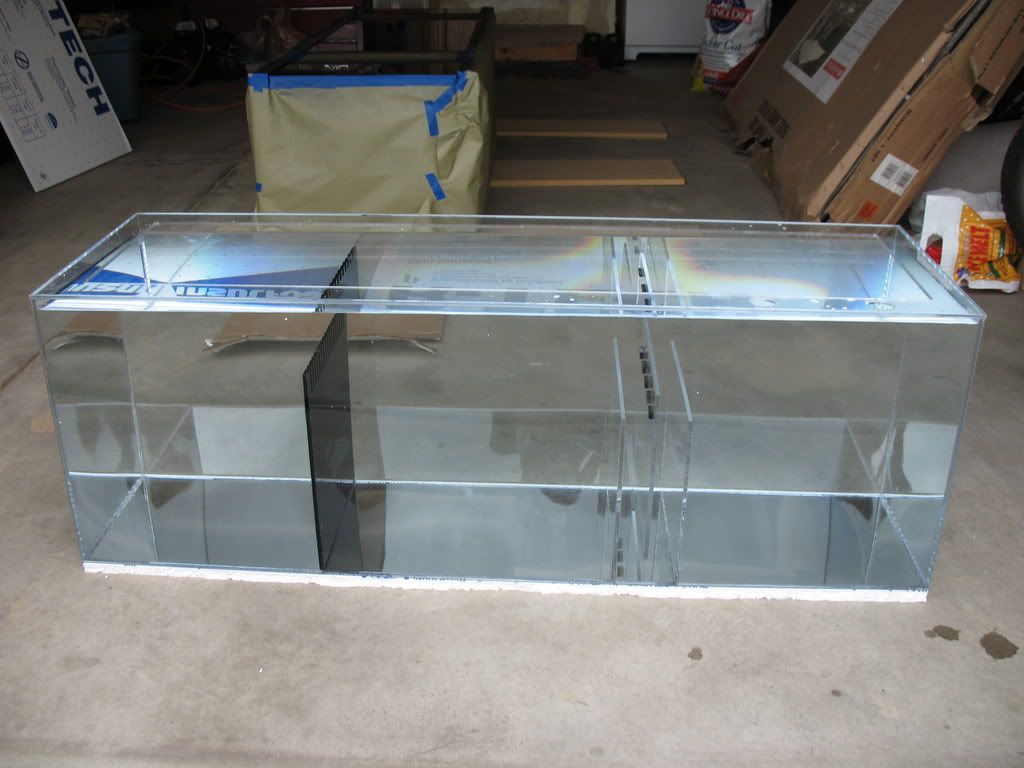
Ok, here is the delema. My stand for my 120g aquarium is poorly designed and I can't get anything bigger then a 20H aquarium under there. My idea is to build a refugium under there, 49 gallon. I ordered in Melt On #4 since I'm using plexiglass and not cast acrylic because I need the pieces to give slightly when I'm placing them into the stand.

I bought sylicone sealant/adheseive from PetCo and I'll add a seam of that to the pieces after I have them "welded" together.

For now, my aquarium is fish only with some artificial rock and a lot of live sand. Eventually I want to convert it into a reef tank. In fact, I'm setting up my 55g aquarium in the basement to cycle the LR in. Eventually the 55g will become my isolation tank.

Anyway, does anyone see any issues with using Plexiglass for a refugium? I bought 24 x 48 sheets of it at Lowes and I have the bottom and two sides cut out and ready to go. Melt on should be here tomorrow. I'll be practicing on spare pieces for a while first. :lol:
 

lcstorc

Well-Known Member
I see no problem whatsoever. Pretty much if it holds water it can be used for a sump or refugium. Are you building a combo sump/refugium? If so you need to plan it out first. There are a number of good plans in the DIY forum or at melevsreef.com .
 

sasquatch

Brunt of all Jokes~
PREMIUM
is melt on#4 the same as weld on #4?, how thick is the acrylic? 49 gal capacity is pretty big, thats 400 lbs of water = considerable pressure, an in place construction is possible but risky. Steve
 

Kirblit

Active Member
I used weld on #4 to make my sump, I made it out of 1/4 acrylic and put a euro brace on top, even full to capacity it doesn't bow at all. Acrylic is very strong and surprisingly easy to work with, it just takes patience.


Here is the sump I made: :)

IMG_1990.jpg


IMG_1994.jpg


48x15x16 and has 10" baffles and a 12" baffle on the fuge which is the left compartment in the photos. The sump holds about 47 gallons completely full but operates at about 28-30 gallons. Hope this helps, oh and you probobly don't need the silicone on the inside, mine didn't leak, just make sure you get the seams bubble free. Silicone doesn't really stick to acrylic very well, if you have a leak you will want to use Weld on #16, it's thicker.
 

Frankie

Well-Known Member
RS STAFF
Great job Kirblit! I hope it holds long term for you. Weld on #4 worked great for me also. I have had this sump running for about a year now with no troubles.
 

tbittner

Well-Known Member
Yes, sorry, I meant Weld On #4. And yes Steve, I'm more then a little concerned with building it in place but I don't have a whole lot of choice. It's either that or use a 20H tank and gluing in baffles. I would prefer a larger refugium for my 120 and my wife is insistant on it NOT being out where it can be seen. :lol:

Anyway, the Weld On should be here tomorrow (it's 10:45 pm here now) and I'll be practicing with it quite a bit before I try the REAL thing. And even after it's built, it will be loaded up very slowly. Not sure WHAT I would do if it collapsed with 20 gallons in it though, I'd probably have to move or my wife would hasten my demise. :lol:

I'm going to check out those DIY plans before I start building it for real. The only thing I did so far was cut out the bottom and two long sides. I wanted to wait on the other pieces until I get those "welded" into place so I could remeasure everything. I did read an article where the person recommended routing the edges to make them fit into each other but from what I read about Weld On, it kind of defeats the purpose, I'm thinking that the large surface area at the contact point would be better. Smooth clean edge laying on top of a smooth clean surface.
 

sasquatch

Brunt of all Jokes~
PREMIUM
If your worried about leaks and blown seams, a suggestion, get a plastic shop to cut you some 3/8 x 3/8 strips, use the weld on sparingly to attach sheets, run a bead of #4 and use the 3/8 strips in the corners to lock it up, hope that makes sense. Steve
 

Kirblit

Active Member
Building it under an existing stand will be difficult. Use the pins method to build the sump, make sure you use the shims as you wont be able to put much weigt on top because it's in the stand already. The most important part about using the Weldon is to get out all the air bubbles in the seams. This is best accomplished with the use of shims and weight. What kind of stand do you have? It may be easier to just cut out a door in one of the sides to slide the sump in. Depending on how the stand is built the "skin" of the stand may not make up much of the structual integrity anyway so you could just cut out a hole for a door of your own that would accomidate you to get the sump in. Even if it is part of the structual support you could add to it to make it strong enough to support the full tank. Just throwing some ideas out there for you. If you have a leak, or have to service the sump in anyway it's going to be very hard to work on when it's in the stand. Check out Melevsreef.com, wealth of good acrylic info, and even how to cut out the side of and existing stand like I was talking about.:)

Here is link: Melevsreef.com - Install a Sump in an Existing Setup
 
Last edited:

tbittner

Well-Known Member
I'm almost positive that the side boards are part of the support. After looking at the stand closely, I'm actually wondering how it is supporting this weight!

I'm planning on build the sump/refug 40 x 16 x 18 and that will leave me enough room that I can use bar clamps to hold everything together and let it cure for a couple days before I do anything with it. I'm planning on doing one side to the bottom, clamp it, give it a day or two, then add the other side, clamp it, give it a day or two, and then do the sides and baffles and clamp it all together for a week or so. I read on the instructions for the Weld On that it takes 24-48 hours to really "take hold" but the process can continue for up to 3 weeks.

Kirby, quick question, where did you buy your acrylic and what exactlly was the KIND of acrylic that you bought. A link would be most appreciative. I bought plexiglass at Lowes (24 x 48 x 3/8) and it's flexible, which I liked because I think it will be easier to work with but now I'm having second thoughts about it because my initial test didn't hold very well, although I hadn't clamped that test. I started another test last night but I have it clamped together really tight so I'll find out tonight how that worked.

I'm beginning to think that I don't have the right type of acrylic though. The Weld On can says that it won't bind all types of plexiglass and I'm wondering if the plexiglass that I have is one of those kinds. Don't get me wrong, it DID take some force to pull the pieces apart but I expected to NOT be able to pull them apart. Are my expectations too high for the strength of the seam?

Thanks all for "listening" and thanks for any advice you can give. :)
 

Kirblit

Active Member
You don't want to use plexiglass for the sump. Plexi is too flexible, and it can get brittle over time. Acrylic is much better to use, mine is Optix made by Plastikolite, INC, but there are other brands, Acrylite is one of the best and most expensive. You can use any brand of acrylic, just make sure it's acrylic, and HD and Lowes don't sell acrylic, only Plexi. I got my acrylic from a local Regal plastic shop, you can order it online from their website, but I think that it's kind of expensive to ship Optix Clear Extruded Acrylic Sheet by Regal Piedmont Plastics, llc this is the link to the clear acrylic pages. Look in a phone book for plastics and you may find you have a shop in your local area for acrylic. For that sixe sump you should only need a 4x8 sheet, that's all I used for my 48x15x16 sump, and it cost me about $153 for the sheet. If the shop cuts acrylic have them make the cuts for you (it cost me $25-30 for all my cuts) if you don't have a table saw and atleast a 60 tooth saw, 80 is much better (cost about $80 Frued makes a great one). You want the edges very smooth when bonding so you don't want a blade to melt the edges. I hope this info helps, let me know if you have more questions, and check out Melevsreef.com - Welcome! it has all you need to know about bonding, cutting, routing, purchasing, and so on.

How long did you wait to try and pull the two pieces of acrylic apart after you jointed them, this should not happen if it was cured. When I was testing my pieces for practice I waited about an hour and then tried to pull them apart to no avail. The Weldon melts the two pieces together as one, just like welding metal. I would be terrified if the pieces came apart without a rediculous amount of pulling, expecially if they were kind of large pieces with a big contact area.

Also what is the thickness of the acrylic you are going to use for the build? I used 1/4" and it's plenty for the size you are planning as long as you are going to have baffles like mine somewhere, and you use a 2" euro brace around the top.
 
Last edited:

tbittner

Well-Known Member
Ok, I glued on one of then end pieces. Tonight I'm going to glue on the other end piece. I'm doing this outside of the stand to help establish a solid platform to glue the sides on. With the ends in place I can still "wiggle" it through the door and lay in under the stand. I'm pretty sure I can put the baffles in place before placing it under the stand too because they will only be 14" high.

After I get the ends and possibly the baffles in place and get that part of it under the stand, I can then lay it on it's side and glue fast a side panel, turn it over, and glue the other side panel. Then stand it upright and glue the top on.

Thats the plan anyway. :)
 

tbittner

Well-Known Member
Ok, change of plans. Thankfully I placed the bottom with the one end attached and I discovered that if the other end was attached, I wouldn't be able to rotate the bottom to the upright position. I'm positive that I'll be able to glue the other end and the two baffles into place while it is in the stand. I'm in the process of cutting those pieces out and cutting the teeth into the baffles.
 

tbittner

Well-Known Member
Measure twice, cut once. Breathe!

:smack: I've already cut one end piece (two days ago) and when I looked at it, something didn't quite look right. I measured it, sure enough 18 1/2 on one side, 18 1/4 on the other. I asked my son "How did THAT happen?"

:laughroll

Fortunately, I had ordered an extra piece of acrylic so I'm still good.
 
Top