sump blueprints

BuDZnSuDS

Member
So i know how to make the sump with the acrylic and the drilling just becuase ive done a little plumbing and construction but i want to grow copal pods so i can get a mandarin. my disign for the tank is 3 section for the skimmer for the live rock and algea growth of the pods a micro bubble catcher(i hate when i see to many) and then the last chamber. Ok now the

questions:what should i put in the thrid chamber?
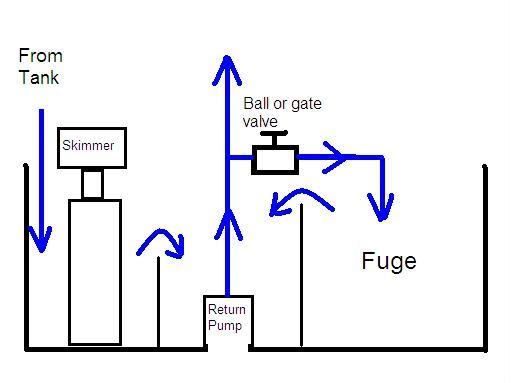
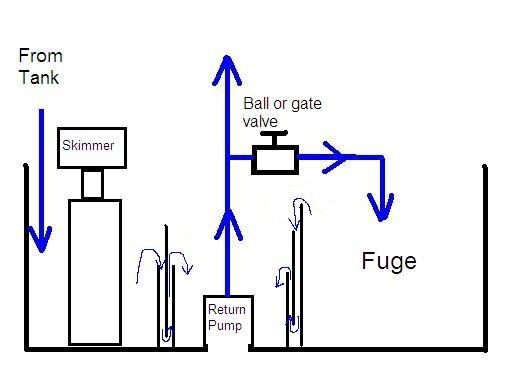
What do I do to get the water flowing from the tank to the sump and back to the tank?
Does anyone have a blueprint it would be much appriecated pleaseee?


30g fowlr and LS
Two Clowns, just lost my six line
 

Varga

Well-Known Member
Usually the third one holds your return pump. Unless you have an external return pump in which case i dunno :) my third shamber is empty right now
 
I drew this one up a while back (not to scale):
sump.jpg

I like to "T" off of the main return line to the fuge and install a ball or gate valve to control the flow rate to the fuge.
 

BuDZnSuDS

Member
now so im gunna need 3 power heads and tubing too? Im gunna take a guess i hook one line up to the power head into the third chamber then let the water go into the second and third and hook up another in the third which pushes the water back to the tank? would a canister type filter be a good idea for the third chamber?

ps. Im still a noob lol. I bought my tank already cycled i wouldnt do it again. Patience and starting from scratch in my opinion is way better.
 

Varga

Well-Known Member
Theres a lot of ways to do it but being the worst plumber in history, I keep things simple.

sumpplan.jpg
 
now so im gunna need 3 power heads and tubing too? Im gunna take a guess i hook one line up to the power head into the third chamber then let the water go into the second and third and hook up another in the third which pushes the water back to the tank? would a canister type filter be a good idea for the third chamber?

ps. Im still a noob lol. I bought my tank already cycled i wouldnt do it again. Patience and starting from scratch in my opinion is way better.
No powerheads needed to get the water from chamber to chamber. Water comes in from the main tank and fills first chamber it then flows over the chamber wall into the middle chamber. Middle chamber fills and return pump runs it back to the tank and to the fuge.
All you need is one single return pump.
 

Varga

Well-Known Member
I drew this one up a while back (not to scale):
sump.jpg

I like to "T" off of the main return line to the fuge and install a ball or gate valve to control the flow rate to the fuge.

That looks great. I'd add a bubble trap after the skimmer. I like this one because every now and then you can open the gate valve and surge the fuge and flush a zillion pods up the return pump
 
Also, you do not want to use a pump to get the water from the main tank to the sump. If the tank is not drilled you will have top use a hang on back type overflow.
If you were to use a pump to get the water from the main tank to the sump you could end up draining your main tank and have a flood in the event that the power went out. It would be like having a siphon hose hooked up.
 
That looks great. I'd add a bubble trap after the skimmer. I like this one because every now and then you can open the gate valve and surge the fuge and flush a zillion pods up the return pump
You are correct about the bubble traps. I use them on my sumps but I was in a hurry to draw up this diagram. Maybe I should revise it;)
 

BuDZnSuDS

Member
alright guys thanks a alot. I have 2 more question untill i sit down and stare at my tank a little longer lol. Do i need a heater in the sump too cuz i have an extra 250 watt heater. I have a crappy on board filter that barely sucks flakes. what would you suggest thats a resonible price?
-Blake
 

Varga

Well-Known Member
Also, you do not want to use a pump to get the water from the main tank to the sump. If the tank is not drilled you will have top use a hang on back type overflow.
If you were to use a pump to get the water from the main tank to the sump you could end up draining your main tank and have a flood in the event that the power went out. It would be like having a siphon hose hooked up.

Very true. but if for some reason you MUST use a pump to get water from DT to sump, you can attach it up about an inch under water surface so if power goes out the water drops one inch before siphon breaks :)

I had to do this when I had rubber maid sumps sitting next to each other.
 

Varga

Well-Known Member
alright guys thanks a alot. I have 2 more question untill i sit down and stare at my tank a little longer lol. Do i need a heater in the sump too cuz i have an extra 250 watt heater. I have a crappy on board filter that barely sucks flakes. what would you suggest thats a resonible price?
-Blake

you can put your existing heater in the sump so your display tank is not crowded with equipment.

the sump/refugium IS your filter. Although I have a sponge filter which is NOT a good idea in a reef unless you clean it all the time.

you can use any hang on back filter but again it MUST be cleaned all the time. it can really screw up your tank.
 

BuDZnSuDS

Member
alright guys. Now if the power goes out ill need an overflow right? I know what it does but how does it work and where does it go? Thats the last of my 99 questions for tonight i have work 11am to 9pm at TGIF =[
 
alright guys thanks a alot. I have 2 more question untill i sit down and stare at my tank a little longer lol. Do i need a heater in the sump too cuz i have an extra 250 watt heater. I have a crappy on board filter that barely sucks flakes. what would you suggest thats a resonible price?
-Blake
I like having as much equipment out of the display tank and in the sump as I can.
I also like having at least 2 heaters on all my tanks in case 1 goes bad. Also having 2 smaller heaters rather than 1 large one is a good idea also. If you use only 1 large heater and it sticks on you could overheat the tank.
 

Varga

Well-Known Member
over flow box hangs on the back of your tank. you will need about 4-5" room between tank and wall. if your tank is empty right now, drilling it would be the best way to go.

you are welcome that's what were here for. I knew nothing about reefing when I found this site.
 

Attachments

  • overflow.jpg
    overflow.jpg
    33.6 KB · Views: 95

luisgo

Member
My sump is very similar to the Varga drawing but 100% of the water coming out of the skimmer flows to the fuge. That way the skimmer is more efficient. Then the bubble trap is after the fuge.

Here is the blueprint and photo


wanareef

Member
alright guys. Now if the power goes out ill need an overflow right? I know what it does but how does it work and where does it go? Thats the last of my 99 questions for tonight i have work 11am to 9pm at TGIF =[

There are basically two types of overflows, internal and external.

Internal - this is usually across the top of the back of the tank, "L" shaped , the top of the vertical "L" sits about and 1" -2" from the top of the tank. Water cascades over into the "inside" of the "L" and you might have several bulkheads drilled into the back of the tank. From here it flows to the sump.

External - small in size a hang on over-flow box, on in the tank and the other out side hanging onto the top of the tank. Here to get the water out, you will need "J" tubes about 1". These are filled with water and "siphon" the water from the inside box to the outside one. Then flows down to the sump.

this link Reef Central Online Community - Silent and Failsafe Overflow System in the first post you will see the coast to coast over flow (internal) and a goof proof way of not dumping water out on the floor.

Best of the two, IMO the coast to coast.


HTH
 

soriano

Member
Your concern about the power going out... are you concerned about the sump overflowing?

Just make sure the water line in your sump is low enough to accomodate some back-siphon from the return pump if the power goes out.

Or you can be extra safe and drill a hole near the top of your sump tank and use bulk head going to another container
 
Top