You are using an out of date browser. It may not display this or other websites correctly.
You should upgrade or use an alternative browser.
You should upgrade or use an alternative browser.
how would you do it?
- Thread starter wooddood
- Start date
Craig Manoukian
Well-Known Member
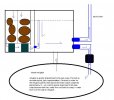
If you're looking to connect the two, I would put the sump first. The sump would house the skimmer, heater, etc. that I didn't want in the display tank.
The water would flow from the sump to the refugium through the bulk head and then into the return chamber and back to the display via the return pump.
HTH")
The water would flow from the sump to the refugium through the bulk head and then into the return chamber and back to the display via the return pump.
HTH
Craig Manoukian
Well-Known Member
Yes you would get rid of the media. Take a look at the sump in Reefgeek's Photo Gallery for a good idea on the baffling!
:smirk:
:smirk:Cosmic
Member
You'll have a hard time incorporating that as a sump/refugium combo for one reason: That low bulkhead between the 2 compartments. That is going to limit the depth of your refugium sandbed, else you suck sand through the system that will kill pumps in short order.
If you are serious about designing this, you want to block that hole, and drill yet another much higher up, where you want the surface of the water to be. You also might want to consider a baffle right before the exit bulkheads in the second (right side) compartment. This will ensure that water has to fall over into the return chamber, again keeping sand at a minimum.
You can use this chamber, but it's going to take a little re-construction.
Just remember to keep with the principals here:
Sump chamber first....
Overflow to refugium chamber......
Overflow to final chamber......
Water always drains to lowest point....
AND......
Always make the final (return pump) chamber as big as possible.
Because the water drains to the lowest point, that lowest point is where your pump goes. However, this lowest point is also going to be where all your evaporated water shows up as missing, meaning levels sway and need topped off. The bigger the chamber, the less often topoff is needed. If a drip system is in play, the last consideration may be neglected.
-HTH-
Cos
Pro_builder
Well-Known Member
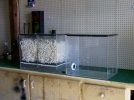
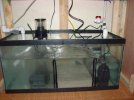
I'm not sure that I would take out the baffles in the first part of the sump. I would add to the bottom of the baffles to seal the m off. Then drill large holes in the baffles at the desired water level, with a hole saw. Then use a Jigsaw and patience to cut them out inbetween the holes. Then add 2 baffles in the last compartment, for your Refuge (first) then return pump could go in the last area, along with a float valve to keep your water level constant.
Here is a picute of the way I made mine.
Here is a picute of the way I made mine.
Attachments
wooddood
the wood dude
thanks guys.is there any way you could draw me a diagram on how you would do it?im moving my 120 to an in wall asap maybe next week and want to get rid of my current wetdry a aquaclear 200 pro.i want use the other one because its larger.48in long and want to do it right the first time.im a contractor so doing the fab work is no problem and i have all the tools.just want to know how and what to do from people that know what their talking about.thanks all.dave.
Pro_builder
Well-Known Member
Dave, What are the dimensions of the setup that you are wanting to use? What is the distance to each baffle, etc? I will try to draw you up something tonight after I get back.
HTH
HTH
Scooterman
Active Member
Post as much info you can on the equipment you plan to use, it is hard to mak something without knowing the constraints. I'll sketch something up tomorrow for you at the office then we can fine tune it to fit your needs. I like the set-up Pro has, similar to mine, they seem to work well but redesigining yours may take a little more work as The COS stated above.
wooddood
the wood dude
ok here ya go.the first media section on the left is 11 3/8 widex 11 3/4 front to back x 18inches tall,the second media chamber is the same.the small section between media chambers and large section on right is 4 5/8 wide x 11 3/4 front to back and 18 in tall.the large section on right is 19 5/8 wide x by 11 3/4 front to back by 18 inches deep.the bulkhead hole between the 2 sections is 2 3/8 hole size.the 2 holes on each side at the end are 1 3/4 holes and the hole in the middle is 1 5/16 hole size. the intake holes on top are 1 3/4 holes. im currently running a rio 32 hyperflow on a scwd as the return pump and am using a aquaclear 200 pro wetdry with a overflow/skimmer box.thanks all.
Scooterman
Active Member
Hey wood, that thing has quite a few holes in it. If your going to connect the two, then you will have to do as Cos stated above so you can hold more water in the last chamber. For a 125, wouldn't you want a larger sump? I know if you can use this thing it would be nice. Where are you installing it and how much room do you have, if under your tank? Personally I'd make one like Pro. & take what you have & try and develop a Refuge with it, maybe install it above the sump. I wish I could help more but guessing at this point maybe others should chime in.
Last edited:
wooddood
the wood dude
i dont mind doing the extra work,i would like to use it since i have it already.i know i will have to some modification on it but i enjoy that kind of stuff.as far as the size of it it as long as my 120 tank just not as wide or deep.im building the tank in wall and will be building the stand also so room is noy my concern at all.i know it can be done and i think it will work well for my application,i just need some guidence.im a contractor so i have all the tools needed.i just need help from somebody that knows alot more then me about sumps/refugiums.thanks dave.
Scooterman
Active Member
In that case you can build a base for the first piece, make it high enough so you can drain into the second, still you will need to have the bulkhead on the upper portion of the second piece. This will allow for a full pump return section at all times. You can pump externally with one of the other holes an d plug the others unless you have need for them.
TDEVIL
Well-Known Member
here is a link with all the diy you can handle, hope it helps
http://www.kingvinnie.com/aquaria/diy/
TD
http://www.kingvinnie.com/aquaria/diy/
TD
Maxx
Well-Known Member
okay....coupla off the wall thoughts
Is this gonna be a reef? I'm guessing so since you want to add a refugium...other wise you've got plans for one monster mandarin tank!
If you have the room/space to dedicate to this, I think that the simplest way of doing this would be to seal the three holes on the compart on the right's, right side. (lose any one yet?) I would close them off/ turn them into ball valves or Union ball valves, with the main idea behind them being flexbility for the future. you want to add a chiller...no problem, ya got the access, no need to buy a drop in model. Want to run a calcium reactor??? same thing...how about your fresh water RO/DI topoff???? Plumb another tank into the sump??? possibilities are endless...
I would remove all the bio media, brace the bottom of the bio media compartment (egg crate) w/ something, and stick a bunch of rock in there. Adding the stand pipe like I suggested earlier will raise the water level in the sump, which will cover the rocks I'm suggesting you put in the sump. You want the rocks underwater to provide anaerobic, (no oxygen...home to nitrate eating bacteria) zones deep w/in the rock. Otherwise you'll wind up w/ more aerobic bacteria, (has oxygen...bacteria here produce nitrate....this is the same bacteria that will live on the bio media we are trying so hard to get you to ditch).
remember to allow for room for back siphoned water in the sump! If you have a power shortage and the standpipe is too high, all that extra water will be on your floor.
The now largely empty second compartment, (right side w/ all the holes in it) could be used to hold your heater, skimmer, etc, and act as a settling tank for detritus...
Finally, I would use the last remaining ball valve/union ball valve/ hole to connect to a pump running to a seperate refugium. This way you are using this sump, and you arent modifying it beyond its useful capabilities. I think you can pick up a rubbermaid stock container fairly inexpensively. I believe Reef Lady is using one of those for her refugium.
if this is possible for you, I would consider it.
I've seen Jesse James on Monster Garage turn a 5.0 mustang into a 100 mph lawn mower...but if I really want a lawn mower I'm probably gonna go to Sears and buy one that works like I need it to, as opposed to spending lots of time and money converting my car into one that will almost do what I want....
(never did figure out where they hooked up the grass catcher to that thing?????)
Hope this helps...
Nick
couldnt he get away w/ a stand pipe/riser from the left side/ entry toward the sand bed? Not really worried about leakage since its in a wet environment....you want to block that hole, and drill yet another much higher up, where you want the surface of the water to be.
Is this gonna be a reef? I'm guessing so since you want to add a refugium...other wise you've got plans for one monster mandarin tank!
If you have the room/space to dedicate to this, I think that the simplest way of doing this would be to seal the three holes on the compart on the right's, right side. (lose any one yet?) I would close them off/ turn them into ball valves or Union ball valves, with the main idea behind them being flexbility for the future. you want to add a chiller...no problem, ya got the access, no need to buy a drop in model. Want to run a calcium reactor??? same thing...how about your fresh water RO/DI topoff???? Plumb another tank into the sump??? possibilities are endless...
I would remove all the bio media, brace the bottom of the bio media compartment (egg crate) w/ something, and stick a bunch of rock in there. Adding the stand pipe like I suggested earlier will raise the water level in the sump, which will cover the rocks I'm suggesting you put in the sump. You want the rocks underwater to provide anaerobic, (no oxygen...home to nitrate eating bacteria) zones deep w/in the rock. Otherwise you'll wind up w/ more aerobic bacteria, (has oxygen...bacteria here produce nitrate....this is the same bacteria that will live on the bio media we are trying so hard to get you to ditch).
remember to allow for room for back siphoned water in the sump! If you have a power shortage and the standpipe is too high, all that extra water will be on your floor.
The now largely empty second compartment, (right side w/ all the holes in it) could be used to hold your heater, skimmer, etc, and act as a settling tank for detritus...
Finally, I would use the last remaining ball valve/union ball valve/ hole to connect to a pump running to a seperate refugium. This way you are using this sump, and you arent modifying it beyond its useful capabilities. I think you can pick up a rubbermaid stock container fairly inexpensively. I believe Reef Lady is using one of those for her refugium.
if this is possible for you, I would consider it.
I've seen Jesse James on Monster Garage turn a 5.0 mustang into a 100 mph lawn mower...but if I really want a lawn mower I'm probably gonna go to Sears and buy one that works like I need it to, as opposed to spending lots of time and money converting my car into one that will almost do what I want....
(never did figure out where they hooked up the grass catcher to that thing?????)
Hope this helps...
Nick
Last edited: