Cosmic
Member
Hi folks,
Time again for another session of Frag workshop")
This session I'm going to focus primarily on the branching varieties of SPS corals. I simply can't cover all the various species of SPS in a single thread, as there are too many growth patterns and methods depending on what coral you come up against.
With that said, this thread will be helpful if you have plans on fragging down corals such as branching Acroporas, Montipora digitata, Hydnophora, poccilopora, among many others. So feel safe that if it has branches, we can break it down safely.
Tools needed will be a good pair of latex gloves (You never want to touch the coral's tissue if possible, as it leaves the coral (and ourselves!!) open to infection), A strong pair of needlenose pliers, (a dremel power tool is optional here if the branch is extra thick), our tubs of water in which the fragging occurs, superglue, and some rubble rock for a base. Some people also prefer to use a 2-part plumbers epoxy, deemed safe for drinking water lines. I have found that the glue gets overgrown faster than the epoxy, but both will work fairly well.
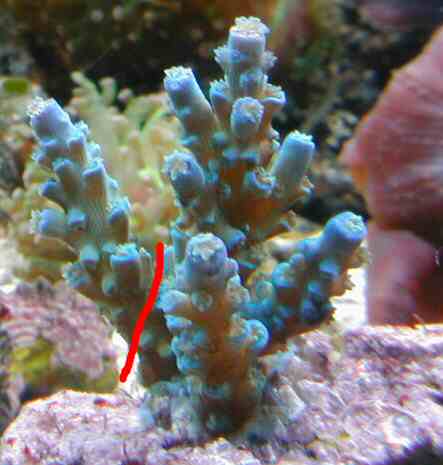
Now that we have everything in front of us, we begin by taking the mother colony ut of the tank and put it into our first dish, the holding container. We eyeball the colony to decide where we want to take our frags from. I always recommend taking a branch from it's base, meaning where it ends into the main branch. See the red line in the picture below for example.
Some tips when taking frags, and that is to take them from ALL sides of the mother colony. This leaves the overall colony with a little bit of symmetry and not showing a single noticeably "GAP" in the coral.
Now that we have found where the frags are coming from, grab the branch you want to frag right at the base, where we want the mother to snap off at. You do not need to squeeze the branch per say, but leverage the pliers in a way so that the branch gets pushed down away from the main branch until it snaps off. For a clearer understanding, it's like hanging on a tree branch until it breaks off, but we use the pliers to "twist" to cause that break with a minimum of damage to both it and the mother colony. Squeeze too tight and you will shatter the base of your frag, leaving an explosion of calcium carbonate skeleton all over your table
Do not be afraid to take the mother out of water while looking for frag sites, and while doing the actual fragging itself. Many SPS corals are exposed to air and direct sunlight for a few hours everyday. As long as the coral's tissue is not dry, the coral should be fine. While at Macna this past year, Anthony Calfo was showing the conference how to frag various corals. While explaining to us, the corals were out of water for a good 1/2 hour or so at a time. I managed to receive one of those frags, ship it home the same day in sterile water, and it is growing phenomenally in my tank now. The point being these corals can take much more stress and abuse than people think, AS LONG AS they are healthy when doing so. Only frag unhealthy corals if trying to save a piece from a colony that is dying.
Ok, back to the next step, mounting. We have the frag in our hand, so to mount the frag to a base I like to use superglue. It sets fast, is durable long enough for the corals to overgrow, and is a clear color which doesn't detract from the coral when it's still young (They overgrow rather fast anyways, w/i a few weeks normally). I think the pH or composition of plumber's epoxy is not to the favor of corals, as they take a longer time to overgrow than on superglue, IME.
To attach it, apply a liberal amount of superglue to the exposed skeleton of your frag, making sure to cover ALL exposed skeleton, as well as overlapping a little live tissue too. Quickly set the frag onto the base and hold a few seconds until sturdy. At that point, when the coral is not in danger of falling over, I place the frag into a second holding container with fresh tankwater to Cure the glue, and allow the frags to exude a bit of stressful slime.
Separate containers for the mother and her resultant frags is a good idea. A new frag is open to infection with the torn tissue (yes, even SPS have tissue, just extremely thin), and a sliming mother colony is not exactly what the doctor ordered for open wounds. Soooo, we put them in a clean rinse instead to help keep mortality down.
It's been said that, when mounting frags, it's helpful to lay the coral on the base so as to have the tissue touching rock. I believe the philosophy behind this is that the exposed area will be one of fastest grwoth, in order to repair itself. by placing this side up, you get new coral growth faster. It is also said that the tissue exposed to rock will tand to drop and encrust the rock quicker. However, in my experience with trying both ways, I have not noticed a considerable difference either way. However, my frag holding tank is not setup to allow uniform conditions for all frags, so that may have scewed my opinion somewhat.
If you have taken more than a few frags from your mother, you're probably thinking how ugly it now looks with all those exposed white stubs. Have no fear as those will quickly overgrow, leaving you with potentially more branching sites for the mother to grow from. Those sites are usually the fastest growing, so within a month or two, it will be hard to distinguish where you took your cuts from.
After all is said and done, you should put the mother back into the same exact spot from whence she came. The frags would ideally go into a separate frag tank that simulates as close to possible the main display from which they came. In this, I mean wave and light intensities.
The branching SPS corals are almost as easy (If not more so) as the leathers and shrooms, Mainly because they are much easier to attach afterwards. The difficulty comes in increased mortality rates when dealing with these corals VS. the softies or corallimorphs.
So concludes this session of fragging workshop. If you have any questions or suggestions on this topic, feel free to post them!
Until next time,
Cos
Time again for another session of Frag workshop
This session I'm going to focus primarily on the branching varieties of SPS corals. I simply can't cover all the various species of SPS in a single thread, as there are too many growth patterns and methods depending on what coral you come up against.
With that said, this thread will be helpful if you have plans on fragging down corals such as branching Acroporas, Montipora digitata, Hydnophora, poccilopora, among many others. So feel safe that if it has branches, we can break it down safely.
Tools needed will be a good pair of latex gloves (You never want to touch the coral's tissue if possible, as it leaves the coral (and ourselves!!) open to infection), A strong pair of needlenose pliers, (a dremel power tool is optional here if the branch is extra thick), our tubs of water in which the fragging occurs, superglue, and some rubble rock for a base. Some people also prefer to use a 2-part plumbers epoxy, deemed safe for drinking water lines. I have found that the glue gets overgrown faster than the epoxy, but both will work fairly well.
Now that we have everything in front of us, we begin by taking the mother colony ut of the tank and put it into our first dish, the holding container. We eyeball the colony to decide where we want to take our frags from. I always recommend taking a branch from it's base, meaning where it ends into the main branch. See the red line in the picture below for example.
Some tips when taking frags, and that is to take them from ALL sides of the mother colony. This leaves the overall colony with a little bit of symmetry and not showing a single noticeably "GAP" in the coral.
Now that we have found where the frags are coming from, grab the branch you want to frag right at the base, where we want the mother to snap off at. You do not need to squeeze the branch per say, but leverage the pliers in a way so that the branch gets pushed down away from the main branch until it snaps off. For a clearer understanding, it's like hanging on a tree branch until it breaks off, but we use the pliers to "twist" to cause that break with a minimum of damage to both it and the mother colony. Squeeze too tight and you will shatter the base of your frag, leaving an explosion of calcium carbonate skeleton all over your table
Do not be afraid to take the mother out of water while looking for frag sites, and while doing the actual fragging itself. Many SPS corals are exposed to air and direct sunlight for a few hours everyday. As long as the coral's tissue is not dry, the coral should be fine. While at Macna this past year, Anthony Calfo was showing the conference how to frag various corals. While explaining to us, the corals were out of water for a good 1/2 hour or so at a time. I managed to receive one of those frags, ship it home the same day in sterile water, and it is growing phenomenally in my tank now. The point being these corals can take much more stress and abuse than people think, AS LONG AS they are healthy when doing so. Only frag unhealthy corals if trying to save a piece from a colony that is dying.
Ok, back to the next step, mounting. We have the frag in our hand, so to mount the frag to a base I like to use superglue. It sets fast, is durable long enough for the corals to overgrow, and is a clear color which doesn't detract from the coral when it's still young (They overgrow rather fast anyways, w/i a few weeks normally). I think the pH or composition of plumber's epoxy is not to the favor of corals, as they take a longer time to overgrow than on superglue, IME.
To attach it, apply a liberal amount of superglue to the exposed skeleton of your frag, making sure to cover ALL exposed skeleton, as well as overlapping a little live tissue too. Quickly set the frag onto the base and hold a few seconds until sturdy. At that point, when the coral is not in danger of falling over, I place the frag into a second holding container with fresh tankwater to Cure the glue, and allow the frags to exude a bit of stressful slime.
Separate containers for the mother and her resultant frags is a good idea. A new frag is open to infection with the torn tissue (yes, even SPS have tissue, just extremely thin), and a sliming mother colony is not exactly what the doctor ordered for open wounds. Soooo, we put them in a clean rinse instead to help keep mortality down.
It's been said that, when mounting frags, it's helpful to lay the coral on the base so as to have the tissue touching rock. I believe the philosophy behind this is that the exposed area will be one of fastest grwoth, in order to repair itself. by placing this side up, you get new coral growth faster. It is also said that the tissue exposed to rock will tand to drop and encrust the rock quicker. However, in my experience with trying both ways, I have not noticed a considerable difference either way. However, my frag holding tank is not setup to allow uniform conditions for all frags, so that may have scewed my opinion somewhat.
If you have taken more than a few frags from your mother, you're probably thinking how ugly it now looks with all those exposed white stubs. Have no fear as those will quickly overgrow, leaving you with potentially more branching sites for the mother to grow from. Those sites are usually the fastest growing, so within a month or two, it will be hard to distinguish where you took your cuts from.
After all is said and done, you should put the mother back into the same exact spot from whence she came. The frags would ideally go into a separate frag tank that simulates as close to possible the main display from which they came. In this, I mean wave and light intensities.
The branching SPS corals are almost as easy (If not more so) as the leathers and shrooms, Mainly because they are much easier to attach afterwards. The difficulty comes in increased mortality rates when dealing with these corals VS. the softies or corallimorphs.
So concludes this session of fragging workshop. If you have any questions or suggestions on this topic, feel free to post them!
Until next time,
Cos
