250gal plywood idea.

ChrisOaty

Member
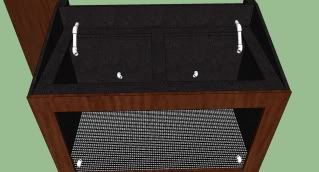
So, I've really given it a lot of thought and I'm over trying to make my 55gallon tank work. There are simply so many things I would like to do that are too difficult with a full glass tank. So I've been doing a lot of research on plywood tanks. I've come across a large piece of glass that would allow me to build a tank in the 250ish gallon range. I spent all day messing with sketchup, and have a really rough idea of what I'd like to build downstairs.

FrontLeft.jpg
FrontRight.jpg

FrontUp.jpg
RearPlumbing.jpg


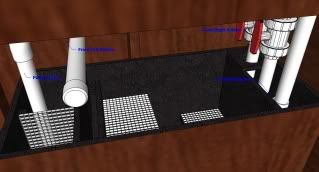
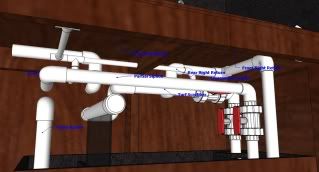
I know, it's large and deep. This will start out as a FOWLR as I still consider myself a novice and don't want to throw a ton of money into this before getting my feet wet a little more. I've kept a nano for almost a year now. To explain the plumbing from left to right: Full siphon to feed a closed loop from overflow, (small) one of 4 closed loop returns, emergency drain to sump, Return from sump (the T will be replaced with a reducer Y), partial siphon to sump, full siphon to feed sump. As you can see, I want to use a closed loop as well as a bean animal style overflow as it's quiet and fail-safe. Please critique! Any and all advice, criticism, and/or comments are welcomed! I may start this once my pond is up in the back yard to house my fresh water pets.
 

ChrisOaty

Member
PlywoodTankPlumbingExplained.jpg


Here it is slightly better explained. As for the tank itself; I'll be painting a food grade liquid rubber that's been tested with great results along the inside of the tank. For lighting; three separate LED arrays for the right and left and a thinner long bar along the front angled to the back in order to light the face of the display.
 

sasquatch

Brunt of all Jokes~
PREMIUM
thats clearer but still why so many overflows? a coast to coast will skim the top water quite well if adequately sized and the closed loop's could be just intake and return fittings, with all that plumbing in the back chamber your never going to keep it clean
 

ChrisOaty

Member
What's not shown, is the bulkheads in the horizontal piece of wood, beyond the bulkheads, there is no need for pvc glue, so if need be, I can take all the fittings apart. Ive had similar overflows for years without the need to clean. Algae won't be a problem as this portion will see no light (lid). These are 1.5" fittings...large enough for anything to fit through that can get through the teeth of the overflow. As far as the number of pipes, he center is a return (necessary). The emergency 1.5" (upturned) is just an emergency which is kept dry. The first "U" shaped full siphon on the left is input for the closed loop. I wanted that going under the tank because that is where the pump will be housed and because the other 2 closed loop returns are in the front two corners (not shown). The neat thing about the two smaller closed loop returns you see in the rear is that they are positioned 1/3 of the way down from the top of the tank, making large water changes (if necessary) very easy without having to measure. The other "U" shaped full siphon on the very right is the main flow down to the sump, which will carry 90% of the flow to the sump without air, creating no sound. The other (with a "T") fitting is a partial siphon, which handles about 10% of the water with air in the line. What this does, is allows a small amount of water to flow down the sides of the pipe, leaving ample room for air through the center of the pipe. This setup allows for huge GPH without even the smallest gurgle or flushing/rushing water sound in the pipes. Since this is a lot of water (I consider 250 gallons large). I wanted redundancy and silence. If you have more questions about this type of overflow, it's called a "Bean Animal" style.
 

sasquatch

Brunt of all Jokes~
PREMIUM
makes sense, didn't see any valves for the Beanie threw me off a bit, so whats the rubber compound??
 

ChrisOaty

Member
I'm putting the valves in the cabinet above the sump. It'll be easier to access there rather than behind such a tall/deep tank. I've finised up the plumbing. This sketchup program is pretty cool. Good thing is, if i'm thorough, i should be able to take this and use it as a template for the real build. There's a few different options for the rubber compound. Off the top of my head, Aquaguard and Zavlar. I'm also looking into a product called Ames Blue Max.

Here's some more photos. I'm really liking this program. Super easy to work with. Free, to boot. Let me know if you want the model. It's a lot easier if you just import the 3d model. That way if you really wanna see it you can poke around at it any which way.

RearPlumbing-1.jpg
FrontTop.jpg

SumpDown.jpg
SumpLeft.jpg
SumpRight.jpg
 

ChrisOaty

Member
It's called Google SketchUp. You can download it for free. If you're interested in playing around with it, I can give you the model I'm building in it and you can poke at it. It's a neat program. I've been glued to it for days! Very easy to learn and there's lots of models you can download on google's 3D warehouse for it.
 
Top