big_vard
Member
So here goes...
Over the past couple months, after finding this amazing site, and the wealth of knowledge here I've been making strides to improve my 20 gallon nano reef. One of the first things I realized was that my "skilter" wasn't going to cut it as a skimmer, and that I could really use a good refugium. I decided to save myself some serious $$$ (I'm in university still...) and build a refugium/skimmer combo from acrylic. The total cost?? about $100.
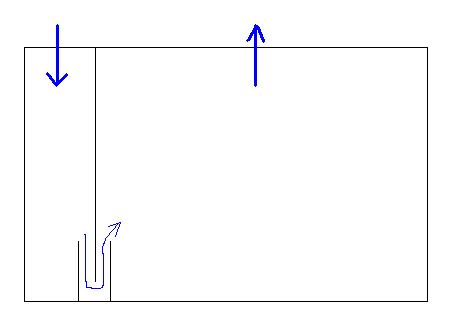
The design is fairly simple. The water is pumped into a skimmer chamber from the display, it travels downward in the chamber, past a few baffels, and out into the refugium area. The water then flows from the refugium area back to the display via overflow spout. See the diagram below.
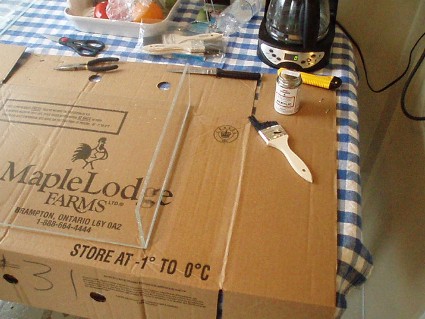
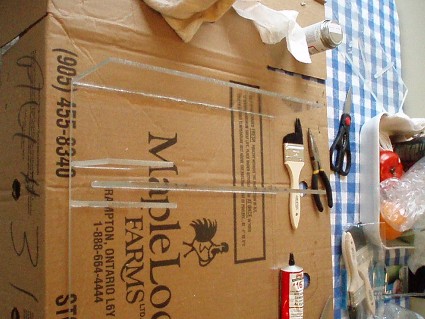
I used 1/4" acrylic, but would have preferred something a little thicker. $$ limited me, so I'm stuck with the thinner acrylic. The volume isn't huge, and the 1/4" will be strong enough, but does have a little bowing to it. I had to add some extra bracing. I used Weld-on 4 (purchased online http://www.rplastics.com/weldon4.html), but since my cuts weren't that great, I didn't get a complete water-tight bond everywhere, so I used copious amounts of weld-on 16 to seal up the joints. It's really strong and watertight. To glue the joints I held them in place, then used a brush to "paint" the weld-on 4 into the joint. My work area can be seen below. You can see my container of weld-on and my brush, which I trimmed to a manageable size using scissors (it was the only brush I had lying around).
All cuts were made using a circular saw with a blade which had many "teeth-per-inch". Some smaller cuts were made using the method of scoring the acrylic, then breaking it. Holes were drilled using normal wood drill bits.
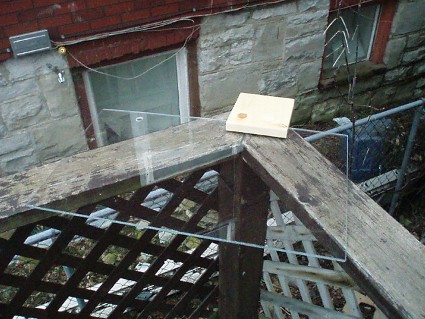
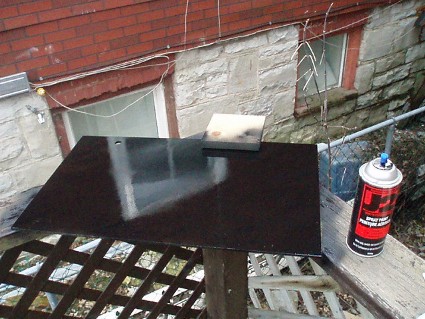
The "front" (which faces the aquarium) I painted black, as the back of my aquarium isn't painted, I wanted a black background on my display, and this kept the light from the refugium seperate from the display. See the unpainted and painted "front" below.
Once this was painted I assembled everything. The finished acrylic structure is shown below.

The section on the right is the skimmer area. You see a hole drilled near the top of this region where the water will enter the skimmer from the display via plumbing.
The section on the left is the fuge area. The series of small holes will be where the water flows back into the display via overflow spout shown below.
A few modifications I made after this point:
1. The top, which is shown as completely open, now has a few top pieces which serve to hold the light above the 'fuge, and to provied additional bracing. These can be seen below.
2. The series of small holes you see drilled for the overflow had the top row enlarged so as to not restrict the flow back to the display too much.
For the water entering the skimmer area, I already had a "quiet-one" (not so quiet) submersible pump. I have this located near the bottom of my display and it pumps water up over the lip of the display and through that hole in the skimmer area you see in the above picture. The water flows through CPVC piping.
For the return, I hacked the overflow trough off of an aquaclear filter and affixed it to the outside of the 'fuge where the series of small holes are drilled. This can be seen below.
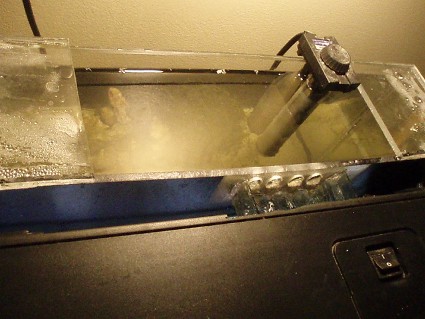
This image also shows the top pieces of acrylic I attached for the light to sit on, and for added bracing.
Seperating the skimmer section and the 'fuge area was a few baffles. These kept the bubbles out of the 'fuge, and kept the sand bed in the 'fuge:
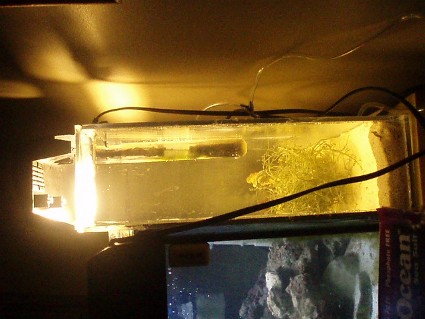
For lighting, I am currently just using a crappy walmart fluorescent bulb, which fits in an incandescent socket. It provides enough light for the macro to grow in the fuge, but is a pretty ugly yellow colour. I'll upgrade this eventually. The side-view of the 'fuge area is shown below. It has about 1.5" of sand, some live rock rubble, and a bunch of macro:
The whole setup is shown in the following image:
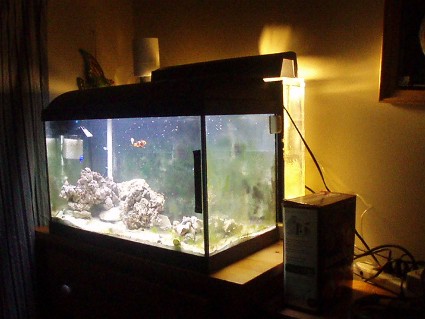
The skimmer section can be seen in the back corner. It consists of a circular riser, and a circular cup. The cup has a drain hose (airline tubing) which drains to a contianer behind the setup. The bubbles are created via two coralife wood airstones. It works GREAT!!!! Check out the skimmate in the image below.
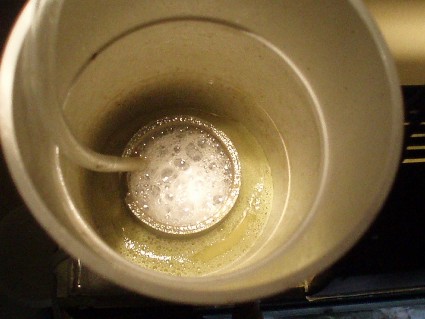
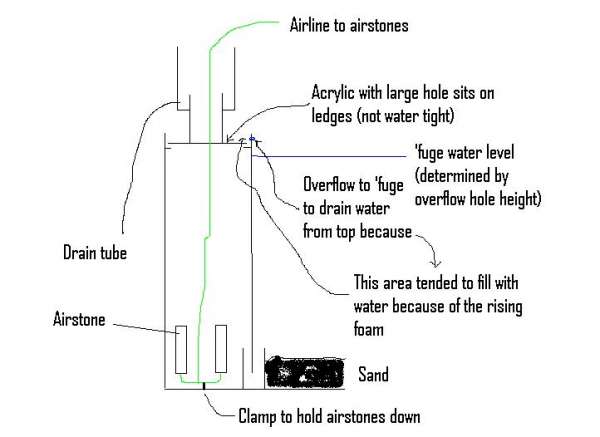
The hose you see in that image is the air going into the skimmer. Below is a diagram of the skimmer section. One thing to note is that when I set the whole thing up and turned it on the first time, because I don't have a tight seal at the top of the skimmer section, i was getting some water overflow, so I had to drill an overflow hole back to the 'fuge, this does allow some bubbles into the fuge, but prevents the skimmer area from overflowing onto the floor. This can be seen better in the image below:
Anyway, that's my new 'fuge/skimmer in a nutshell. It's working fabulously. I'm pulling out lots of icky skimmate, and my Nitrates are starting to drop as a result of the better skimming and the macro now growing in the 'fuge. I have seen some "creepy-crawlies" in there too, which makes me happy")
If you want more information, please PM me.
Steve
Over the past couple months, after finding this amazing site, and the wealth of knowledge here I've been making strides to improve my 20 gallon nano reef. One of the first things I realized was that my "skilter" wasn't going to cut it as a skimmer, and that I could really use a good refugium. I decided to save myself some serious $$$ (I'm in university still...) and build a refugium/skimmer combo from acrylic. The total cost?? about $100.
The design is fairly simple. The water is pumped into a skimmer chamber from the display, it travels downward in the chamber, past a few baffels, and out into the refugium area. The water then flows from the refugium area back to the display via overflow spout. See the diagram below.
I used 1/4" acrylic, but would have preferred something a little thicker. $$ limited me, so I'm stuck with the thinner acrylic. The volume isn't huge, and the 1/4" will be strong enough, but does have a little bowing to it. I had to add some extra bracing. I used Weld-on 4 (purchased online http://www.rplastics.com/weldon4.html), but since my cuts weren't that great, I didn't get a complete water-tight bond everywhere, so I used copious amounts of weld-on 16 to seal up the joints. It's really strong and watertight. To glue the joints I held them in place, then used a brush to "paint" the weld-on 4 into the joint. My work area can be seen below. You can see my container of weld-on and my brush, which I trimmed to a manageable size using scissors (it was the only brush I had lying around).
All cuts were made using a circular saw with a blade which had many "teeth-per-inch". Some smaller cuts were made using the method of scoring the acrylic, then breaking it. Holes were drilled using normal wood drill bits.
The "front" (which faces the aquarium) I painted black, as the back of my aquarium isn't painted, I wanted a black background on my display, and this kept the light from the refugium seperate from the display. See the unpainted and painted "front" below.
Once this was painted I assembled everything. The finished acrylic structure is shown below.
The section on the right is the skimmer area. You see a hole drilled near the top of this region where the water will enter the skimmer from the display via plumbing.
The section on the left is the fuge area. The series of small holes will be where the water flows back into the display via overflow spout shown below.
A few modifications I made after this point:
1. The top, which is shown as completely open, now has a few top pieces which serve to hold the light above the 'fuge, and to provied additional bracing. These can be seen below.
2. The series of small holes you see drilled for the overflow had the top row enlarged so as to not restrict the flow back to the display too much.
For the water entering the skimmer area, I already had a "quiet-one" (not so quiet) submersible pump. I have this located near the bottom of my display and it pumps water up over the lip of the display and through that hole in the skimmer area you see in the above picture. The water flows through CPVC piping.
For the return, I hacked the overflow trough off of an aquaclear filter and affixed it to the outside of the 'fuge where the series of small holes are drilled. This can be seen below.
This image also shows the top pieces of acrylic I attached for the light to sit on, and for added bracing.
Seperating the skimmer section and the 'fuge area was a few baffles. These kept the bubbles out of the 'fuge, and kept the sand bed in the 'fuge:
For lighting, I am currently just using a crappy walmart fluorescent bulb, which fits in an incandescent socket. It provides enough light for the macro to grow in the fuge, but is a pretty ugly yellow colour. I'll upgrade this eventually. The side-view of the 'fuge area is shown below. It has about 1.5" of sand, some live rock rubble, and a bunch of macro:
The whole setup is shown in the following image:
The skimmer section can be seen in the back corner. It consists of a circular riser, and a circular cup. The cup has a drain hose (airline tubing) which drains to a contianer behind the setup. The bubbles are created via two coralife wood airstones. It works GREAT!!!! Check out the skimmate in the image below.
The hose you see in that image is the air going into the skimmer. Below is a diagram of the skimmer section. One thing to note is that when I set the whole thing up and turned it on the first time, because I don't have a tight seal at the top of the skimmer section, i was getting some water overflow, so I had to drill an overflow hole back to the 'fuge, this does allow some bubbles into the fuge, but prevents the skimmer area from overflowing onto the floor. This can be seen better in the image below:
Anyway, that's my new 'fuge/skimmer in a nutshell. It's working fabulously. I'm pulling out lots of icky skimmate, and my Nitrates are starting to drop as a result of the better skimming and the macro now growing in the 'fuge. I have seen some "creepy-crawlies" in there too, which makes me happy
If you want more information, please PM me.
Steve