You are using an out of date browser. It may not display this or other websites correctly.
You should upgrade or use an alternative browser.
You should upgrade or use an alternative browser.
RSM Moonlights
- Thread starter TheEdge
- Start date
As promised here's a link that may help:
http://www.redseamax.com/redseamax/250Temp/redseamax/downloads/Replacing moonlights.pdf
http://www.redseamax.com/redseamax/250Temp/redseamax/downloads/Replacing moonlights.pdf
Im also having problems with Moonlights but in the RSM 130.
Ive only had it set up 3 weeks, when I first set it up the moonlights worked, but now they wont come on at all.
I contacted Interpet but all they could do for me was name a few Online shops that might be able to get them for me, but up to now ive had no joy with that.
I need to find somewhere that does spare moonlights for the RSM 130.
If anyone here knows of such a place, please let me know.
Would be much appreciated
LittleJester
Member
12v DC.
Thanks to steve for getting the schematics for me. Over the weekend I took apart my 130D cover. I switched out the leads to the moonlights with a 12V DC power supply ran the cable out the back through a small hole and now have the moonlights on a separate circuit that turns on and off the the Moon rise and Moon set. Actually was easier then I thought it would be.
Thanks to steve for getting the schematics for me. Over the weekend I took apart my 130D cover. I switched out the leads to the moonlights with a 12V DC power supply ran the cable out the back through a small hole and now have the moonlights on a separate circuit that turns on and off the the Moon rise and Moon set. Actually was easier then I thought it would be.
12v DC.
Thanks to steve for getting the schematics for me. Over the weekend I took apart my 130D cover. I switched out the leads to the moonlights with a 12V DC power supply ran the cable out the back through a small hole and now have the moonlights on a separate circuit that turns on and off the the Moon rise and Moon set. Actually was easier then I thought it would be.
Is that 12V-DC to both? If so wow, i guess i could FLOOD the tank with blue, and place them on a variable resistor/potentiometer to control their intensity!
LittleJester
Member
I started to take some then got caught up in the mod and forgot. I will post the mod as best as I can. It probably will not be until Saturday because of my work schedule. I am using a Aquacontroller Jr. and an X-10 lamp control to run the moon lights. It automatically increases the intensity when the lights come on. I haven't been up at night to see how the diodes react but they where on this morning at 5:30 AM when I went to see if they worked and they seemed to be just fine, and at full power. I don't know what time they came on or off at this point. That's controlled by the Jr.
All 4 diodes are running off the same DC voltage supply. I would think they are set up in parallel. so it's pretty simple DC power supply to 2 wires in hood. What you use to control them is up to you.
All 4 diodes are running off the same DC voltage supply. I would think they are set up in parallel. so it's pretty simple DC power supply to 2 wires in hood. What you use to control them is up to you.
Harro & Shazza- if you are both in the UK and have moonlight failures then send me an email to: steveh@redseafish.com. I need date of purchase, shop where bought, hood serial number and your address. I will happily send replacement led's for you to fit. They are pretty easy to install and it shouldn't take more than 15 minutes of your time.
Harro & Shazza- if you are both in the UK and have moonlight failures then send me an email to: steveh@redseafish.com. I need date of purchase, shop where bought, hood serial number and your address. I will happily send replacement led's for you to fit. They are pretty easy to install and it shouldn't take more than 15 minutes of your time.
Hi Steve
Thanks for the reply, email sent
LittleJester
Member
RSM Moonlights Mod
OK. I hope I can explain this so you can understand it with the pictures I took. I did this on my 130D I don't know if the 130 is different but it's probably close.
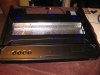
1) Take the cover off the tank. Turn it over and lay it down on something that will not scratch the top. Remove the 8 plastic screws that keep the bulb cover attached to the top and remove the cover and the 2 bulbs.
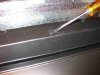
2) Take a small screwdriver and remove the plastic screw covers There is a small notch in each one so you can get a screwdriver under the lip. Picture 1 and 2. Use a philips head screwdriver and unscrew the screws.
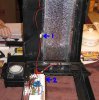
3) carefully turn the cover over so the screws will fall out of the deep holes. You then should be able to separate the two pieces of the top. You don't have to take the screws from the flip portion of the top. Be careful it may stick in places. Be sure to lift the end opposite the timer. Put something behind the light portion to keep it vertical. Picture 3.Unscrew the 2 screws so you can get behind the timer. That's where I drill for my hole for the power supply wires. In picture 3 the #2 is the DC power supply that powers the Moonlights as well as the fans. the two wires that go to the moonlights are pretty self explanatory #1 in picture 3. cut the wires on either side of that connector (#1). I attached my power supply to the connector so I could
disconnect the lights easily.
4) Get a 12V DC power supply .85 mA. is what is used by RS. The one I had was .70 mA and it seems to work fine. I drilled a small hole next to the power cord and threaded the wire through it and made it long enough to connect to the Moonlights wires. I used some aquarium caulking to cover the hole. I then soldered the wires together make sure you get the polarity right. The Red wire should be Positive (+). My power supply had a line going down the (+) wire. I used shrink tubing to cover the solder joints. If you are going to use the connector be sure you put the wire through a small hole first then do your soldering on the inside of the top. In that way you have a small hole coming out of the back, less chance of water getting into the hood. Test your lights before you put the hood back together.
You can connect the DC supply to any type of controller and you should be fine.
I hope this makes sense. If you have any questions drop me a PM and I will try to answer them.
OK. I hope I can explain this so you can understand it with the pictures I took. I did this on my 130D I don't know if the 130 is different but it's probably close.
1) Take the cover off the tank. Turn it over and lay it down on something that will not scratch the top. Remove the 8 plastic screws that keep the bulb cover attached to the top and remove the cover and the 2 bulbs.
2) Take a small screwdriver and remove the plastic screw covers There is a small notch in each one so you can get a screwdriver under the lip. Picture 1 and 2. Use a philips head screwdriver and unscrew the screws.
3) carefully turn the cover over so the screws will fall out of the deep holes. You then should be able to separate the two pieces of the top. You don't have to take the screws from the flip portion of the top. Be careful it may stick in places. Be sure to lift the end opposite the timer. Put something behind the light portion to keep it vertical. Picture 3.Unscrew the 2 screws so you can get behind the timer. That's where I drill for my hole for the power supply wires. In picture 3 the #2 is the DC power supply that powers the Moonlights as well as the fans. the two wires that go to the moonlights are pretty self explanatory #1 in picture 3. cut the wires on either side of that connector (#1). I attached my power supply to the connector so I could
disconnect the lights easily.
4) Get a 12V DC power supply .85 mA. is what is used by RS. The one I had was .70 mA and it seems to work fine. I drilled a small hole next to the power cord and threaded the wire through it and made it long enough to connect to the Moonlights wires. I used some aquarium caulking to cover the hole. I then soldered the wires together make sure you get the polarity right. The Red wire should be Positive (+). My power supply had a line going down the (+) wire. I used shrink tubing to cover the solder joints. If you are going to use the connector be sure you put the wire through a small hole first then do your soldering on the inside of the top. In that way you have a small hole coming out of the back, less chance of water getting into the hood. Test your lights before you put the hood back together.
You can connect the DC supply to any type of controller and you should be fine.
I hope this makes sense. If you have any questions drop me a PM and I will try to answer them.
Attachments
Right so i whent thorugh the rigmarole of taking the hood apart.
I took out the 6 under the plastic caps, thencouldnt figure out why the hood wasnt lifting off. It turns out that on the 130 there are bulb holders that are screwed into the lid. You need to unscrew these.
Then you can put the lid clean off.
Anyways. I checked the voltage on a digital Multi meter, and found that the woltage was around 16V. That scuppard my plans of connecting 3 blues to the orginal wires.
So i set about building my Luxeon 1 watt LEDs. Which i know at night are quite blue, but once the compacts are on it kind of floods the tank so you cant really see them.
Anyways i set about connecting the two spare blues i had to their own driver. With a planned to drill a hole through the back and have a little connector on it like the one for the optional fan. The idea was then to mount the two LED's using heat sink gel and super glue to mount them between the Tubes. Then i realised i had been supplied with the wrong blues. Boy was i wound up!
Anyways put it all back together until i get the correct blues supplied!
I just had another thought while writing this. Shouldnt the blues be facing diagnonally down from the top front of the tank? That way the light reflects of the bits you can see!
LittleJester
Member
Step one on in my post.
"1) Take the cover off the tank. Turn it over and lay it down on something that will not scratch the top. Remove the 8 plastic screws that keep the bulb cover attached to the top and remove the cover and the 2 bulbs."
I'm kind of surprised that your voltmetter was saying 16V. The power supply for the moonlights and the fan is listed at 12V. right on it. Maybe there is a difference in the system that you get on the other side of the pond. I also questioned why the lights weren't pointing down but didn't want to go through the bother of re doing them. When they come on they do give a nice reflection off the water thou. The blue spectrum does disappear when the main lights come especially if you are running the stock bulbs with the Actinic side.
Hope you get things worked out.
Step one on in my post.
"1) Take the cover off the tank. Turn it over and lay it down on something that will not scratch the top. Remove the 8 plastic screws that keep the bulb cover attached to the top and remove the cover and the 2 bulbs."
Lol..oh no the plastic ones and the bulb cover came of first.
I meant Once you have taken the bulbs out their are two metal clips that are screwed into the reflector, but the screws actually go into the top lid.
I will check the Voltage again when the new correct blue LED's arrive.
I think i will put 3 in if it is 12v supply to the stock LED's.
I think the stock LED's are next to useless. If you want to see good LED's check these out. That was a test on my Vision 180 using just two LED's.
LittleJester
Member
OK, so that seems to be different then mine. I have a 130D I wonder if they made a change.
You might want to check the voltage when the moon lights are on it might be lower with the load on. I doubt it but it's worth a shot.
The video is impressive. To me that's a lot of light for the simulation of the moon, but that's just me. Let me know how you make out, OK
You might want to check the voltage when the moon lights are on it might be lower with the load on. I doubt it but it's worth a shot.
The video is impressive. To me that's a lot of light for the simulation of the moon, but that's just me. Let me know how you make out, OK
OK, so that seems to be different then mine. I have a 130D I wonder if they made a change.
You might want to check the voltage when the moon lights are on it might be lower with the load on. I doubt it but it's worth a shot.
The video is impressive. To me that's a lot of light for the simulation of the moon, but that's just me. Let me know how you make out, OK
That was on two LED's on shining on a depth of 18inchs. I think the voltage was 6v so not on full power. My plan was putting a variable resistor or 3 different settings This way LEDs dim.
To go advanced i may try adding a controller to simulate moon too.
For me the moon similation isnt to actually mimic the moon as such, but i use it more for cosmetic reasosns so i can keep staring at the tank in the dark. You should see the coral colours under the blues!!!!


Whipitup
Member
Hi Steve, the idea behind the extra moonlights is to provide a "staged" start up and end to the photo period the same way people use their Atinics prior to the main lights coming on:
Lights off, 1 hour of new moonlights only, main light+ moonlights, 1 hour of moonlights only, lights off.
The tank will be in complete darkness after the evening moonlight phase or with just the original LED's.
They are in!!!!
Some of the corals looks bloody fantastic under the Blue's............
")
They are in!!!!
Some of the corals looks bloody fantastic under the Blue's............
Dont say it..SHOW it!!!
Whipitup
Member
Dont say it..SHOW it!!!
I TRIED...................**** camera phone wont show the colours..........

For details on how to open the Max 130 (original) hood, check out www.redseamax.com where you will find a downloadable pdf