Kate
Member
Hi all! I am going to share with you, how I made my canister filter.
I decided to make one, because I couldn't bring myself to buy one for fifty dollars, when I could make one that was just as efficient, for less than fifteen. That is, using a pump I already had on hand that is 60 gph adjustable. The only problem I had, in finding what I needed for supplies , was finding a small fixture to glue to the top of the pump, where the water came out, to attach to the tubing going out of the tank. I found a small black plastic piece, on one of those water fountain pumps, that someone had bought me for a gift, and I never used. You can probably find something to fit at Lowes. I don't live close to one, and it wasn't worth the trip for one tiny piece.") You could make due with a couple small pieces of clear plastic tubing, in different sizes, if you could get them to fit into both ends; the pump, and also into the 7/16 tube going out of the filter.
You could make due with a couple small pieces of clear plastic tubing, in different sizes, if you could get them to fit into both ends; the pump, and also into the 7/16 tube going out of the filter.
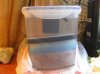
The other materials I used, were a five by six plastic lock lock box, I bought at Walmart, for around four dollars. These are food storage containers. There is a bigger one, if you prefer. Next, I bought, OD 7/16 clear plastic tubing, six feet, and cut it into two pieces. This size tubing, fits into the holes in the lid of the Oceanic biocube, without having to cut it. Depending on which side of the tank you set the filter on, that piece of tubing will need to be the longest to go around the back of the tank. You need Super glue, and Super glue Gel. I bought the Walmart brand, and used one small tube of each. I bought four of the white nylon disks, (inside diameter 7/16) at Ace Hardware store, and cut them to fit up against the canister rim, to give extra support to the tubing; one on the inside of the lid, and one on the outside. You want to make sure that your pump bottom, where the water goes in, is pointing down inside of your filter, so that you won't get air problems. You will need to cut two 7/16 inch holes in the top of the lock box lid, with a drill, for the tubing to go through, one hole, near the corner of the lid, the other, near the center; both about an inch from the side. You also need to drill a small hole for the plug to go through. I put mine in the other corner. You will need to buy a new end for the plug. Also, a bag of the clear plastic mesh with the little squares for making crafts. Also at Walmart.
Ok. After all holes are cut, and you get all the supplies, You want to take the clear plastic mesh, and cut squares to fit in your filter, for your filter media. I also cut a small square in the corner, for the intake tube, to go down to the bottom of the tank. That way, the flow keeps the water moving from the bottom up through the media. I also made a box out of a piece of the mesh, to sit over the live rock I placed into the bottom. I used plastic ties to hold the sides together into a box. Once you get all mesh cut, and holes cut for the tubing, you are ready to glue.
Glue the intake tubing and attachment to the top of the pump, and place one white nylon ring on the tubing, then through the hole in the lid, and put the other white nylon ring on the outside. Use the super glue gel, to glue the rings and tubing in place, pushing the pump as close to the top as you can get it, so you have room in your filter for the media. When the glue is starting to dry, use the super glue liquid, to go over your fixtures, and seal all air holes. Don't be afraid to use it. You need a good seal. Get it to run into the hole between the tubing and the fixtures.
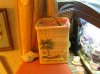
Then, you want to glue the intake tube, with white nylon rings, into the hole near the corner. Also, pull the cord through the hole, and seal that hole with super glue gel, then liquid. Add new plug end onto your cord. After glue is dry, I let mine set for about two hours. Place pump into the filter, putting the intake tube down through the holes you cut into the media, and plastic squares,down into the bottom. Sit pump inside filter. You need to put a tiny piece of tubing, or plastic of some sort, on the bottom of the filter, so that it doesn't rest up against the plastic, and obstruct the flow. I used a small piece of tubing. Now, fill the filter with new salt water, and lock the top shut. Place into a large plastic bag, to catch any leaks, but it shouldnt' leak at all, if you used enough glue! Use LOTS of glue! Now, take the intake, and outtake tubing, and run the longer one, behind the tank, into the right back hole, into the right chamber, and put the shorter one, in the left side hole, across the middle chamber, and place into the right chamber. Now you should be able to plug it in, and Wha laaaaa! You made your own filter! You might want to find a decorative box or basket to set your filter in. I found a couple that this small filter will go into. Walmart has a small garbage can, for eighteen dollars, that has a lighthouse on it, that it will fit into. Also, Bed Bath and Beyond has the basket that I found. There are also nice square ceramic planters you can use. Anyway, I hope this helps some of you!
I decided to make one, because I couldn't bring myself to buy one for fifty dollars, when I could make one that was just as efficient, for less than fifteen. That is, using a pump I already had on hand that is 60 gph adjustable. The only problem I had, in finding what I needed for supplies , was finding a small fixture to glue to the top of the pump, where the water came out, to attach to the tubing going out of the tank. I found a small black plastic piece, on one of those water fountain pumps, that someone had bought me for a gift, and I never used. You can probably find something to fit at Lowes. I don't live close to one, and it wasn't worth the trip for one tiny piece.
You could make due with a couple small pieces of clear plastic tubing, in different sizes, if you could get them to fit into both ends; the pump, and also into the 7/16 tube going out of the filter. The other materials I used, were a five by six plastic lock lock box, I bought at Walmart, for around four dollars. These are food storage containers. There is a bigger one, if you prefer. Next, I bought, OD 7/16 clear plastic tubing, six feet, and cut it into two pieces. This size tubing, fits into the holes in the lid of the Oceanic biocube, without having to cut it. Depending on which side of the tank you set the filter on, that piece of tubing will need to be the longest to go around the back of the tank. You need Super glue, and Super glue Gel. I bought the Walmart brand, and used one small tube of each. I bought four of the white nylon disks, (inside diameter 7/16) at Ace Hardware store, and cut them to fit up against the canister rim, to give extra support to the tubing; one on the inside of the lid, and one on the outside. You want to make sure that your pump bottom, where the water goes in, is pointing down inside of your filter, so that you won't get air problems. You will need to cut two 7/16 inch holes in the top of the lock box lid, with a drill, for the tubing to go through, one hole, near the corner of the lid, the other, near the center; both about an inch from the side. You also need to drill a small hole for the plug to go through. I put mine in the other corner. You will need to buy a new end for the plug. Also, a bag of the clear plastic mesh with the little squares for making crafts. Also at Walmart.
Ok. After all holes are cut, and you get all the supplies, You want to take the clear plastic mesh, and cut squares to fit in your filter, for your filter media. I also cut a small square in the corner, for the intake tube, to go down to the bottom of the tank. That way, the flow keeps the water moving from the bottom up through the media. I also made a box out of a piece of the mesh, to sit over the live rock I placed into the bottom. I used plastic ties to hold the sides together into a box. Once you get all mesh cut, and holes cut for the tubing, you are ready to glue.
Glue the intake tubing and attachment to the top of the pump, and place one white nylon ring on the tubing, then through the hole in the lid, and put the other white nylon ring on the outside. Use the super glue gel, to glue the rings and tubing in place, pushing the pump as close to the top as you can get it, so you have room in your filter for the media. When the glue is starting to dry, use the super glue liquid, to go over your fixtures, and seal all air holes. Don't be afraid to use it. You need a good seal. Get it to run into the hole between the tubing and the fixtures.
Then, you want to glue the intake tube, with white nylon rings, into the hole near the corner. Also, pull the cord through the hole, and seal that hole with super glue gel, then liquid. Add new plug end onto your cord. After glue is dry, I let mine set for about two hours. Place pump into the filter, putting the intake tube down through the holes you cut into the media, and plastic squares,down into the bottom. Sit pump inside filter. You need to put a tiny piece of tubing, or plastic of some sort, on the bottom of the filter, so that it doesn't rest up against the plastic, and obstruct the flow. I used a small piece of tubing. Now, fill the filter with new salt water, and lock the top shut. Place into a large plastic bag, to catch any leaks, but it shouldnt' leak at all, if you used enough glue! Use LOTS of glue!
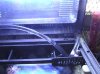
Now, take the intake, and outtake tubing, and run the longer one, behind the tank, into the right back hole, into the right chamber, and put the shorter one, in the left side hole, across the middle chamber, and place into the right chamber. Now you should be able to plug it in, and Wha laaaaa! You made your own filter! You might want to find a decorative box or basket to set your filter in. I found a couple that this small filter will go into. Walmart has a small garbage can, for eighteen dollars, that has a lighthouse on it, that it will fit into. Also, Bed Bath and Beyond has the basket that I found. There are also nice square ceramic planters you can use. Anyway, I hope this helps some of you!