You are using an out of date browser. It may not display this or other websites correctly.
You should upgrade or use an alternative browser.
You should upgrade or use an alternative browser.
Red Sea Max LED Conversions
- Thread starter nanoreefing4fun
- Start date
I'm not sure about the monster controller but you might be thinking about the Typhon controller from BoostLED which is all those things you mentioned and it has 4? channels off the top of my head and it retails for just over $50 ($53 off the top of my head again lol)
The controller interface isn't a controller either it's more of a power modulator that you need with certain controllers so that the right signal output gets to the LEDs
I've just bought a StevesLED kit for my RSM 130D and a typhon controller which I should be setting up this week if my tank comes in hopefully, I'll be creating an install thread and try and find out what the differences are so it can be used to help those with an RSM250 who want to install a Steve's kit but I'll keep everyone posted
Last edited:
Adding the link to my RSM 250 converted to LEDs with Steve's LED conversion:
http://www.reefsanctuary.com/forums/red-sea-max-owners-club/85536-steves-leds.html
http://www.reefsanctuary.com/forums/red-sea-max-owners-club/85536-steves-leds.html
jimv
Member
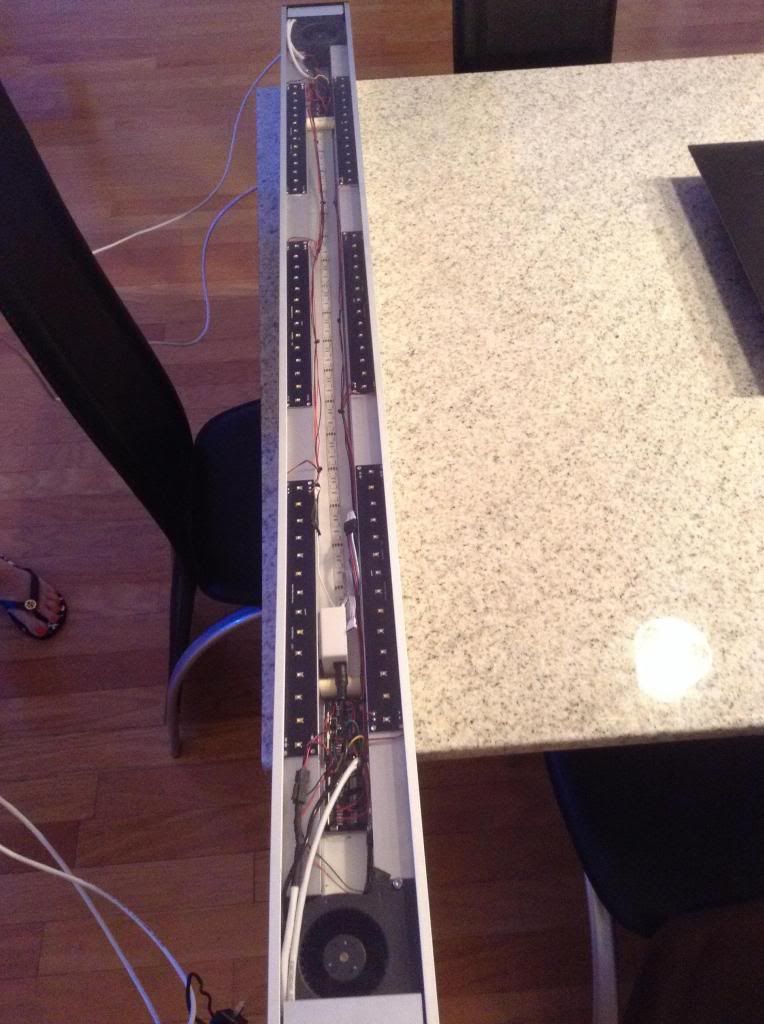
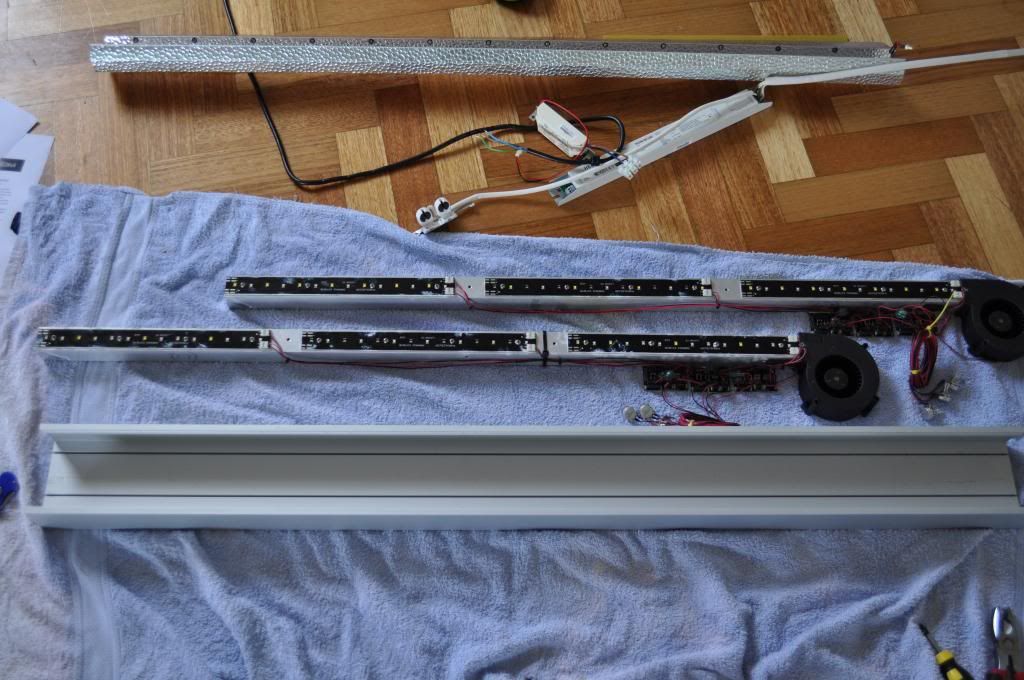
I have been wanting to upgrade my lights for a while and after doing a lot of research I finally made the move. I pieced together a design based on other builds I have seen on the internet. I wanted to keep the install clean and to have the ability to revert back to the stock lighting if needed. I also wanted a dimmable fixture so I could adjust the color and potentially set up a sunrise/sunset schedule.
This is what I ended up with:
27 Cree LED's. 9 neutral white and 18 royal blue.
Makers driver
Makers controller
16" heat sink
48v power supply
I needed to drill 4 holes to mount the heat sink.

I opened up the case.

And removed the ballast.

Using thermal adhesive I attached the LED's to the heat sink. And then wired them in two arrays.

I installed the heat sink back into the hood.

And then wired up the driver and power supply. I ended up mounting these inside the cabinet.

I plugged in the power supply and we have light.

Here is the tank with 50% light. I have read about a lot of people bleaching their coral so I am going to move up the light intensity slowly.

Wiring up the controller to the makers driver was easy. It just has a headphone style interface that connects the two. I programmed it for sunrise, sunset and to follow the lunar cycle. It is also capable of cloud cover and a noon peak. Over all I am satisfied with the way it turned out. Now hopefully my coral like the upgrade.

The entire project cost me less than $300.
This is what I ended up with:
27 Cree LED's. 9 neutral white and 18 royal blue.
Makers driver
Makers controller
16" heat sink
48v power supply
I needed to drill 4 holes to mount the heat sink.
I opened up the case.
And removed the ballast.
Using thermal adhesive I attached the LED's to the heat sink. And then wired them in two arrays.
I installed the heat sink back into the hood.
And then wired up the driver and power supply. I ended up mounting these inside the cabinet.
I plugged in the power supply and we have light.
Here is the tank with 50% light. I have read about a lot of people bleaching their coral so I am going to move up the light intensity slowly.
Wiring up the controller to the makers driver was easy. It just has a headphone style interface that connects the two. I programmed it for sunrise, sunset and to follow the lunar cycle. It is also capable of cloud cover and a noon peak. Over all I am satisfied with the way it turned out. Now hopefully my coral like the upgrade.
The entire project cost me less than $300.
MDK's RSM 650 LED conversion
http://www.reefsanctuary.com/forums/red-sea-max-owners-club/86045-mdks-s650-6.html#post1212315
http://www.reefsanctuary.com/forums/red-sea-max-owners-club/86045-mdks-s650-6.html#post1212315

ST1Doppelganger
New Member
So for a RSM 250 how many cree/luxeon LEDs should I run if I want to replace the t5s completely?
So for a RSM 250 how many cree/luxeon LEDs should I run if I want to replace the t5s completely?
If you don't get an answer here, you can also try asking here:
http://www.reefsanctuary.com/forums/led-lighting/
ST1Doppelganger
New Member
Thanks for the link

Roy Page
Active Member
I am jealous Glenn !!!!
Is that an LED conversion kit ?
For sure I want LED's in my White C-250
roy