My 120 Gallon Project - First Timer !

OneFishTwoFish

Active Member
PREMIUM

Welcome to my Tank Thread :fishy2:

My name is Frank, I'm located in Central NJ, and I'm quickly becoming a reefaholic. This is my first attempt at a marine environment. I've had several fresh water aquariums over the years (largest was 45 gallons), but only admired those fancy salt water fish from afar. I'm at a point in my life where I have time to devote to a new hobby, and I'm welcoming the challenge.

And so, the adventure begins !

Well, it actually began about 18 months ago. My wife and I saw a nice little (15 gal) BiOrb tank in a hotel lobby. She thought that it would look nice in our home office. I thought, "I'm IN. It's just a matter of time !!" A few months after we saw that tank, we had one of our own. It's right in front of me as I type this. A few neons, a couple of platys, a swordfish (that's been named "The Assassin"), and several others, make quite a lively tank. Very well cared for, no over-feeding, regular testing, and regular water changes. It's good to be a fish in this tank.

What could be better ? A zillion gallon marine tank with a bunch of exotic animals - that's what !

But how do I make the transition from 15 gallons to several times that ? By bringing my wife along on visits to just about every LFS in New Jersey. Big, small, we've seen them all. She got to choose fish for our little fresh water world, and we both had the opportunity to learn a great deal about salt water environments from some interesting people. Don't worry . . . by "learn a great deal" I mean that we learned enough to know that this is where we want to be. Maybe we've picked-up our first 1% of the lifetime of learning that's ahead of us.

What did we see ? Everything from small Nanos to a custom Elos that you could swim laps in. We were very impressed with Red Sea systems and got pretty close to buying one. But as I collected more details, I realized that I needing something that could be customized... something where I could choose the parts and have the experience of assembling them, learning along the way.

So that brought us here:

TankinRoom_zpsc167613d.jpg


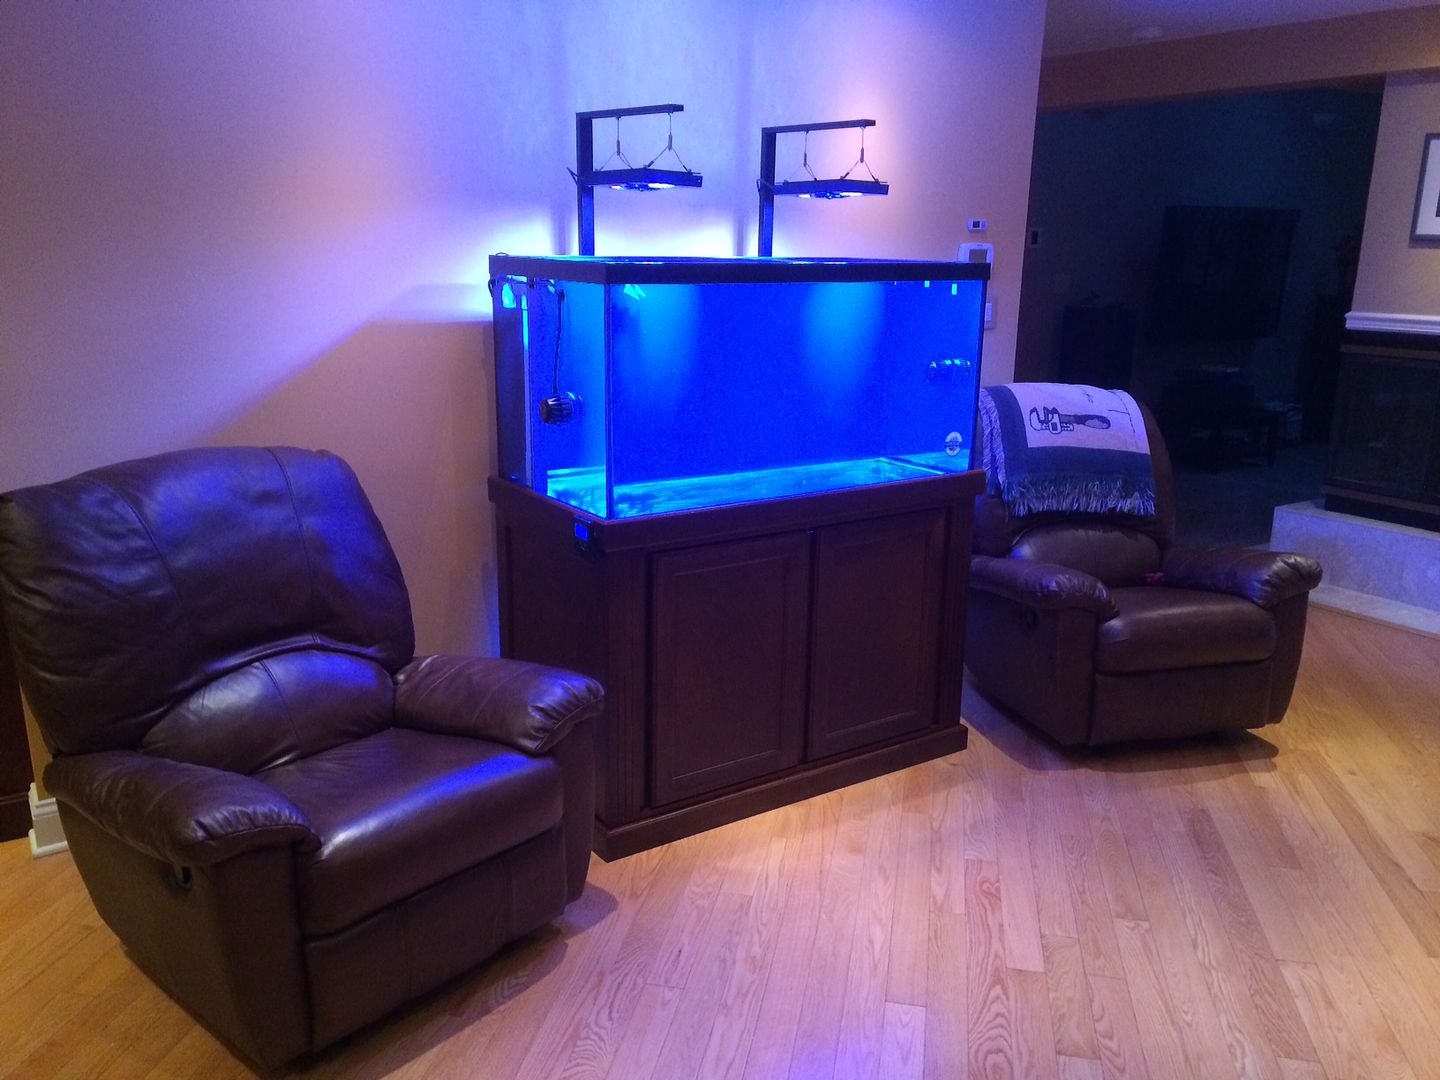
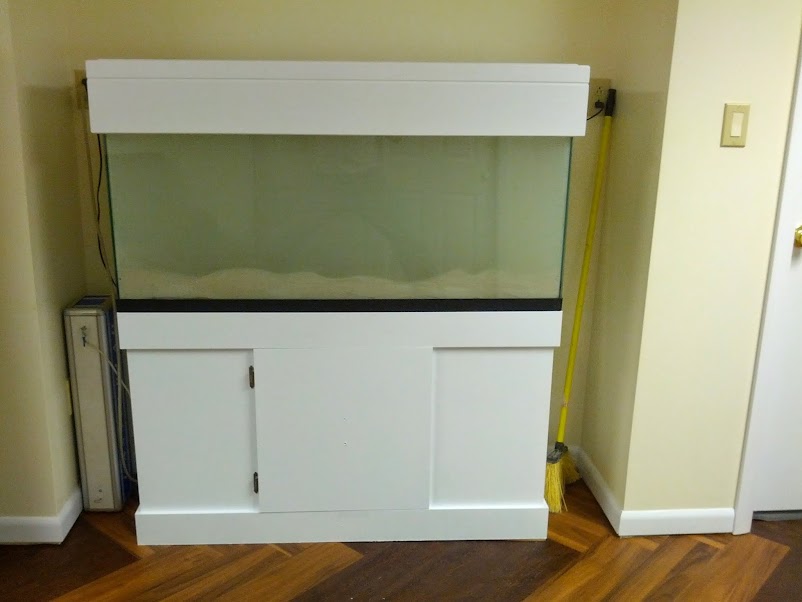
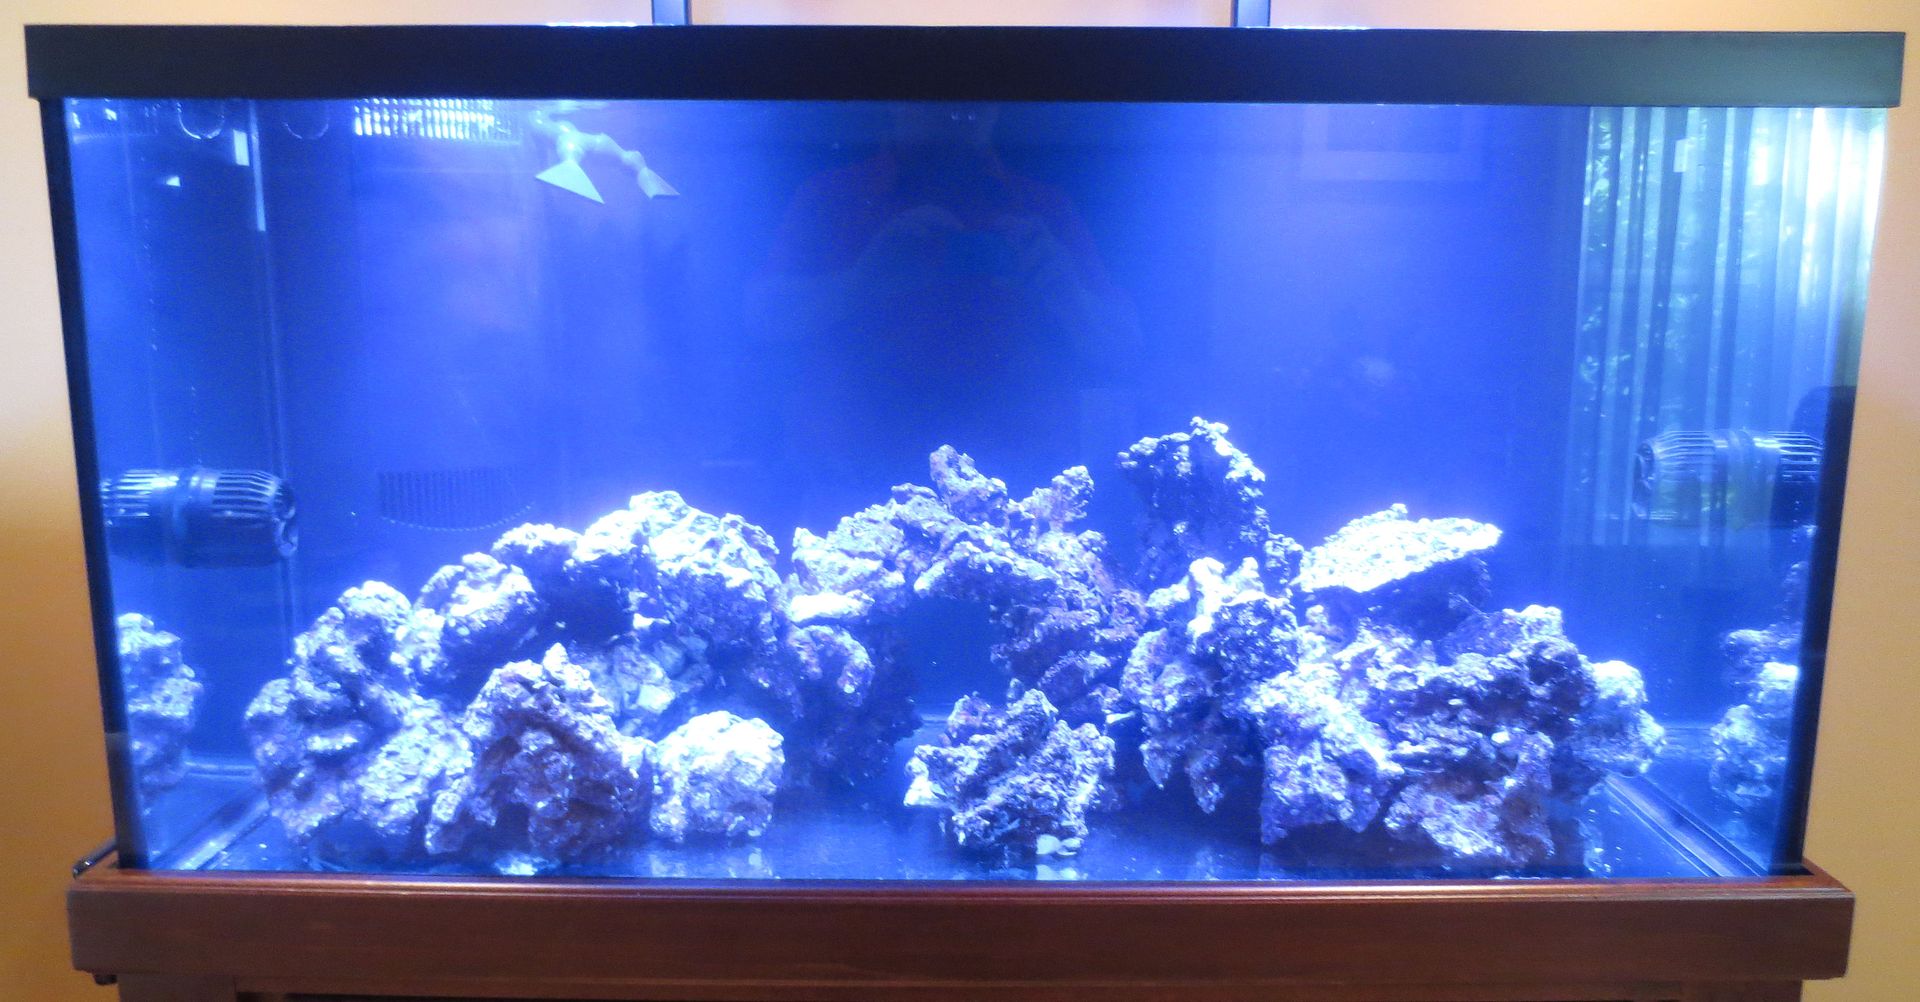
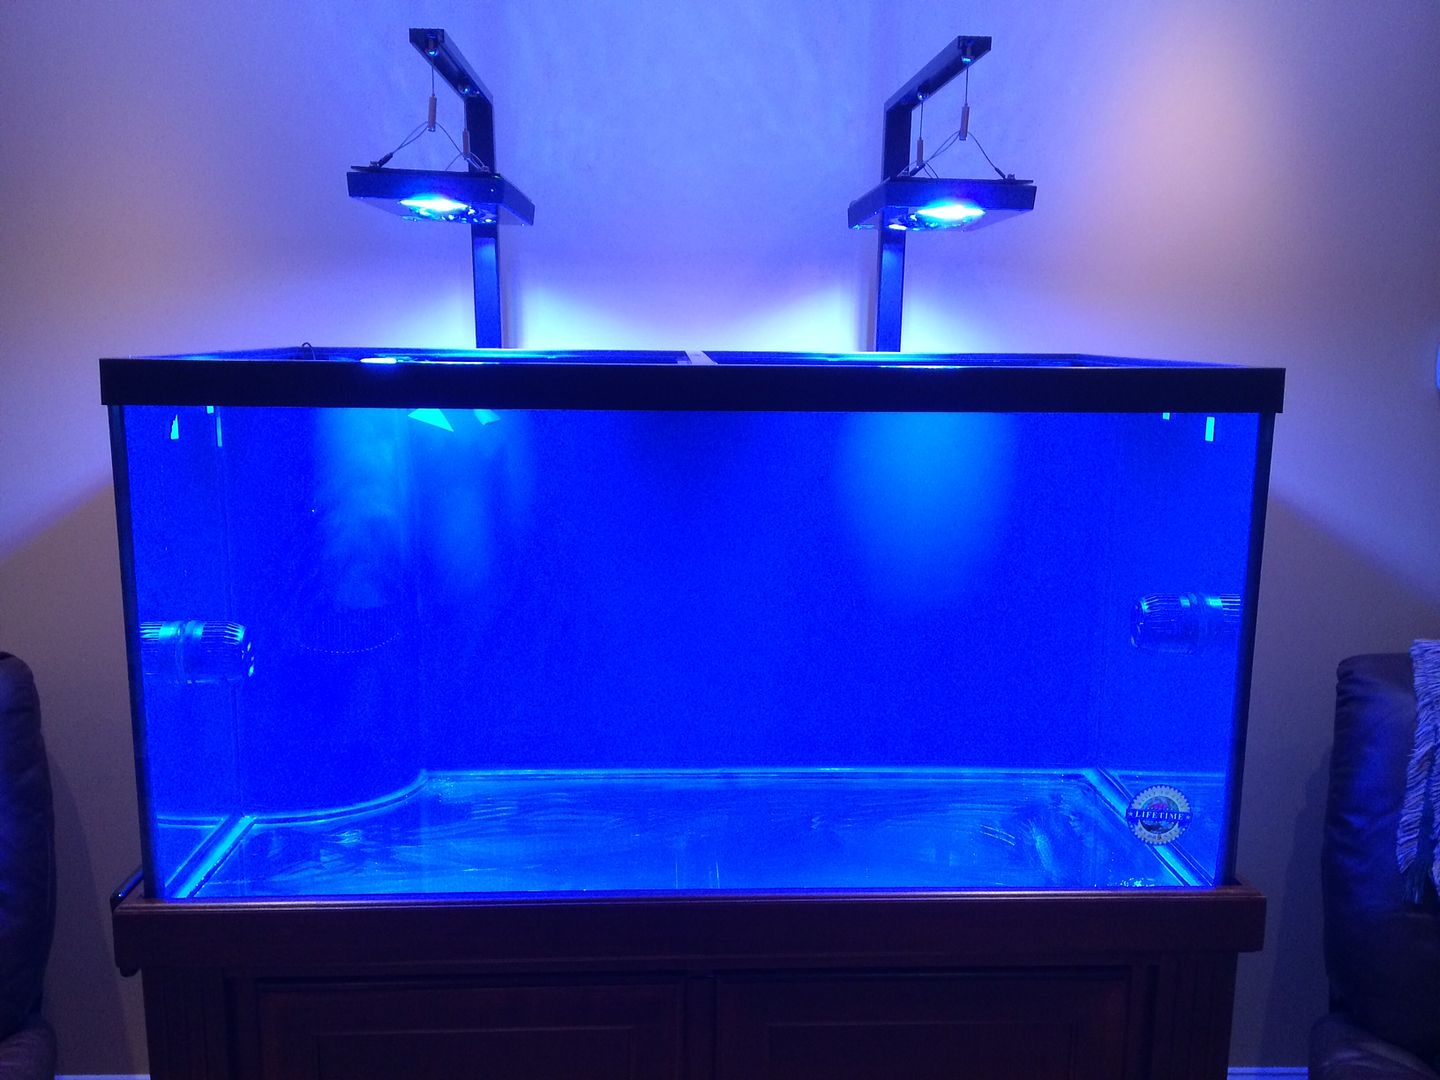
It's a Marineland 120 Gallon Tank (4 feet wide, 2 feet tall, 2 feet deep), on a Marineland cabinet. In the above photo, you can see that I've combined EcoTech Radion lighting with AquaIllumination EXT Rails. It's nice to make choices, then figure out how to make them work together. Both companies are merging, so I couldn't be too far off in combining their products. There's an EcoTech Vortech MP40 on each side of the tank. And yes, that's an Apex display on the left edge of the cabinet (my Fusion account is all setup too).


Does this count as my first FTS ? . . . . .

TankandLights_zpsb21cb3cc.jpg


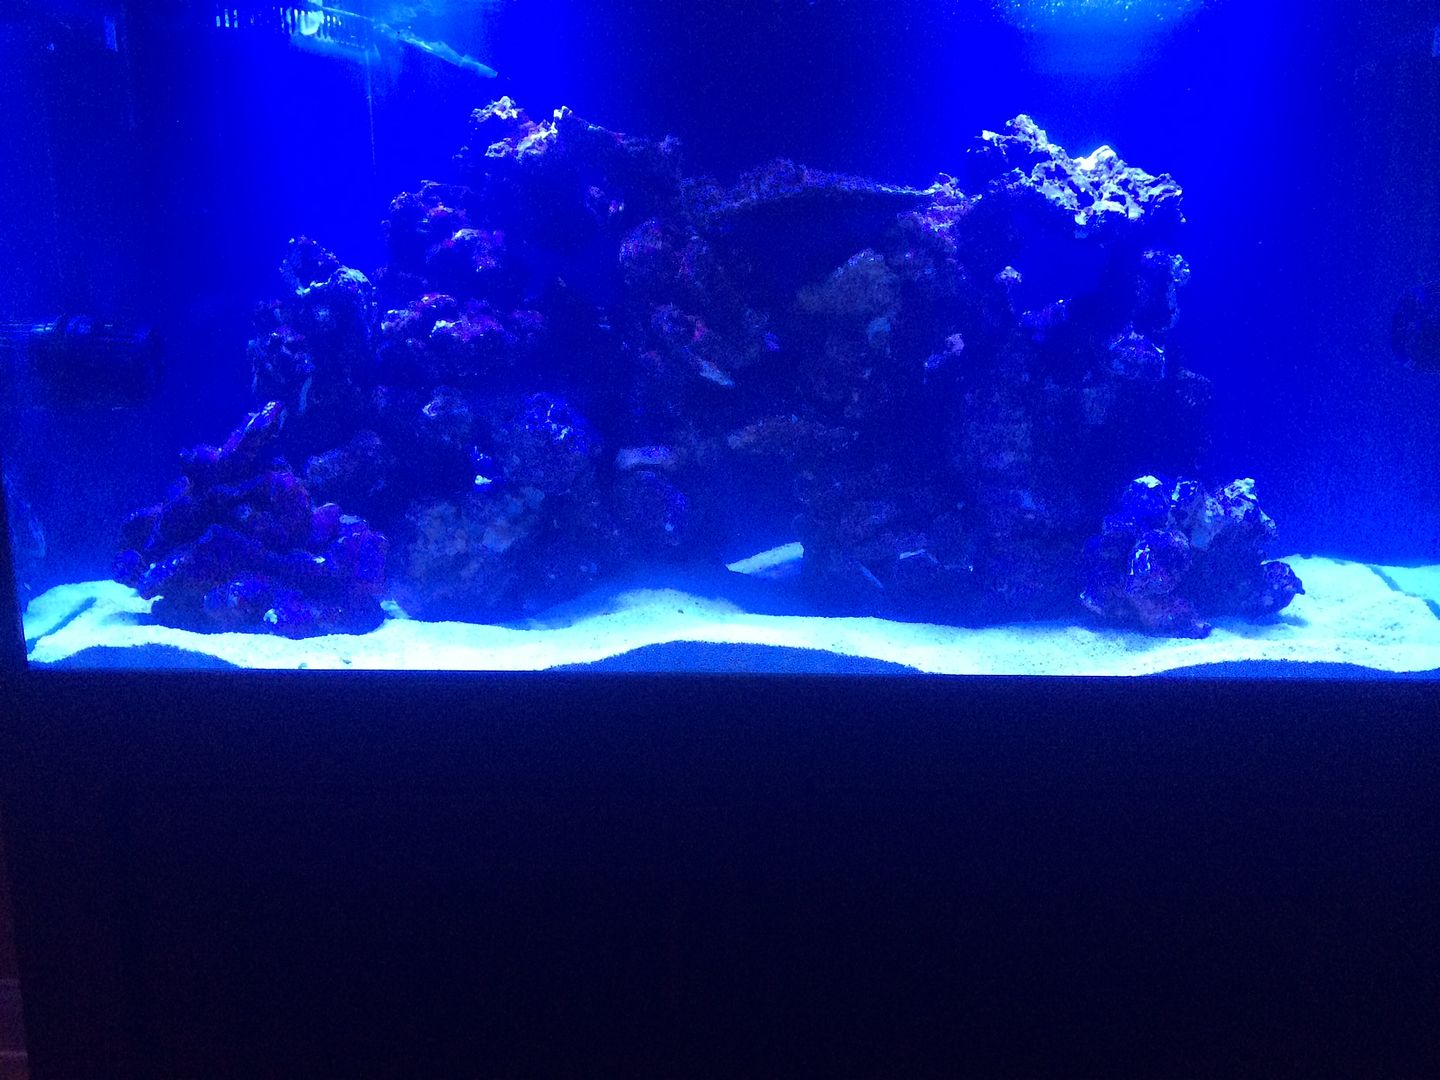
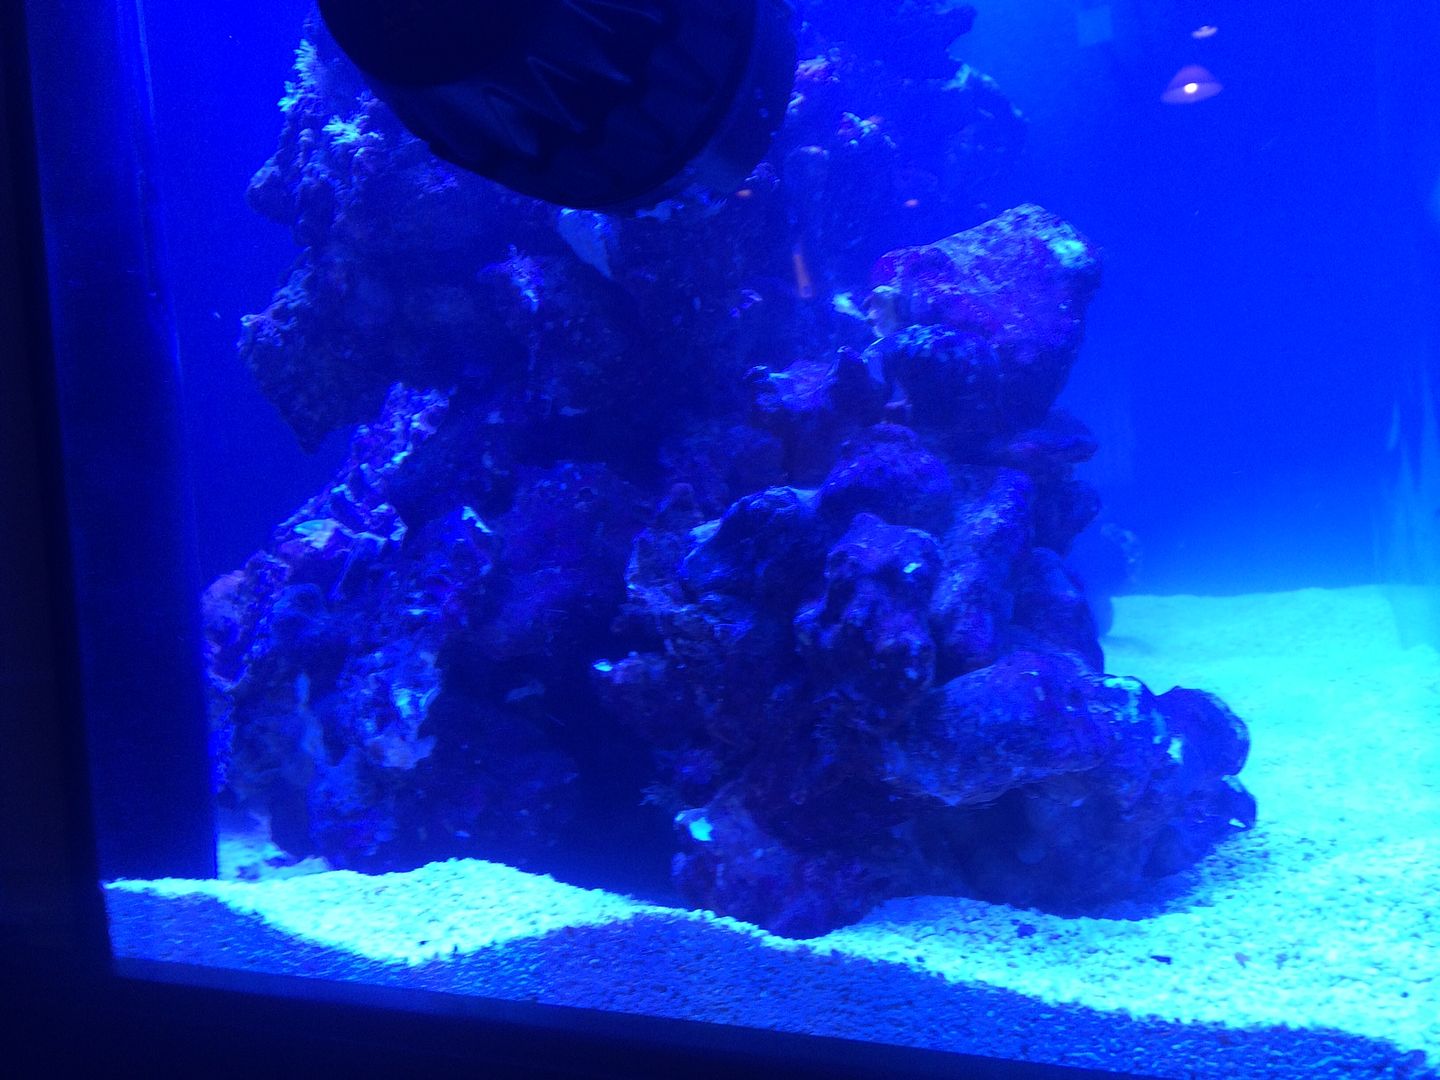
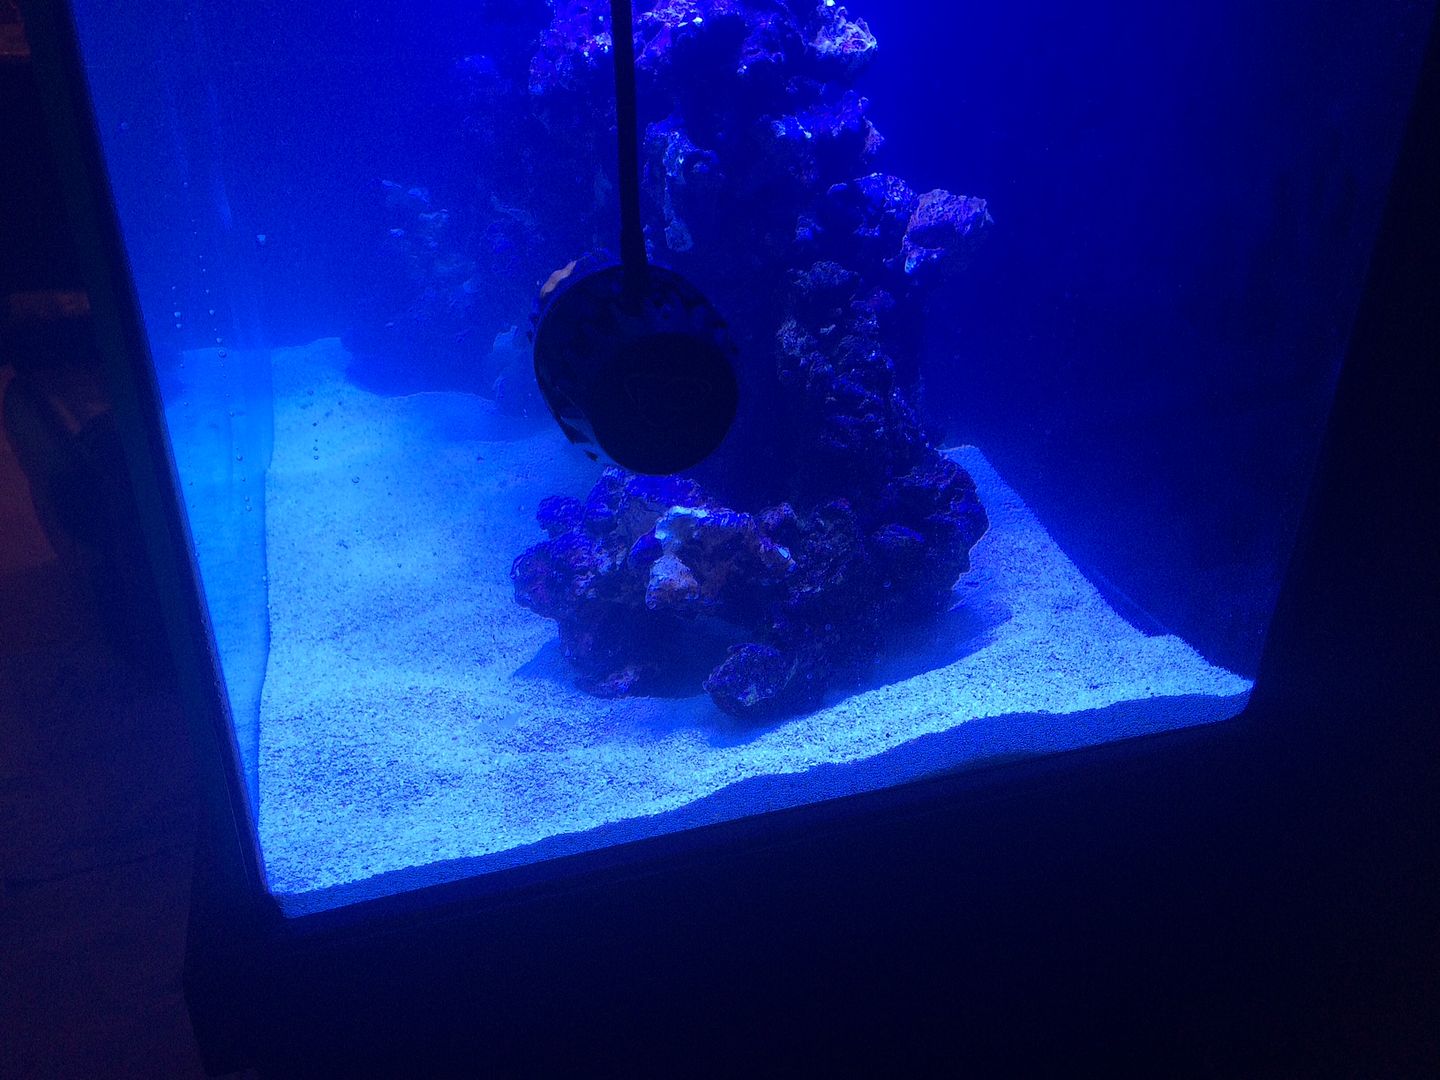
There's a little bit of salt residue on the bottom of the tank. Approx 45 pounds of Red Sea Coral Pro, added about 24 hours ago. Salinity is 35ppt on my digital refractometer and 34.6ppt as reported by my Apex. Temp is 79 degrees. Nothing living in there yet. I have not started the cycle. My plan is to wait about 10 days, just making sure that salinity and temperature remain stable, before my next step: Live Rock !


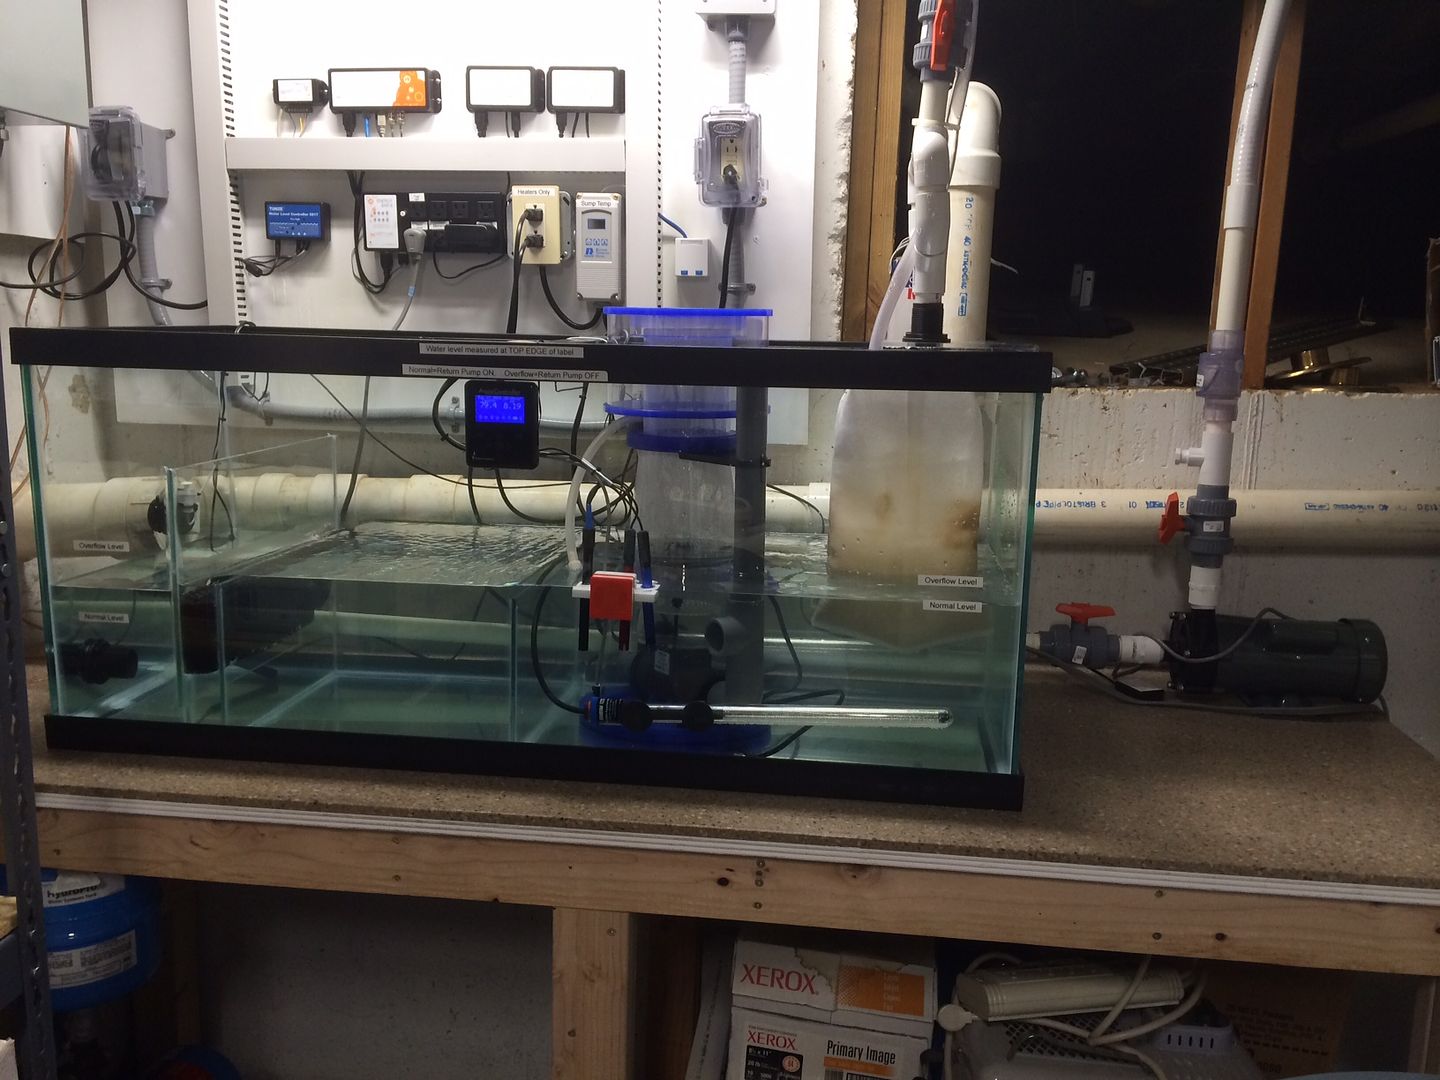
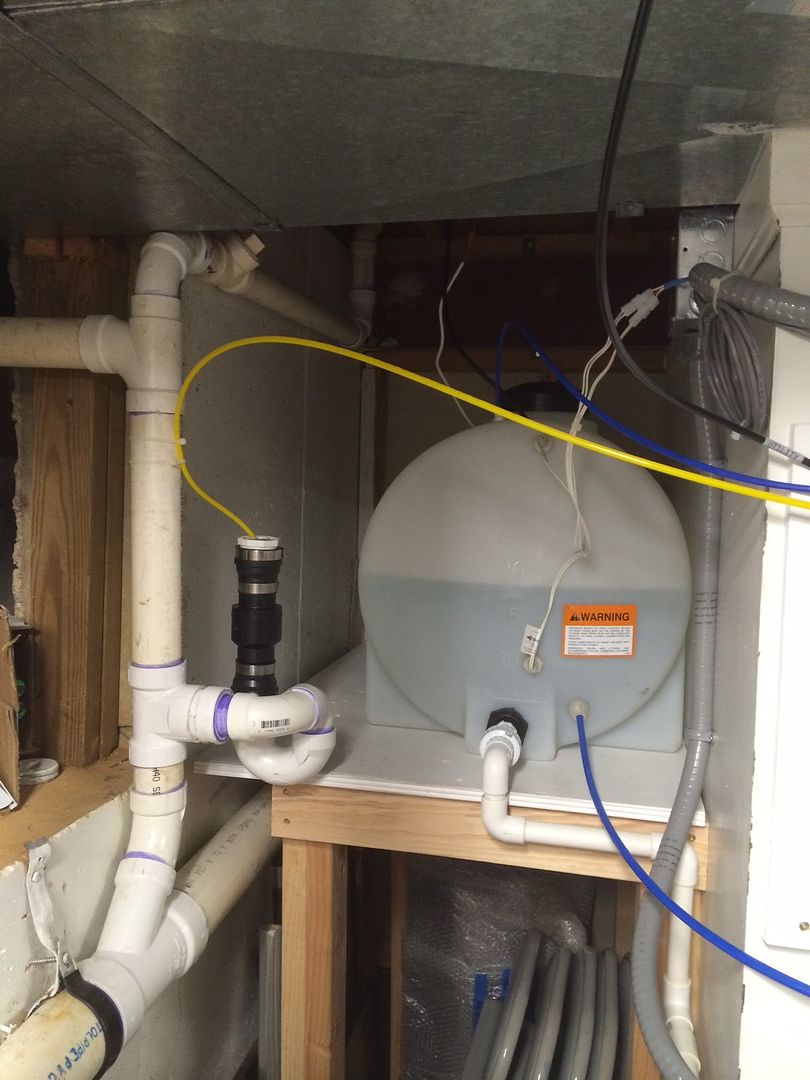
Let's look under the hood . . . . .

UnderTankFull_zpsdb0ba491.jpg


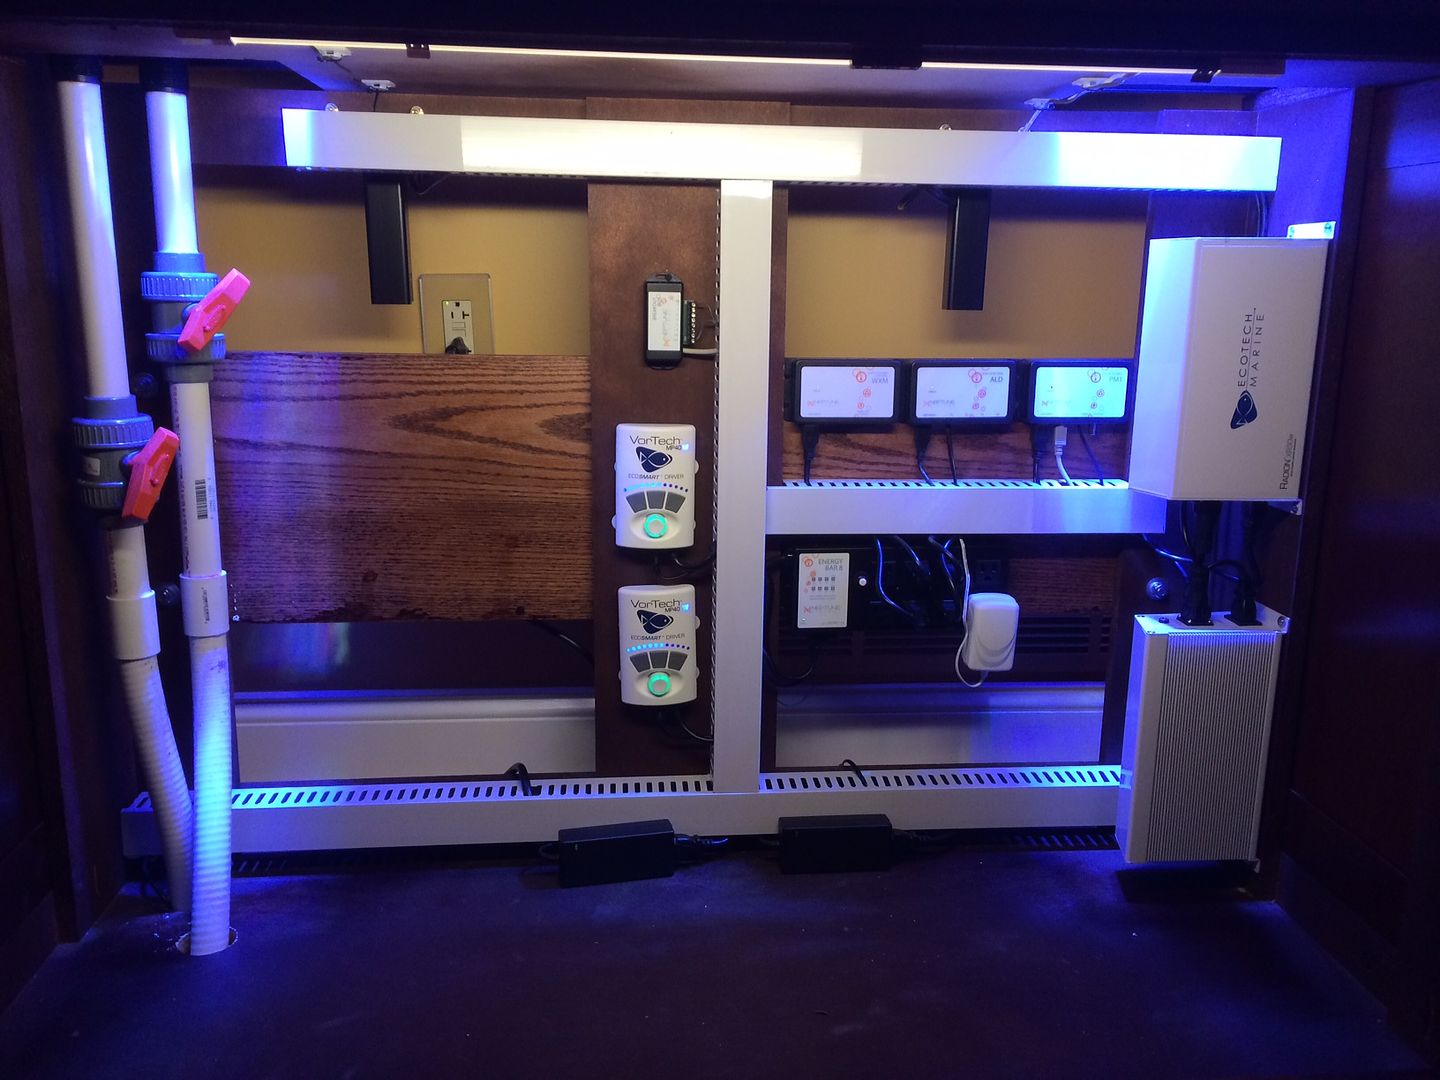
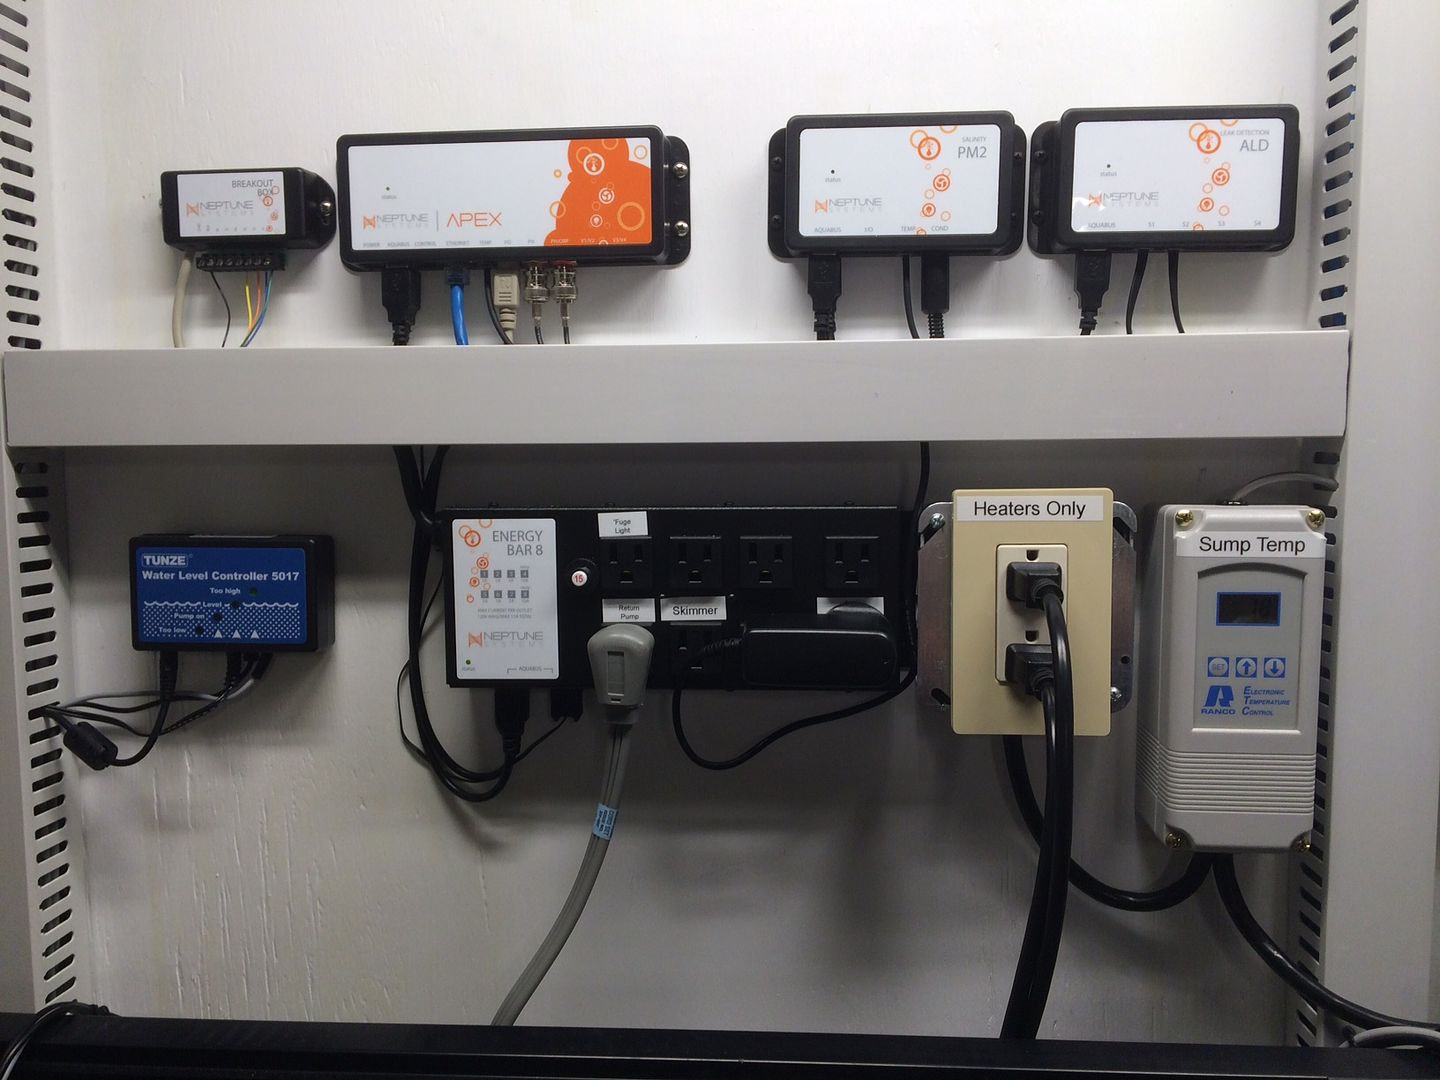
Not bad for a rookie tank builder, right ? This is where I've had most of my fun so far. What's under there ? Well, NO sump, for starters. I was really concerned about doing the "remote sump thing". I thought it would be too complicated, too much work, etc. But after really considering the benefits, the sump got located in the basement, almost directly below the tank. I like the idea of doing messy things in the basement, rather than around the display tank. And, not having the sump under the tank gave me space to neatly install Apex hardware, Radion power supplies, Vortech controllers and power supplies, etc. I've got an Apex Leak Detector right behind the tank, used the Breakout Box to turn on a light when the cabinet doors are opened, WXM module for Radion and Vortech integration. Lots of fun !


I'd love to hear what you think about what I have done up to this point. Any comments would be very welcome.

I'll be back later with info (and pictures) about our basement sump area.

Thanks !
---Frank
 

goma

Well-Known Member
RS STAFF
PREMIUM
That is really well done! Love the under cabinet work, very clean. When is the rock going in?
 

Snid

Active Member
Welcome Aboard, Matey!

Well... I'm jealous. That's a great setup you have going on there. Glad to see that you are taking things nice and slow. You mentioned that LR is coming in about 10 days. Are you going with a sand bed as well?
 

DianaKay

Princess Diana
RS STAFF
This looks to be an AWESOME thread to follow along with.
Love your 1st FTS & beginning journal Frank. Good job :thumbup:
Look forward to watching this come to life. :chair::lurk:
 

OneFishTwoFish

Active Member
PREMIUM
Thanks so much Glenn, Greg, Snid, and Diana ! I'm having a great time with my tank project.

Greg, I'm planning on adding Live Rock on Monday June 30th, as long as I don't run into any problems between now and then.

Snid, yes I will have a sand bed. Still deciding on what to use. I'd like to wait a week or so after adding Live Rock before the sand goes in. That way, it might be easier to tweak the rockscape without having daily sandstorms.

Diana, I love your tank and am really impressed with the modifications you have made to your Red Sea system.

Thanks again everyone ! Maybe I'll post some 'basement sump' info later today . . . .

---Frank
 

Snid

Active Member
The only catch with the sand going in last is that it will be impossible to not have an initial sandstorm that will hide everything from sight. So for a few days, you might not be able to see what is happening with the LR very well. Here's a picture of when I added sand to my tank to give you an idea.

IMG_20140401_201851.jpg


There is plumbing and things behind that sandy water that you can't even begin to see. Of course, I have a nice fine sand, so depending upon what you decide on may cause different results. I am using the Jaubert/Plenum Method, which has a Deep Sand Bed (DSB), but in order to do this you need to have some livestock that stirs the sand occasionally. I have Nassarius Snails, which bury themselves in the sand when they aren't out hunting. I'll probably add some other things that stir sand too in the lines of fish.

When you decide on your sand, think about if you want a DSB or a shallow sand bed. If you go with a DSB, you'll want at least 4 inches. If you go shallow, somewhere around 1-2" Knowing what livestock you plan to keep will help you determine what type of sand bed you will want. If you plan on having things like Nassarius Snails to help eat detritus and keep your tank clean, for example, you'd want a DSB so they can hide.

Here's a nifty little sand bed calculator that can help you figure out how much sand you'll want to get...

Sand Bed Calculator
 

DaveK

Well-Known Member
I don't usually post too much on tank build threads, but in this case, the electrical layout is extremely well done. Note the lack of a rats nest of wiring, and how everything is mounted. Keep up the good work.
 

OneFishTwoFish

Active Member
PREMIUM
So, on to my basement sump area. Sorry it's been a week (or so), I squeezed a little vacation in !

At first, I was more than a little put off by the idea of having a sump area that was not right below the display tank. Since this is my first time around, I thought "Let's keep this simple and have everything in one place." As I did more research, I slowly began to adjust my thinking about the complexities of a remote sump area. The benefits started to outweigh those complexities. For me, reducing the messy maintenance activity in and around the display tank, and having more physical space for equipment in a nice, open area were the deciding factors.

So, down to the basement we went. I don't have lots of extra space available. A basement can be like closets: never big enough. So I set out to do something that would be 'space efficient' and not feel too cramped. I cleared-out a back corner of the basement that was being used for some pretty unorganized storage. As a bonus, the chosen area had access to a water line and a drain.

Here's an overall view:

SumpWideView_zpsedf79dbe.jpg


The sump tank is a 75 Gallon Aqueon that my LFS assembled. Looking from right to left, the display tank overflow water drops into two large filter bags in the skimmer area. That's an Eshopps S-300 Skimmer. Also in that section, I have 2 Eheim heaters, a Neptune probe rack (PH, ORP, Conductivity), and the temp sensor for my Ranco Temperature Controller.

In the mid-area, there's space for a future refugium. And over to the left end, there's a sponge, bubble trap, and return area. A Temperature Probe sits in the return area, as well as the Tunze ATO sensors. I have another Temp Probe outside of the sump to monitor "room temperature". The left side has been drilled for the return plumbing that wraps around the back of the sump to the Iwaki return pump that sits to the right hand end of the sump.


Here's a look at the components located above (and somewhat behind) the sump tank:

PanelBehindSump_zpsdd4eb2a9.jpg


Mostly Neptune Apex hardware (Breakout Box, Controller, Probe and Leak Detection Modules, and an Energy Bar). Also, a Tunze ATO, and the Ranco Electronic Temperature Controller.


Farther off of the right hand side of the sump, I have a SpectraPure Ultra High Efficiency RO/DI System that can make 100 gallons per day. Below that, I've got the traditional Rubbermaid 32 Gallon salt-mixing bucket:

WaterFilterandSaltMix_zpsd3157f68.jpg


A little off to the left of the RO/DI System, I have storage space for 35 Gallons of 'clean' water:

WaterStorage_zps7a883c05.jpg


Out of view (sorry, no picture yet), I mounted a standard 36 inch wide kitchen wall cabinet to provide storage space for test kits, supplies, etc.

I'm happy with the way my sump area turned out. It's easy to work within the area, everything is nearby, If I spill anything, it falls on an unfinished basement floor. And, I've still got some storage space under the sump tank, and under the RO/DI water storage tank.

At this point (June 27th), everything has been running for 2+ weeks. Still nothing in my display tank - no rock, no sand - it's pretty empty. But that will change soon. I wanted to prove to myself that the systems were all functional. Temperature has remained between 78 and 79 degrees, salinity is stable at 35ppt, the ATO has worked perfectly, and the RO/DI system makes new water when needed. I was on vacation for 6 days and was able to monitor everything via Neptune Fusion and a pair of cameras that let me see the sump area. So far, so good.

I'm planning to add Live Rock on Monday. That should be an adventure, and an excuse to update this thread with more pictures !

Thanks for following along :square:

---Frank
 

OneFishTwoFish

Active Member
PREMIUM
We have rock !

RocksOnly001_zpsd5777af4.jpg


That's approximately 125 pounds of Live Rock from my LFS. Tank is a 120Gal an I have about 140 gallons of water in the total system. I'm thinking about adding another 50 pounds. I'd like to make the rockscape appear taller.

Any suggestions would be appreciated.

In the meantime, I'm going to practice my photographic skills. That's a pretty bad picture with reflections, poor white balance, etc. :read:

Thanks

---Frank
 

nanoreefing4fun

Well-Known Member
RS STAFF
Pretty tank & rock looks great - might try for some more height as you said, some corals like more light & I like a pretty open sandbed (will you be using sand?) Many of my corals love living on the bottom in a sandbed and thrive there...

Great start !
 

OneFishTwoFish

Active Member
PREMIUM
Thanks Nano ! I added 60 pounds of CaribSea Arag-Alive Reef Sand just a few hours ago. Got a pretty good sandstorm going right now. After it settles a bit, I'll see if more sand is needed. I'm trying to get about 1.5 inches of depth. Do you think that would be sufficient ? Hopefully, it will be clear enough for a picture in the morning. I'm going to look through the rock pile at my LFS this weekend and find a few appropriate pieces to build something taller in the right-rear of the tank.
---Frank
 

jrose323

Member
I agree with Nano. You might want to shrink the floor print of the rock and go higher so you have more sand bed. Better to do it now than later. Some corals are sand bed corals and others rock. In addition, if you get snails and other sand bed livestock, you will want more floor space for them. At the moment, you do not have much open space for sand beds.
 

jrose323

Member
Below is a good view of good live rock placement for height and hiding places as well as having good sand bed surface area.

DSC_0029.jpg
 

OneFishTwoFish

Active Member
PREMIUM
Quick Update . . . I relocated several rocks, took a few out, and added a few new pieces. Now, there is much more "open sand" area in front of the rocks. Also, the rockscape is much taller.

Sorry about the photo quality -- I stirred up some stuff while I was in there.

Front, from a lower angle:
Rocksv2FrontLowAngle_zpsd7acbb40.jpg


Front, from a higher angle:
Rocksv2FrontHighAngle_zps0576c684.jpg


Left End:
Rocksv2FromLeft_zpscfab8205.jpg


Right End:
Rocksv2FromRight_zpsed32b803.jpg


All comments / suggestions are appreciated !

Thank You

---Frank
 

puffermike

Active Member
Might I be the first one to say... I love where you put the tank? I love leather and I love clean cut! Nicely done!
 
Top