You are using an out of date browser. It may not display this or other websites correctly.
You should upgrade or use an alternative browser.
You should upgrade or use an alternative browser.
Shaun's 2000 Litre (530 USG) Living Reef & Red Sea Max S 650 LED Design & Build
- Thread starter SPR
- Start date
SPR
Well-Known Member
Lol!Didn't hear her say a word.
Does this mean I have to wear a crop top on my next video?Lol!
SPR
Well-Known Member
No! LolDoes this mean I have to wear a crop top on my next video?
SPR
Well-Known Member
I’ve watched it about 5 times now and I just can’t seem to take anything in. I might watch it again in a minute.Didn't hear her say a word.
I never knew lights could be so difficult to understand and to say it’s all at the bottom of the bed. God I wish I was a gorgonian coral!
I just seem to get just so distracted by the lights........
I’m subscribed definitely!
Last edited:
SPR
Well-Known Member
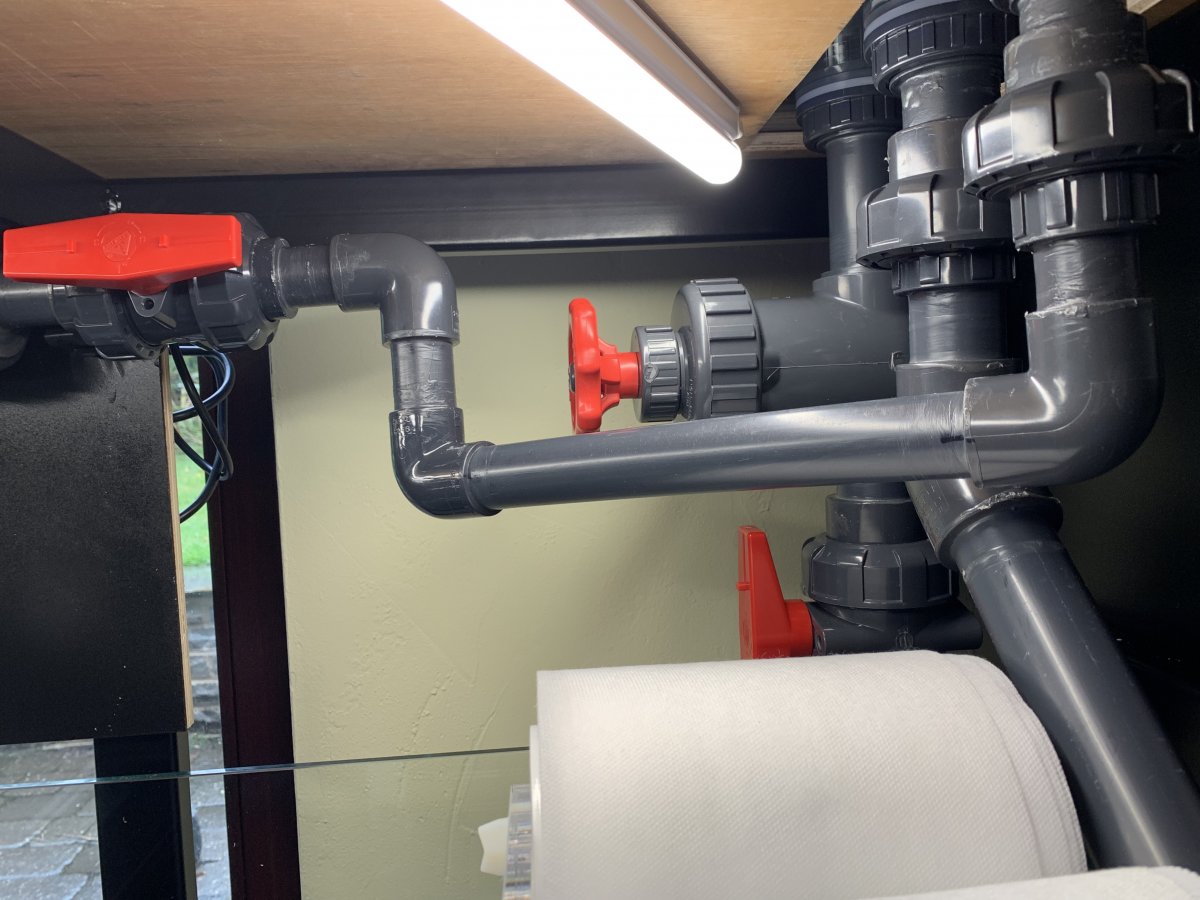
I’ve finished much of the plumbing in the sump, I’ve just got to redo the emergency downpipe as Im not fully happy with how close to the Clarisea roll it is, which may cause issues in the future so I’m just going to lower the 45’ angle a bit lower down when I get some more pipe delivered.
To the left of the return pump (unfinished) is were the pipework for the UVC and Chiller will go and I’m just awaiting delivery of some of the final items, including 2 1” Apex flow sensors and the Teco chiller as well. the UVC is already located outside in the shed for ease of maintenance and I might put the chiller out there as well so in the summer it’s not venting hot air back into the room. Because I have heaters as well, I’m anticipating turning the chiller off potentially over winter, but we will see.
The final piece of the return pipe was a bit fiddly designing and installing. When I did the final solvent weld and fitted it, it wasn’t quiet lined up, but I’ve tightened the 2 union connectors at each and and it sort of pulled itself into place (I think!!). I’ve zoomed in on the pictures and the unions look ok. I won’t know for sure until I do a ’wet test’ once everything is set up. I anticipate just filling the return section of the sump and putting a bucket over the return outlet just to do an initial basic test for leaks just before the final fill.
Ive tried to design the pipework so that any one piece can be removed for either repair, change or whatever by installing unions and ball valves between section. The Deltec FR512 doesn’t have a ball valve on the main pipework because it has one built in on its own pipe so I can turn of the flow there for removal.
Here’s a full length shot of the sump so far, somethings like the heaters aren’t in final position yet
The long pipe you can see coming in from the left is the spare return pipework (unfinished) which will go into the left hand corner of the display. I haven’t really decided what pump to use yet, probably a Vectra L2 because of the battery backup option
The remaining equipment should be arriving in the next week or so and I can the start finishing varies bits off, but it’s all starting to come together nicely.
Ive also considered what I’m going to do with the waste saltwater. I have a very large blocked paved driveway which I keep clean by pouring a solution of Jays fluid over it around 3 times a year, to keep off the moss etc. I do it usually over a few days.
Now the other thing that keeps things growing on it, is salt or saltwater (and I’ve tested this before). So one of the last jobs will be to purchase a 1000 litre IBC container and the waste saltwater will go into that. Then I’ll attach a hose to it and can pour the saltwater over my block paved driveway and patio. How ‘eco’ is that! Lol. And do you know how much 2 5 litre containers of Jays fluid costs these days!
For anyone considering a build like this, because I’m keeping the S650, at least for the foreseeable future, there’s no time pressure to build the tank up. So the whole process is much more enjoyable, I can take my time, alter things etc.
SPR
Well-Known Member
I suppose it depends how close to the final fill I do it, no reason not to just RODI anyway as I will have plenty, and then I don’t need to worry about taking it back out.For the water test I assume you'll just use tap water?
SPR
Well-Known Member
Hahahhhhhhhh ha! no! lolI see that there is a lot of flooding up North today. That wasn't you and your leak test was it?
SPR
Well-Known Member
So I’ve been busy today and even didn’t play golf so I could get on with several things with the nice weather we had today.
The S650 is now plumbed in and connected into the automatic water change system, other than I need two John guest 1/4 connectors for the last few feet as the hose wasn’t quiet long enough to reach the Apex DOS unit. I’ve also installed a hose which will be connected to a pump in the RODI water tank so I can transfer water into the RO reservoir of the s650 with a press of a button in Apex.
I’ve finished the water production systems and the saltwater tank is on and filling. I’ll need to leave the RODI tank a bit longer as I may need to move it for the UVC plumbing parts.
‘The RODI system blue hose is split and then has 2 shut off valves so I can control flow into each tank and cut it off. For example when the saltwater tank is full and has salt in, it doesn’t want refilling as it’s drained until it’s empty otherwise the salinity will be diluted of course so once filled the flow will be switched off. The RODI tank can potentially be left on auto fill and both have float valves installed and a pressure switch will shut off the whole system when the float shuts off flow.
The braided hose hanging just below the RODI system is the hose to refill the RO reservoir of the S650 and will be connected to a pump with an anti siphon connector just inside the water tank. Basically I need to join the pipe so I’ll drill a tiny hole in the plastic hose connector and this will be above water pointing back into the water tank

The DD 80w UVC is installed at the side for easy maintenance an the bulb will just lift out for replacement rather than having to move or take anything apart. I just need to finish the last plumbing on it and the parts of arriving tomorrow

This isn’t a picture of a toilet, it’s a custom made shed to fill a gap, but all the water pipes and outlet waste water pipes are installed and insulated. The field is mine in case your wondering why the water is going over there.

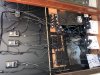
It’s been a godsend leaving access to the back of the tank as I’ve been able to install most of the electrical equipment there. Infact there’s nothing in the bespoke cabinet under the tank at the moment apart from a light.
The VorTech battery backups and anything else will be raised off the floor shortly and wires tidied up were possible

The Ecotech Vortechs are all installed an operational and if you haven’t seen these up close they are really good quality pieces of equipment especially the MP60’s. These are all controlled within Neptune Apex and ready to go,

So that’s an update as to were we are so far, it’s all coming together nicely
The S650 is now plumbed in and connected into the automatic water change system, other than I need two John guest 1/4 connectors for the last few feet as the hose wasn’t quiet long enough to reach the Apex DOS unit. I’ve also installed a hose which will be connected to a pump in the RODI water tank so I can transfer water into the RO reservoir of the s650 with a press of a button in Apex.
I’ve finished the water production systems and the saltwater tank is on and filling. I’ll need to leave the RODI tank a bit longer as I may need to move it for the UVC plumbing parts.
‘The RODI system blue hose is split and then has 2 shut off valves so I can control flow into each tank and cut it off. For example when the saltwater tank is full and has salt in, it doesn’t want refilling as it’s drained until it’s empty otherwise the salinity will be diluted of course so once filled the flow will be switched off. The RODI tank can potentially be left on auto fill and both have float valves installed and a pressure switch will shut off the whole system when the float shuts off flow.
The braided hose hanging just below the RODI system is the hose to refill the RO reservoir of the S650 and will be connected to a pump with an anti siphon connector just inside the water tank. Basically I need to join the pipe so I’ll drill a tiny hole in the plastic hose connector and this will be above water pointing back into the water tank
The DD 80w UVC is installed at the side for easy maintenance an the bulb will just lift out for replacement rather than having to move or take anything apart. I just need to finish the last plumbing on it and the parts of arriving tomorrow
This isn’t a picture of a toilet, it’s a custom made shed to fill a gap, but all the water pipes and outlet waste water pipes are installed and insulated. The field is mine in case your wondering why the water is going over there.
It’s been a godsend leaving access to the back of the tank as I’ve been able to install most of the electrical equipment there. Infact there’s nothing in the bespoke cabinet under the tank at the moment apart from a light.
The VorTech battery backups and anything else will be raised off the floor shortly and wires tidied up were possible
The Ecotech Vortechs are all installed an operational and if you haven’t seen these up close they are really good quality pieces of equipment especially the MP60’s. These are all controlled within Neptune Apex and ready to go,
So that’s an update as to were we are so far, it’s all coming together nicely
Attachments
SPR
Well-Known Member
When I’ve done I’ll do a complete summary of it all.I am getting confused with all your pipes and splits and valves. Maybe you could Mindi to make a video explaining it all?
You've got the UV in the garden shed as well? Is that fed from the manifold or by a pump?
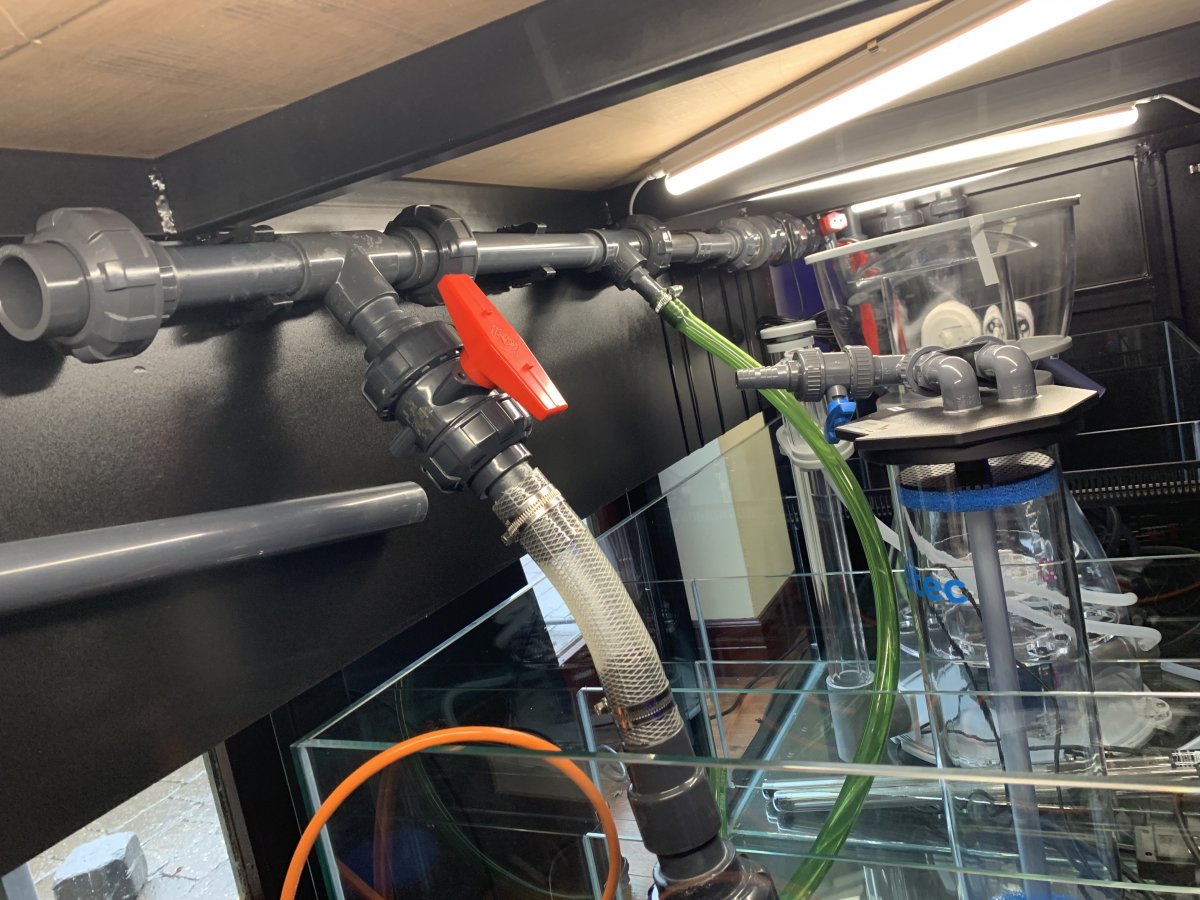
The UVC is in the shed and shown in the second picture down above against the side stood vertical. It’s going to be fed from the manifold as is the chiller.
I’ve got to finish plumbing in the UVC and then the chiller and then all the plumbing is done apart from a couple of minor bits
There are actually only 3 things fed from the main pump, the UVC, Chiller and FR512 Rhowaphos reactor, that’s it. Activated carbon and possibly Purigen eventually will just lay in the sump in media bags like it does now.
I think I’m going to change the Clarisea SK5000 for the X Filter 1.7 because of flow. The Clarisea is right on the borderline of being to small. The only reason I didn’t get it in the first place was because they hadn’t been trading very long, but the equipment looks very well made and can cope with up to 10000lph, as opposed to the 5000lph of the clarisea
"and FR512 Rhowaphos reactor, that’s it. Activated carbon and possibly Purigen eventually will just lay in the sump in media bags like it does now." - Have you looked at the NYOS Torq 2.0 body, which will allow you to put the Rhowophos and Activated Carbon into a single reactor?
Mine works beautifully and is silent.
You have probably mentioned it somewhere, but what is the distance from the tank to the shed?
Oh, and have you got the Chiller?
Mine works beautifully and is silent.
You have probably mentioned it somewhere, but what is the distance from the tank to the shed?
Oh, and have you got the Chiller?
SPR
Well-Known Member
The shed is the other side of the patio door so about 1ft from the back of the tank"and FR512 Rhowaphos reactor, that’s it. Activated carbon and possibly Purigen eventually will just lay in the sump in media bags like it does now." - Have you looked at the NYOS Torq 2.0 body, which will allow you to put the Rhowophos and Activated Carbon into a single reactor?
Mine works beautifully and is silent.
You have probably mentioned it somewhere, but what is the distance from the tank to the shed?
Oh, and have you got the Chiller?
I didn’t get the NYOS for the simple reason it’s another pump to clean. I just have 1 pump the Abyzz, and also the FR512 is big enough for lots of rhowaphos as and when I need it.
the Teco 2000e arrived a few days ago and I just need to get it out of the box and have a look at it.
I might put it under the sump cabinet somewhere but I need to see the footprint of the Twin Tech Calcium Reactor before I finally decide as that will sit next to the glass sump; or I might put it in the shed outside.
How load is your Teco in your cabinet, does it bother you when on ?
Mine vents into the Living Room, which is not ideal, especially when it normally operates when it is hot outdoors ! Where my tank is situated it is just impossible to connect the vent to an outside connection. In an ideal world I would have it connected so it vents outdoors. On my tank it can take 45 to 60 minutes to drop the temperature by one degree. That is with a TECO 1000. The TECO 2000 will obviously work quicker but your tank is much bigger. If you can, get it to vent outdoors. You can adjust when the Chiller kicks in by setting the temp limit. The default is one degree, but you can set it to half a degree if you wish. It just means the chiller will kick in more often but for shorter periods.
Personally, it doesn't bother me and She Who Casts No Shadow doesn't even realize when it is on as it is quiet. In fact I'm not sure that she even knows that there is a Chiller in there !
The beauty of the NYOS Torq is that the pump is in the base housing. It's part of the system. No green tubes to connect to it, no inlet tube, no outlet tube. A Reactor uses the Rhowo more efficiently than just leaving it in a bag, and the same goes for the Activated Carbon !
You'll be buying one within six months") .
.
Personally, it doesn't bother me and She Who Casts No Shadow doesn't even realize when it is on as it is quiet. In fact I'm not sure that she even knows that there is a Chiller in there !
The beauty of the NYOS Torq is that the pump is in the base housing. It's part of the system. No green tubes to connect to it, no inlet tube, no outlet tube. A Reactor uses the Rhowo more efficiently than just leaving it in a bag, and the same goes for the Activated Carbon !
You'll be buying one within six months
.SPR
Well-Known Member
I removed the ALR2 algae reactor from the S650 a few days ago completely
The Chaeto had grown a bit better than the first time, but not enough to convince me to leave it in place. The bulb just seems to get covered in a brown slime in a very short period of time. It was located in a window so would also get light, but maybe my nutrient levels weren’t correct to support it, which is probably a good thing anyway. I already have massive filtration systems in place.
It’s currently soaking in a bleach solution for the time being and I’ll keep it and may use it in the new system at some point in the future. I like the idea of it as it keeps the refugium away from the sump as I don’t like the other things that grow down there when using a full blown refugium.
You can put it in the garage next to the bucket of Miracle Mud !I removed the ALR2 algae reactor from the S650 a few days ago completely
The Chaeto had grown a bit better than the first time, but not enough to convince me to leave it in place. The bulb just seems to get covered in a brown slime in a very short period of time. It was located in a window so would also get light, but maybe my nutrient levels weren’t correct to support it, which is probably a good thing anyway. I already have massive filtration systems in place.
It’s currently soaking in a bleach solution for the time being and I’ll keep it and may use it in the new system at some point in the future. I like the idea of it as it keeps the refugium away from the sump as I don’t like the other things that grow down there when using a full blown refugium.